Refer to our updated tutorial about Customizing HTML5 Player Settings to see the latest information.
The HTM5 Player is the interface around the content of the slide. It consists of a control toolbar, a seek bar, a progress bar, etc., letting viewers control the presentation while it’s playing. ActivePresenter allows you to customize HTML5 Player skin or template including color, showing or hiding objects and elements, etc. If you need to export projects to HTML5, don’t miss this article.
Open Player Settings Window
You can customize HTML5 Player skin through the Player Settings window. To open this window, in the Export tab, click Player Settings.

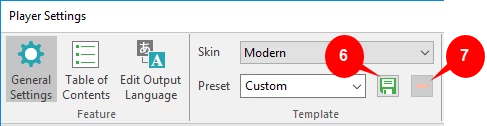
Below is the screenshot of the Player Settings window.
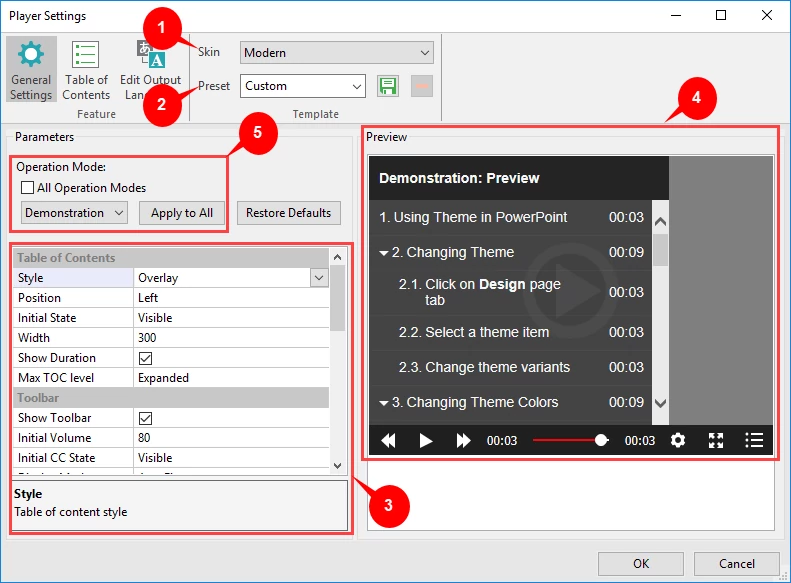
In which:
- Skin (1) is the skin/template type of the HTML Player. Skin list contains the skin that ActivePresenter provides. Currently, only Modern skin is available.
- Preset (2) contains the list of the preset parameters. You can save parameter changes in the Custom template that ActivePresenter provides or create new templates.
- Parameters (3) contains parameters and their values to customize the table of contents, toolbar, and color of the Player.
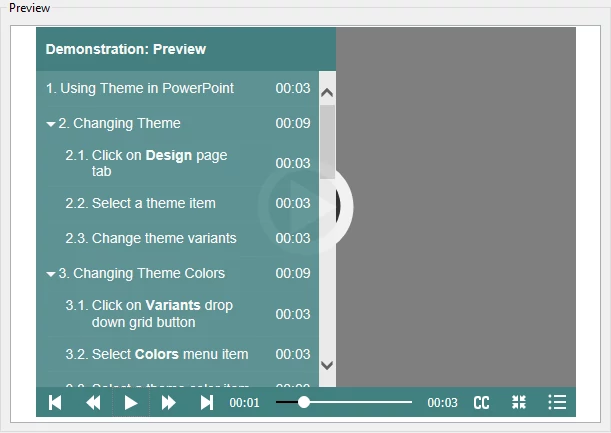
- Preview (4) lets you preview the changes and adjustments you make.
- Operation Mode (5) allows you to select which mode to export parameter changes. You can customize the player look and feel for all four modes at once or each mode separately. Besides, select Apply to All if you need to apply the changes in all four modes.
For more information about operation modes, see Working with Operation Modes.
Customize HTML5 Player Skin
Customizing HTML5 Player skin means customizing the color, visibility of the parameters, etc., of the Player.
You can change the values of parameters and save them in the Custom template. Besides, you can also save it in the new created templates. The latter is useful especially when you want to have different templates to use in different purposes, four Player templates four modes, for example.
Customize Table of Contents of the Player
When it comes to the table of contents, you can change the style, position, and width of the slide list of the presentation. Besides, you can show the slide duration so that users can know how much time has passed during the test. See Working with Table of Contents for more information.
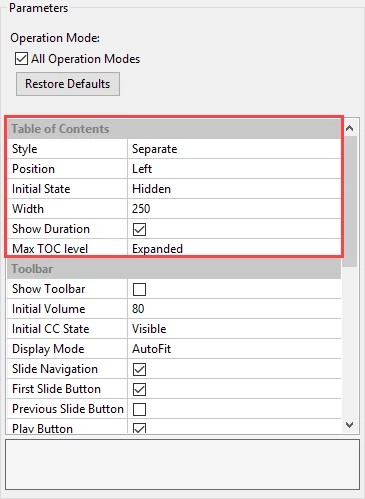
- Style: Choose from Separate and Overlay that control how the table of contents displays. It can be separate from the main content or overlay it.
- Position: Choose Left or Right to show the table of contents on the left or right of the main content respectively.
- Initial State: Define the table of contents initial state. It can be shown or hidden.
- Width: Enter the value that defines the width of the table of contents.
- Show Duration: Toggle to show or hide slide duration.
- Max TOC level: Select Expanded to show more detail contents in each slide or Collapsed to show slide name only.
Customize Toolbar of the Player
Also from the Parameters section (4), you can control showing or hiding buttons on the toolbar of the Player.
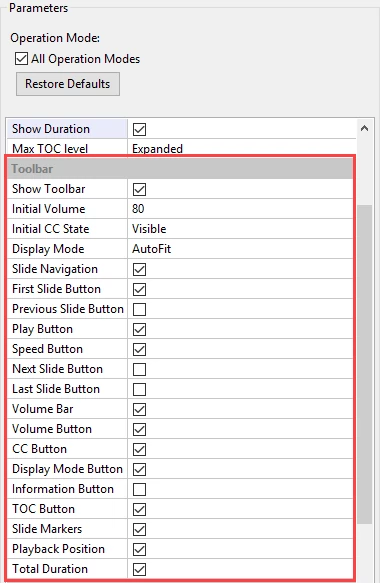
- Show Toolbar: Show the toolbar of the Player in the output. Uncheck it will hide the Toolbar, meaning viewers cannot control the presentation in the output.
- Initial Volume: Specify the initial volume level of the sound of the output.
- Initial CC State: Select from Visible or Hidden to show or hide the Closed Caption from the beginning.
- Display Mode: Select the mode to display the toolbar. It can remain its actual size (select Actual Size) or auto change its size (select AutoFit) to fit the Player size.
- For the rest of parameters in this section, toggle to show or hide them on the Toolbar.
For example, the Volume Bar lets viewers control the volume in the output. Besides, you can let the CC Button be visible to users to let them control showing/hiding Closed Caption in the output.
Customize Color of the Player
ActivePresenter allows you to change the colors of the background, foreground, and progress bar of the Player. As a reminder, you can visually view all the changes you make in the Preview section (4).
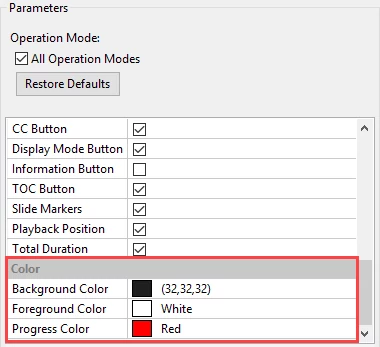
- Background Color: The colors of the table of contents and the toolbar of the Player.
- Foreground Color: The colors of text and buttons of the Player.
- Progress Color: The colors of the progress bar and volume bar.
Below is the screenshot of the Player after applying some changes in color of the background, foreground, and progress bar.
If you don’t like your customization and want to go back to the default settings, click the Restore Defaults button. All the original properties will be restored.

Create New Player Templates
As being said above, you can create new templates with the customizations you need. Below is how to create new templates:
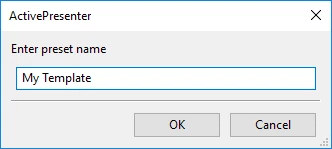
Step 1: Click the Save button (6) next to the Preset list.
Step 2: Enter a name in the pop-up dialog and click OK.
On the other hand, to delete a template, select it and click the Delete button (7). You cannot delete the Custom template.
That’s how to customize the HTML5 Player skin in ActivePresenter 7. Try it to create your own style of the Player and feel free to email us if you need support.