The Picture in Picture is also called images on top of images feature that helps when you want to overlay a small video on the top of the other one. It strongly supports especially in designing an eLearning course or a how-to simulation video, in which you want to have a small video of yourself stick on the screen for visible demonstration, while the course is still running. In this article, I will explain you how to use it in details.
Insert a Video for Picture in Picture
First, you have to insert another video, hereafter call the webcam video:
Step 1: Open the ANNOTATION tab. (1)
Step 2: Click the Video icon (2) and select video that you want to insert in.

ActivePresenter allows inserting more than one webcam video in each slide. However, keep in mind that they shouldn’t be placed in the coincident position, otherwise, they will be displayed over each other and this is not effective.
Step 3: Resize and reposition the webcam video.
- Click, hold and drag its green handles to change its size and direction. (3)
- Then drag to place it where you want to.
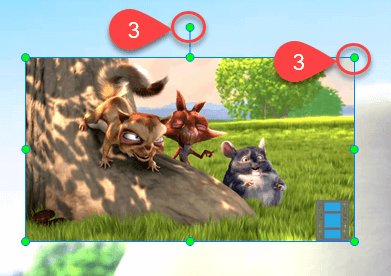
Usually, it is placed at the right or left corner of the screen so it won’t cover important information of the screen capture. Also, it should not be either too big or too small because it might cover a large area of the recording screen or look so tiny.
Step 4: Change video Start Time.
You can drag the video object along the Timeline to set the time it should start appearing.
However, you cannot change the video time duration because it’s fixed already.
Define video Timing and Animations
Next, so as to make your project look more engaging and interesting, you should change the video animation effect. Carry out followings steps to do that:
Step 5: Select the video and go to the Timing and Animations section in the Properties Pane.
Step 6: Define Entrance Effect and Duration and Direction. (4)
Step 7: Define Exit Effect and Duration and Direction. (5)
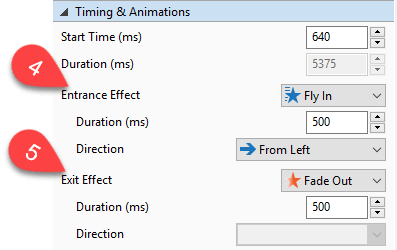
Regarding the effect time duration, you can change it by dragging the green and red mark (6) of the video object along the Timeline.
These effects define how the video appear and disappear.
So, they shouldn’t be either too short or too long because it might cause your video seem to appear either in hurry or disjoint.

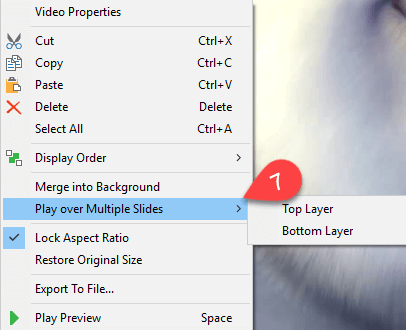
Step 8 (Optional): Play the video over multiple slides if your project has more than one slide.
- Right-Click video
- Select Play over Multiple Slides (7)
Insert Zoom-n-Pan
Now, what if you want audiences to see and focus on your webcam video very well and visibly while ignoring the rest of the screen?
The solution is using the Zoom-n-Pan tool. Do as followings to do that:
- Select the Timestamp.
- Open the ANNOTATION (1)
- Click the Zoom-n-Pan (8)
- Drag it to the webcam video area and resize it properly.
- Drag its green handles to resize the Zoom-n-Pan area.
Depending on how clear you want your audiences to see, you can choose to zoom in a small or large area.

When you want it to zoom out to display the whole screen again, you have to insert another Zoom-n-Pan:
- Choose the Timestamp.
- Click Zoom-n-Pan (8)
- Resize it to cover whole Canvas.
You should go to the Zoom-n-Pan object on the Timeline and drag it to change its time duration. (6) Again, it should not be too short or too long because the zoom in and out will seem too fast or too slow.
So, that’s how to use Picture in Picture Feature with ActivePresenter. Hope that it brings you some tips for creating more engaging eLearning courses. Please, give it a try and let us know if you have any obstacle.