This blog uncovers how to add the best text-to-voice AI using ActivePresenter—turning scripts into natural-sounding audio without the need for a mic or recording studio
Think about the problems with recording your own voice for lectures. You don’t have fancy equipments, or your recording space might sound bad, making you redo things over and over. If you’re not a native speaker, it’s even harder to worry about saying everything perfectly. These problems can make you put off recording, make the audio sound worse, or even make you give up on making videos.
AI text-to-voice technology is changing the game. Instead of needing a professional recording setup or worrying background noise, you can now focus solely on writing great scripts.
With just a few clicks, your text is transformed into clear, consistent audio—no microphone needed.
As a result, it saves you time, reduces stress, and ensures that every video has clear and consistent audio.
Innovative tools like the ActivePresenter eLearning authoring tool, which includes built-in best AI text to voice features, simplify creating professional-quality narration for video lectures, tutorials and demos alike. It also assists you in recording your lectures and editing your recordings, creating interactive quizzes, all in one place.

Want to hear what ActivePresenter‘s text-to-voice sounds like? Explore our range of AI text to voice samples.
In this blog, we would uncover how to add free text to speech AI voice using ActivePresenter. If you have not downloaded yet, click the button below then we would set you up with step by step tutorial right away.

How to Generate Best AI Text to Voice in ActivePresenter
First up, this blog would give you clear instructions on (1) how to generate AI text to speech with machine voices and (2) how to turn subtitles into speech.
Let’s explore one-by one.
Alright, let’s get some voice into your projects! Here’s how you can easily create audio from text within ActivePresenter. This is super handy when you want to make your content more engaging without having to record your own voice or hire a narrator.
Feel free to watch the YouTube video here, or continue reading for more details
1. Creating Audio from a New Audio File:
To start, you can create a brand new audio file that’s linked directly to your slide. Here’s how you do it:
Step 1: Go up to the Insert tab, then click on Audio, and select New.
You’ll see a little speaker icon pop up on your Canvas.
Step 2: Now, over in the Properties pane, you’ll find the settings where you can turn your text into speech.
2. Creating Audio from Text-Containing Objects:
Besides creating standalone audio, you can also directly turn text to a voice to objects that already have text in them. Think of things like callouts or text annotations that you’ve typed text into.
First, select the object that contains the text you want to turn into speech. Just click on it!
Next, in the Properties pane, navigate over to the Audio tab. You’ll see it right there.
And finally, in this Audio tab, you can choose the voice you want to use from the drop-down list.

3. Embed Third Parties Voices
By default, ActivePresenter provides two available machine voices. If you want to use other voices from third parties, you can click More voices.
From here you can choose voices from three famous providers:
Amazon Polly,
Google Cloud,
and Microsoft Azure.
Now, once you pick one of these providers, ActivePresenter will ask you to enter an API key or an authentication key.
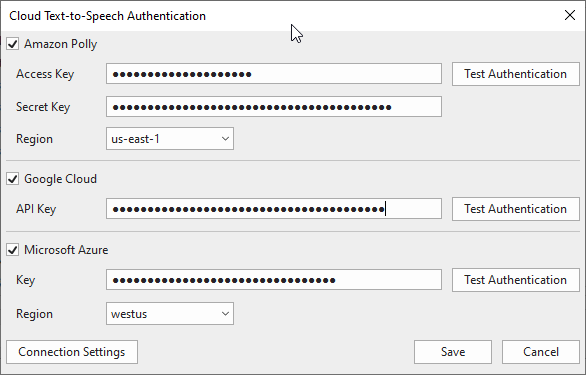
To get this key, you’ll need to sign up for an account on each of their respective platforms. It’s a quick registration process to unlock a whole new world of AI text to voice options. You can refer to the Get authentication key from third parties to know how to get these keys.
4. Picking and Testing out The Voices!
Choosing the right AI text to voice is key to making your lectures sound clear and engaging. So, take your time to experiment and pick one that fits your needs before you apply it.
Once you’ve successfully connected to one of those voice providers, here’s what you can do:
- Browse through the list of voices offered by each provider. You’ll see them all laid out.
- Select the language you need for output, for example, English
- Listen to a preview of each voice. This way, you can hear what they sound like before you start generating.
- Once you find the perfect voice, just click Add to include it in your ActivePresenter options.

5. Start Generating
Once done, you can start creating your free AI text-to-speech voice.
Click Speak for testing out voices speaking real case text, then click Generate to create audio from text.
You know you have successfully created when the text to speech audio appears on the Timeline.
How to Convert Subtitles into AI Text To Voice
If you’ve already got subtitles ready for your lecture, ActivePresenter can automatically convert them into audio. This is a fantastic way to save yourself from retyping everything. Plus, it keeps your visuals and audio perfectly in sync!
Converting Individual Subtitle Segments to Audio:
This is the quickest way to turn your subtitles into spoken words:
- Select a subtitle segment (you’ll see it as a CC node) on the Timeline. Just click on the one you want.
- Right-click on that selected subtitle segment.
- In the context menu that pops up, choose Convert Subtitle to Audio
Instantly, ActivePresenter will generate an audio file from that subtitle text. You can then edit this audio just like any other sound file – easily move it around and adjust it on the Timeline.
Batch Converting Subtitles Across Multiple Slides:
Working with lots of slides and want to save even more time? Then you’ll love the batch operation feature! It’s super efficient when you need to apply voice to your entire lecture.
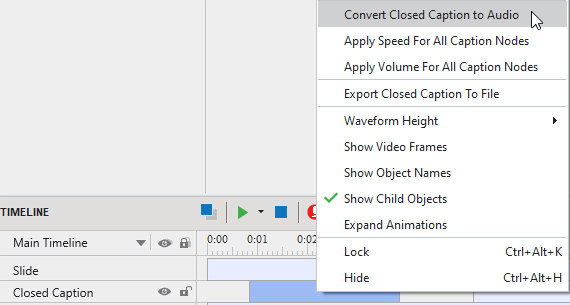
- Go to ActivePresenter in the top menu, then select Project, and then Batch Operations.
- In the Batch Operations window, choose Convert Closed Caption to Audio.
- A dialog box will appear. Here, select the slides you want to apply this to. You can choose all of them or just specific ones.
- Once you’ve made your selections, click OK to start the process.

With just one click, all your chosen subtitles will be converted into voice quickly, consistently, and saving you a significant amount of time!
Beyond just converting text to speech, ActivePresenter is packed with other features to help you create professional eLearning lectures. You can record your screen, edit video and audio, and even trim your webcam footage.
Compare with Other Text to Voice Tools

I’ve spent a lot of time exploring and testing various AI voice tools to see how well they really perform. These tools offer some impressive benefits right out of the gate. They allow you to generate AI voiceovers in just minutes—far faster than traditional recording methods. Many of them even support voice cloning and tone adjustments, giving you the ability to replicate specific voices or match the mood of your content with surprising accuracy.
However, while these tools are powerful, I quickly realized that most of them are designed with a narrow focus:
One Function Tool Only
Most AI voice generators on the market today offer one core function: turning written text into spoken audio. While the voice quality may be impressive—some even offering realistic, human-like tones—these tools often fall short when it comes to supporting a complete content creation workflow.
Users are typically limited to generating the voice, downloading the audio file, and then switching to separate applications to manually add that audio into a video editor, presentation tool, or e-learning platform. This fragmented process is not only time-consuming but also increases the chances of technical errors and workflow disruptions.
Recurring Cost Problem
Many AI voice tools operate on recurring subscriptions, which can become surprisingly expensive over time. What may seem like an affordable monthly fee at first can add up to hundreds of dollars a year—especially when you factor in the need for other supporting tools.
For example, you might pay one subscription just to access the AI voice generator, another for a video editor, and yet another for screen recording or slide presentation software. This fragmented approach not only increases your expenses but also complicates your workflow, requiring constant switching between platforms and managing multiple billing cycles.
Moreover, some AI voice services even charge based on usage, such as character limits, voice quality tiers, or export formats—meaning your costs can fluctuate unpredictably depending on your project needs. If you’re creating content regularly, these limitations can quickly become both a financial and creative burden.
Best AI Text to Voice, and More
In contrast, ActivePresenter offers a seamless, all-in-one solution. It combines the power of AI text to speech voice with a comprehensive set of tools designed for educators, trainers, and content creators.
Edit Text-to-speech Audio
After generating speech from your text, editing audio is simple and intuitive. You can trim unwanted parts, split audio into segments, or cut and rearrange clips directly on the timeline.
You are able to speed up or slow down playback without affecting pitch, raise or lower the audio level for each segment, ensuring clarity and balance.
Specifically, you can also merge multiple audio clips into a single track, making transitions smoother and syncing easier with your visuals.
This sets ActivePresenter apart, as it allows you to combine scattered audio segments into one cohesive track—without the need to micro-edit each piece individually.
Record Screen and Webcam Simultaneously
From there, you can take your project further by recording your screen and webcam simultaneously—perfect for creating tutorials, software demos, or online courses.
Once recorded, you can trim, cut, and rearrange video and audio clips with precision using ActivePresenter’s professional-grade timeline editor.

The platform also lets you enrich your content with a wide variety of built-in features, such as annotations, callouts, animations, transitions, and even interactive elements like quizzes and clickable objects.
All of this happens within a single, unified workspace.
There’s no need to juggle between different software tools, convert file formats, or re-upload assets just to make small edits. Whether you’re polishing a voiceover, syncing visuals, or adding learner interactions, everything is streamlined in one place—saving you time and maintaining consistency across your entire project.
Create Online Courses with Interactivity
You can turn your AI-generated voiceovers into fully interactive online courses. After creating your audio using the built-in text-to-speech feature, you can easily layer it with engaging interactive elements such as drag-and-drop exercises, animated timers, click-to-reveal activities, and interactive quizzes.
These features not only make your content more dynamic but also help learners stay engaged and actively involved. By combining narration, visual elements, and interactivity—all within one platform—you can build exciting e-learning experiences without needing to jump between tools or hire voice actors.
Check out this video to see everything ActivePresenter has to offer.
There’s More to Come
Moreover, ActivePresenter offers a refreshing alternative. With a single one-time payment, you unlock all essential features: high-quality AI voice generation, audio editing, screen and webcam recording, video editing, interactive elements, and more.
There are no hidden costs, no usage caps, and no monthly bills to worry about. This makes it not only a more affordable option in the long run, but also a simpler, stress-free solution for content creators who want full control without ongoing expenses.
With the upcoming release of ActivePresenter 10, a significant expansion of its AI voice library is coming close—introducing hundreds of voice options, including new human-like voices that are more natural, expressive, and diverse in tone and accent.
Whether you’re creating e-learning content, video tutorials, or marketing presentations, you’ll soon have a wide range of voices to match your content style and audience needs.
To Wrap Up
In summary, while many AI voice tools offer fast and realistic voice generation, they often lack the broader functionality needed for full content creation.
ActivePresenter stands out as an all-in-one solution, combining AI text-to-speech with screen and webcam recording, timeline-based video editing, audio customization, and interactive features like drag-and-drop, quizzes, and animated timers.
This blog not only explores those advantages but also provides a step-by-step guide on how to add AI-generated voice to your projects in ActivePresenter. Whether you’re building online courses, instructional videos, or tutorials, you’ll learn exactly how to turn written scripts into engaging, professional audio voice —all within a single, streamlined workspace in ActivePresenter.
Go ahead and download ActivePresenter today and experience the power of AI text-to-voice technology for yourself!