
Small buttons, crowded menus, and detailed forms can be difficult to follow in a screen-recorded lesson. A screen recorder with auto zoom helps bring these details into view without requiring you to build every camera movement manually.
With Smart Studio in ActivePresenter 10.6, you can record a software workflow, then automatically generate zoom shots around captured actions. You can preview the camera movements and adjust individual shots before sharing your tutorial.
In this guide, we’ll walk through recording your screen, configuring automatic zoom, refining the results, and exporting your video. We’ll also share practical ways to use zoom in employee training and online courses.

Why Use Automatic Zoom in Screen-Recorded Lessons?
When you demonstrate a task, you already know where to look. Your learners may still be locating the menu or field you just mentioned. This becomes especially noticeable when a large desktop recording plays inside a smaller course window.
Automatic zoom can help you direct attention to the current action. For instructional designers and course creators, that makes it useful for:
- Showing small controls in complex applications.
- Highlighting a field while demonstrating data entry.
- Following actions across different parts of an interface.
- Creating an initial camera sequence that you can refine.
The instructional goal is to make each step easy to follow. A close-up should show enough surrounding interface for learners to understand where the action happens.
How Smart Studio Generates Automatic Zoom
Smart Studio uses the cursor-path and action data stored with an ActivePresenter screen recording. Captured clicks, typing, and mouse-wheel actions help determine where camera shots belong.
You record first and apply automatic zoom afterward. This gives you time to review the framing before committing it to your project.
Smart Studio requires an eligible ActivePresenter screen recording with the necessary metadata. A regular imported MP4 does not provide that action data simply because it shows someone using software.
For a broader overview of its tools, see our guide to Smart Studio in ActivePresenter 10.6.
How to Automatically Zoom In on Screen Recordings with Smart Studio
For your first project, choose a short workflow with several clear actions, such as creating a customer record or changing an application setting.
Smart Studio is included in ActivePresenter’s Standard and Pro editions.
Step 1: Set Up Your Screen Recording
Open ActivePresenter 10.6 and select Record Screen as Video on the Start Page.
Choose your recording area, then configure microphone audio, system audio, and webcam recording as needed. Capture the entire screen or enough of the application window to include all relevant menus, dialogs, and results.
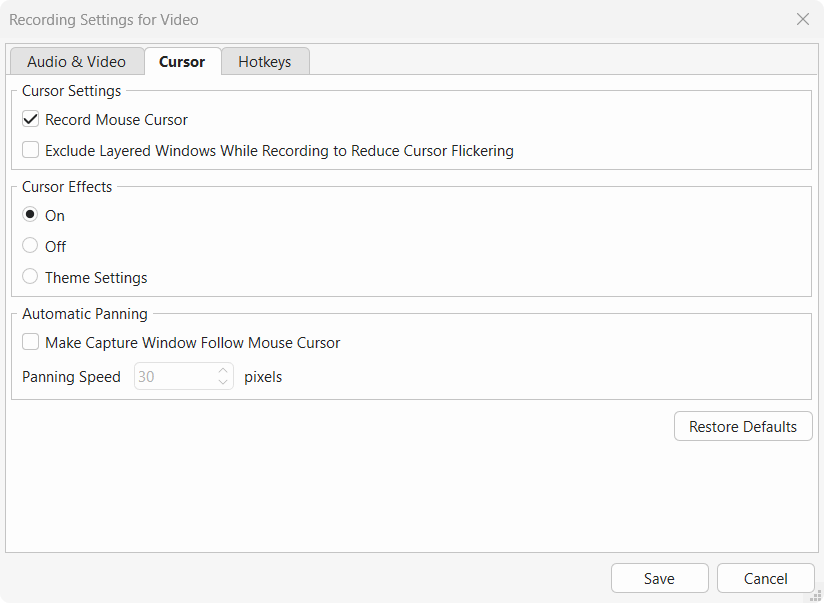
Before starting, open Recording Settings > Cursor and enable Record Mouse Cursor. This preserves the cursor-path and action data Smart Studio needs.
A tightly cropped recording can limit your framing choices later. Leave enough space to show both the action and its context.
Pro tip: Enlarge unusually small application text before recording. Zoom can make captured content bigger, but it cannot restore detail that was never captured clearly.
Step 2: Record the Workflow
Start recording and demonstrate your task in a clear sequence.
For example, when teaching users to create a customer record:
- Open the customer list.
- Select the command for adding a record.
- Enter the required information.
- Save the record.
- Show the saved result.
Move deliberately and pause briefly after meaningful actions. These pauses also give learners time to connect your explanation with the screen.
Stop the recording when you finish. ActivePresenter opens the captured content in its editing workspace.
Step 3: Open Smart Studio
Select the screen-recording video on the Canvas or Timeline, then go to:
Properties > Media > Smart Studio
Choose the Apply to scope and click Open Smart Studio….
Select exactly one video object. If your selection includes another object, such as a caption or cursor path, select only the recording and try again. Green Screen must also be turned off on the recording.
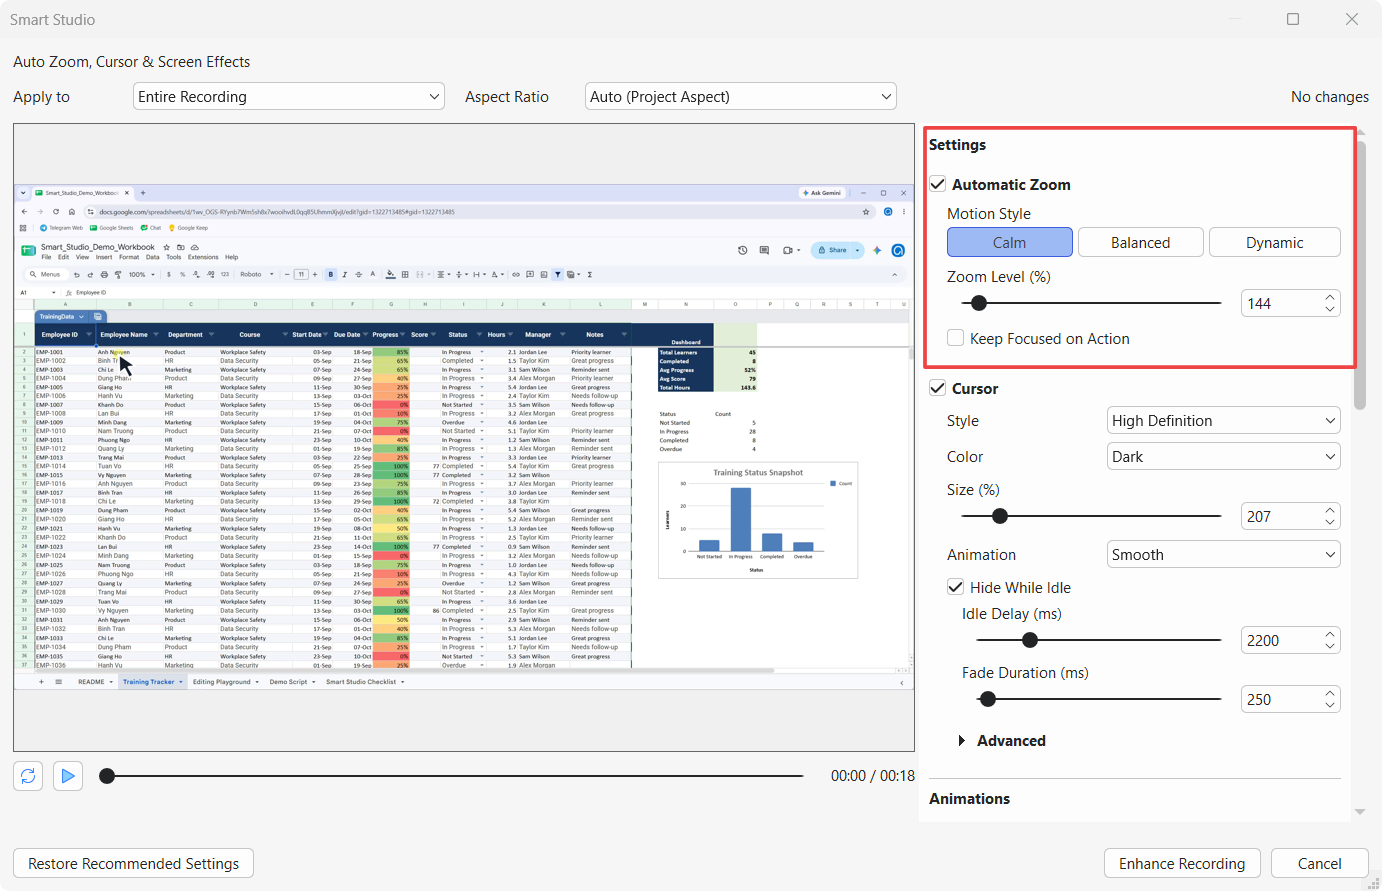
Inside Smart Studio, you’ll see a preview on the left and a Settings pane on the right.
Step 4: Choose the Scope and Aspect Ratio
Use Apply to to decide which clips receive the configuration.
| Scope | When to choose it |
| Entire Recording | Apply a consistent setup across eligible clips from the same recording source, including split clips on other slides. |
| Current Slide | Configure eligible clips from that recording source on the current slide. |
| Selected Clip | Give one clip its own camera setup. |
Next, choose Aspect Ratio. Keep Auto (Project Aspect) when you want the camera viewport to follow the project ratio. For a widescreen tutorial, Wide (16:9) is another option.
Smart Studio reframes the recording through a camera viewport. With a narrow format such as 9:16, inspect the preview carefully so important controls stay visible.
Step 5: Configure Automatic Zoom
Enable Automatic Zoom, then adjust its three main controls.
Motion Style sets the character of the camera movement:
- Calm: Gentler movement for formal training or longer demonstrations.
- Balanced: A general-purpose starting point for software tutorials.
- Dynamic: More energetic movement for short demonstrations.
Zoom Level (%) controls how closely the camera focuses. The available range is 125% to 400%, with 225% as the recommended starting point. Reduce the value if learners need more surrounding context.
Keep Focused on Action encourages the camera to continue following action locations. Clear it when you want broader framing to return more readily between actions.
For a first attempt, try Balanced, 225%, and Keep Focused on Action enabled. Treat this as a starting configuration and evaluate it against your lesson.
Instructional tip: Check whether the zoom shows both the control and the result. A close-up of a button may need wider framing once it opens a dialog.
Step 6: Make the Cursor Easy to Follow
A visible cursor can reduce the need for excessive zoom.
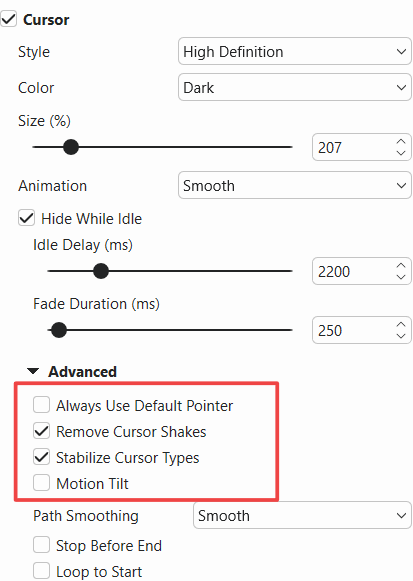
In Cursor, try High Definition style, 300% size, and Smooth animation. Adjust the size to suit your interface. You can also enable Hide While Idle to reduce distraction during pauses.
Under Cursor > Advanced, Remove Cursor Shakes and Path Smoothing can help clean up movement.
If the pointer is difficult to see, increase Cursor > Size (%) before increasing the camera zoom. That lets you preserve more of the application on screen.
Enable Show Keyboard Shortcuts when keyboard commands are part of the lesson, and check that overlays do not cover the controls you are explaining.
 Step 7: Preview and Apply the Zoom
Play or scrub through the candidate preview before applying the changes.
Check each important action:
- Is the target control visible?
- Can learners still identify the surrounding area?
- Does the camera settle in time for your explanation?
- Are the results of the action shown?
- Do cursor effects or overlays obscure anything?
If the scope includes several clips, inspect each one.
Click Enhance Recording when you are satisfied. When revising an enhanced recording, click Apply Changes. The draft settings remain in the candidate preview until you apply them.
Step 8: Refine Camera Shots and Export
After applying Smart Studio, generated camera shots appear on the Timeline.
Select an individual shot or keyframe to refine its zoom level, motion, or focus area. Use these adjustments when an instructional moment needs different framing from the automatic result.
For example, widen a shot when learners need to compare two fields on opposite sides of a form. Keep a closer shot when explaining one setting in detail.
Review the complete lesson, then go to Export > Video. Use an aspect ratio compatible with your Smart Studio camera setup and check the exported video at the size learners will watch.
You can also use ActivePresenter’s video editing tools to trim waiting time and finish the tutorial.
Create Your First Tutorial with Automatic Zoom
A screen recorder with auto zoom can reduce the work of building camera movements for software lessons. With Smart Studio, you can capture your workflow, generate an initial sequence, and refine the moments that need closer attention.
Download ActivePresenter and start with a short recording. Apply automatic zoom, preview it at your learners’ viewing size, and adjust the framing until every step is clear.