In the process of making a screencast or training video, you will often find the need to crop video. That is because it’s has been proved that taking extra recordings and edit the recorded video later often helps us reducing the product time in making training videos dramatically.
ActivePresenter, a powerful video editing software for Windows and Mac
Along with screencasting, ActivePresenter is also a powerful video editing software proved by millions of users all over the world. It offers unique features for screencasting and elearning authoring purposes:
- Recording on screen activities – You can record your screen in full motion video either for a custom area or full screen. ActivePresenter is available for both Windows and Mac OS X.
- Editing recorded videos – Cut, Copy, Delete, Crop Video, Blur Effect, Inserting background music or subtitles. Compared with other video editing software such as Adobe Premiere, ActivePresenter is much easier to use, has a simpler interface, as well as suits both novices and intermediate users. On top of that, all these features are applied to not only recorded videos but also existing ones you already have on your computer. You can read more about video editing features here.
In the scope of this article, we will walk you through a full understanding of the Crop Video Range command in ActivePresenter.
But first, make sure you have downloaded the right version of ActivePresenter. Don’t worry if you are new to the app! It is free to try with no limitation in time or functionality, so just click the button below to download and install it on your device.

Cropping video with ActivePresenter
As you know, Cut, Copy, and Delete are very basic features available in most video editing tools. They are often used with the purpose of duplicating or removing some parts of video/audio. Along with those features, ActivePresenter also offers you the Crop Video Range command with a different capability. With this command, you can save a considerable amount of time when you need to edit your videos.
Basically, once clicking this command (relative to the Crop to Range button), ActivePresenter automatically deletes everything outside the selected range.
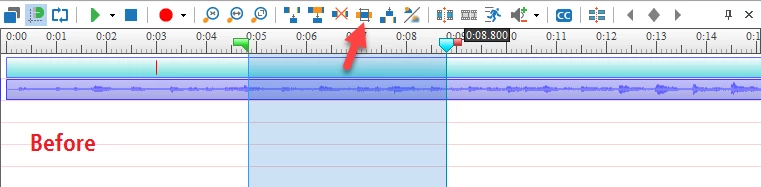
Click the Crop to Range button on the Timeline
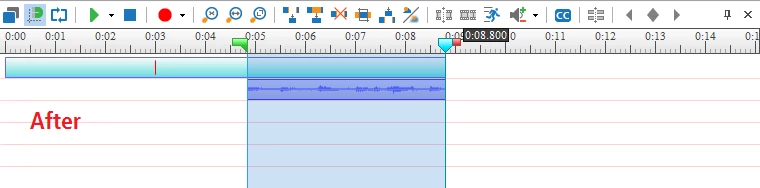
The right and left sides of the selected range are removed from the Timeline
Steps to Crop Video in ActivePresenter
Before going into details, keep in mind that the Crop Range command is available to all types of annotations (video, audio, shapes, etc.) not just video. Additionally, when there are no selected objects, changes are applied to all objects, no matter what video, audio or shapes. Read more about Cut, Copy, Delete or Crop Video Range here.
Below are the steps to use the Crop Range command in ActivePresenter:
Step 1: Pick up your desired range.
Step 2: Click the Crop to Range button.
Case 1: When there are no selected objects:
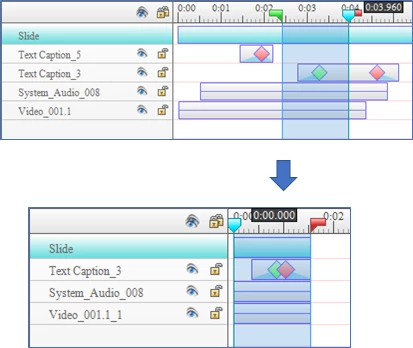
- All contents in that range are reserved, and the rest is deleted.
- The time duration of the slide containing the selected range is reduced to that of the range.
- If an object in the slide doesn’t have any content inside that range, it completely disappears on the Timeline (for example, “Text Caption_5”).
Case 2: When there is at least one selected object:
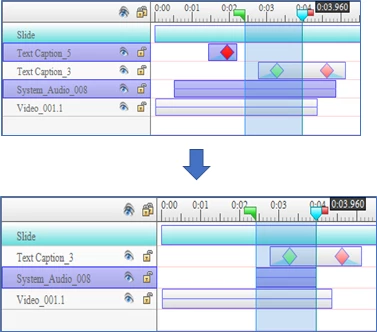
- Changes are applied to only selected objects (refer to “Text_Caption_5” and “System_Audio_008”). The slide itself and other objects are not affected at all.
- Regarding selected objects, their parts inside the range are retained.
- If any selected object is outside the range, it is removed entirely from the slide (for example, “Text_Caption_5”).
Because of some obvious differences, the best advice is that you should define contents and types of objects you want to keep first.
That’s all we want to share with you in this article. Come and download ActivePresenter right now to try this function. Feel free to connect to us if you need any help along the way.