Wanted to create an interesting Color Blind game to test players’ visual acuity? Let’s walk with us to build this color blind test together in today’s blog post.
Are you parents and wish to design a Color Blind game for your children? Are you artists, or teachers working in an art center who want to check your students with color blind test? If the answer is yes, would you like to create a similar game like that?
As you may not know, the Color Blind game Tiktok attracted 128.5 million views, and the Color Blind game Instagram reached 600 million views in less than 60 days.
We can tell you that creating a Color Blind game is not very difficult. In fact, it is quite easy when you design the game with ActivePresenter – our powerful eLearning authoring tool. This game requires players to click on a color different from the rest in each question for a limited time. If players choose the right one, they are able to go ahead. If players choose the wrong one, they lose the game but are given unlimited replay times.
We would instruct you to create the Color Blind game in a couple of minutes with doable and digestible steps.
To create this game, we have to go through 6 stages as below:
- Color Blind Game Preparation
- Design Open Slide
- Design Question Slides
- Design Close Slide
- Customize Feedback Layer
- Preview and Export Color Blind Game
Let us walk you one by one.
Step 1. Color Blind Game Preparation
1.1 Customize Slide Master
To maintain a consistent layout appearance, we encourage you to use Slide Master by navigating to the View tab > Slide Master. After that, you are able to change the background image by accessing the Properties pane > Slide Properties tab > Background Fill > Image Fill > Import image.
Next, we access the Properties pane > Slide Properties > General > Untick Auto Advance checkbox to avoid auto-moving slides. Then click Close Master View to return to the main working Canvas.
1.2 Add Background Music
Music audio is added to uplift players’ moods when playing the game by navigating the Insert tab > Audio. In this case, we choose music outside. Right-click on the audio symbol, choose Play over Multiple Slides, and choose what you prefer: Top Layer or Bottom Layer. Navigate to the Properties pane > Tick the Loop checkbox and Background Music checkbox so the audio would play smoothly between slides.
Thus, we have done the preparation part of the game. Color Blind game’s main content includes 3 parts: Open slide, Question slides, and Close slide. Therefore, we will head into creating the Open slide first.
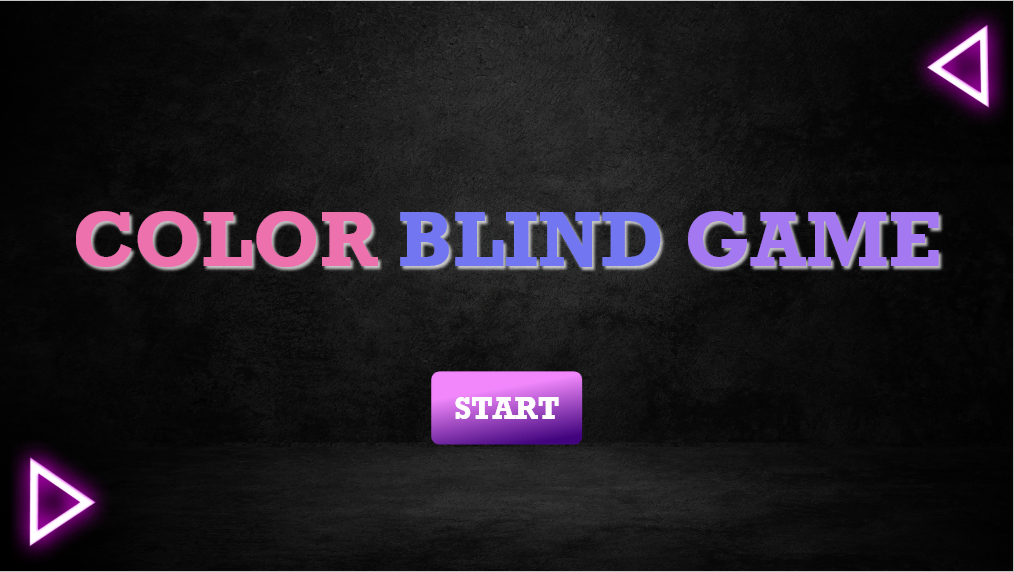
Step 2. Design Open Slide
The open slide contains 2 elements: Game Title and the Start button.
2.1. Add Game Title for Color Blind Game
We add the game title by navigating to the Insert tab > Text Caption > Fill in the game title. You could change color to make it more playful. In case you would like to create the effect of letters floating on the background, access the Properties pane > Styles & Effects > Shadow > Check Custom Shadow and freely customize it as you want.
2.2. Customize the Start Button
When players click on the Start button, it would forward to the Question slides part. Then, to add and customize the Start button, follow these steps:
- Insert a button (Insert tab > Button > Rename the button).
- Customize the button (Select the button > Access Properties > Styles & Effects > Fill > Gradient Fill).
- Create interactivity for the button (Properties pane > Interactivity > Add the On Click event > Add the Go Forward 1 slide action).
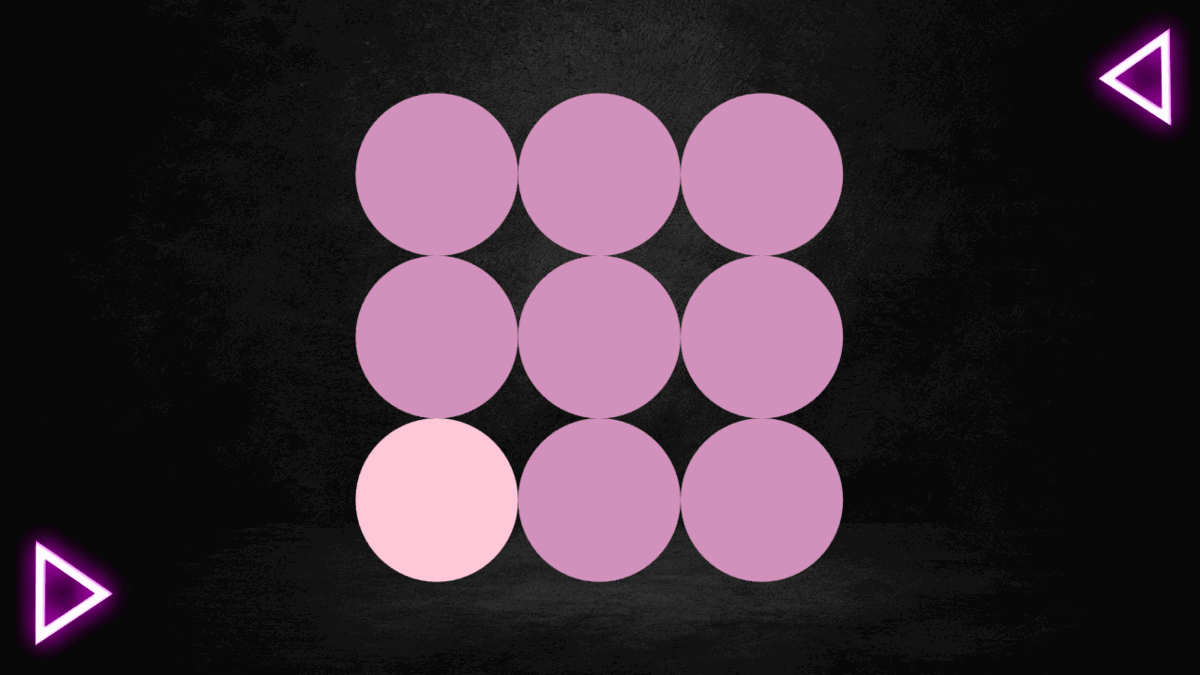
Step 3. Design Question Slides
The Color Blind game contains a couple of question slides. It’s up to you to decide on the question number. For that reason, we would instruct you how to create a single question slide.
3.1 Create Color Blind Game Play Area Layout
The game area in the question slide is designed in 3×3 format as follows:
- Insert a shape (Insert tab > Shapes > Select the rounded shape).
- Change the Cursor (Properties panes > Interactivity > Cursor > Choose the icon with the hand symbol to simulate the feeling of playing the game).
- Change color & multiply shapes (Properties pane > Styles & Effects tab > Fill section > Choose the color you like > Copy and paste 8 times).
- Insert a Grid Box (Insert tab > Container > Grid Box).
- Set columns for Grid box (Select the Grid Box > Navigate to the Properties panes > Side & Properties tab > Container Layout > Set 3 for the Number of Column).
- Choose all the shapes then drag and drop them into the box.
- Make the box square by adjusting the Width and Height in the same number then place the Grid Box to the desired position on the Canvas.
- Change one shape into a different color (Properties pane > Styles & Effects > Fill > Change the color).
Moreover, we would give you a tip for picking colors: Have a look at our recommended color generator websites if you get stuck in choosing suitable color pairs for the color blind test.
This is how a question slide is designed. You only have to copy and paste to multiple slides depending on how many questions you like to have, then change the color by navigating to the Properties pane > Styles & Effects > Change Color.
3.2. Add Score and Set Actions for the Right Answer
Create and Customize Score Box
Players gain 1 point for each right answer. Thus, we set the score box as follows:
- Insert a text caption for Score box (Insert tab > Text Caption).
- Add Score variable (Access the Home tab > Variables > Click the Add button > Enter a name, “Score” for example. After that, we select NUMBER for Type and 0 for Value > click Add & Close to add a new variable > Close the dialog.
- Click to edit the Text Caption object > Navigate to the Home tab > Reference > Select the variable created earlier > OK. Copy and Paste to all question slides.
Set Actions for the Right Answer
The logic of this Color Blind game is that if we choose the right answer, it would lead to 2 following activities:
(1) Add 1 point to the score box and,
(2) Move to the next question slide
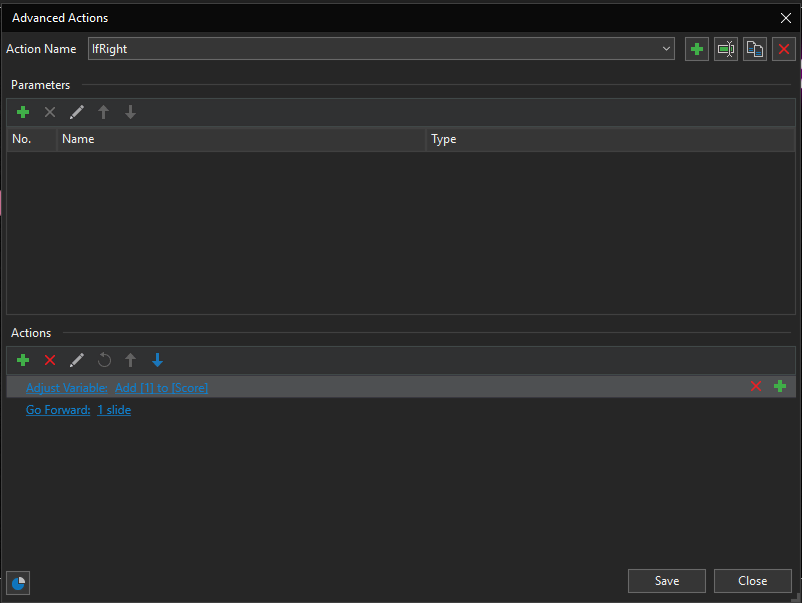
Therefore, we can reduce the burden of repeating actions by creating Advanced Actions in the Questions tab.
- On the Advanced Actions dialog, fill in the action name, “IfRight” for example.
- Add the Adjust Variable action > Choose “Score”. In Operator, choose Add, Value set 1.
- Add the Go forward 1 slide action.
- Click Save and Close.
In each question slide, choose the right answer > Access Properties pane > Interactivity tab > Events-Actions section > On Click event > Advanced Action then Select “IfRight” – the action name for the right answer. Lastly, repeat the same with the rest of the question slides for this Color Blind game.
3.3. Set Timer and Actions for the Wrong Answers
Set Timer
The timer is the time limit for each question and is customized as follows:
- Add a timer by navigating the Insert tab and choosing Progress Timer.
- Customize Timer (Properties pane > Styles & Effects > Fill color you like).
- Access the Properties pane > Interactivity tab > Timer section > Uncheck Match Objects Duration then adjust the time you want to set in the spin box next by > Check Countdown box.
- Add an incorrect feedback (Properties pane > Interactivity > Events-Actions section > On Timer Complete > Show Feedback Layer action > Incorrect Feedback (as Gameover message).
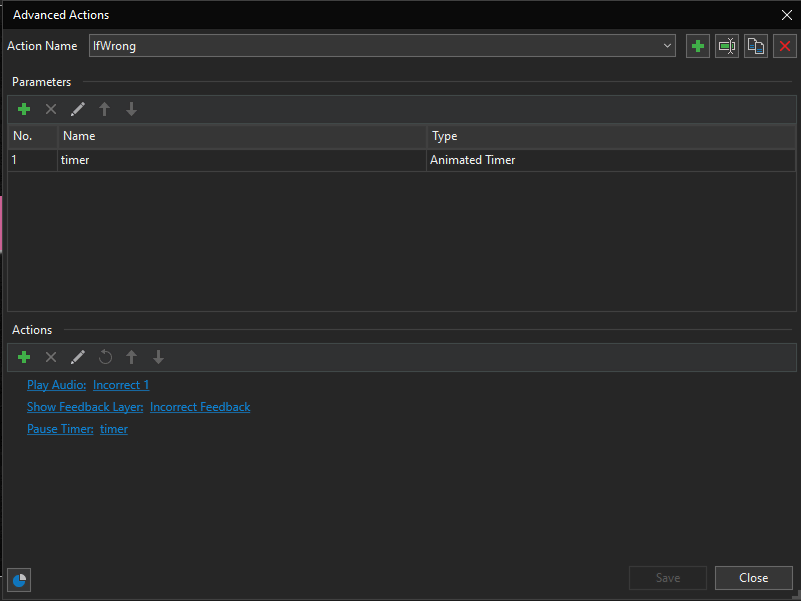
Set Actions for the Wrong Answers
Setting wrong answers for this Color Blind game follows the same logic as the right ones. Access the Questions tab > Advanced Actions > Add a new action name, “IfWrong” for example. If the player clicks on the wrong answers, it would lead to 3 following activities:
(1) Play an incorrect sound,
(2) Show an incorrect feedback message as a Game-over notification
(3) Pause timer.
Therefore, we will put all three actions in the Advanced Actions dialog as belows:
- Add the Play Audio action > Choose Incorrect 1 from the built-in list > Untick Blocking checkbox.
- Next, click to add actions, add the Show Feedback Layer action > Incorrect Feedback > Uncheck Blocking checkbox.
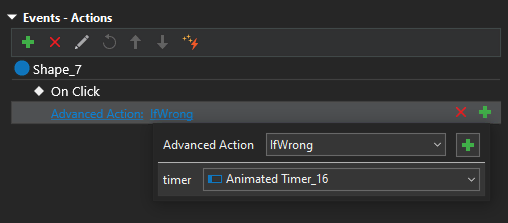
- Since Advanced Actions can apply to multiple slides including different animated timers, we add a new parameter in Parameters in the Advanced Actions dialog. Then we enter the name, let’s say “timer” > Choose Animated Timer for Type > Add Pause Timer action > Click to edit > Tick the Param checkbox > Choose “timer” > Click Save and Close.
In the Events-Actions of each wrong answer > Add the On Click event > Advanced Action action > Choose “IfWrong” then select value for timer parameter.
Then repeat this step for all wrong answers set up and we are done with step 3. Let’s move to the next step.
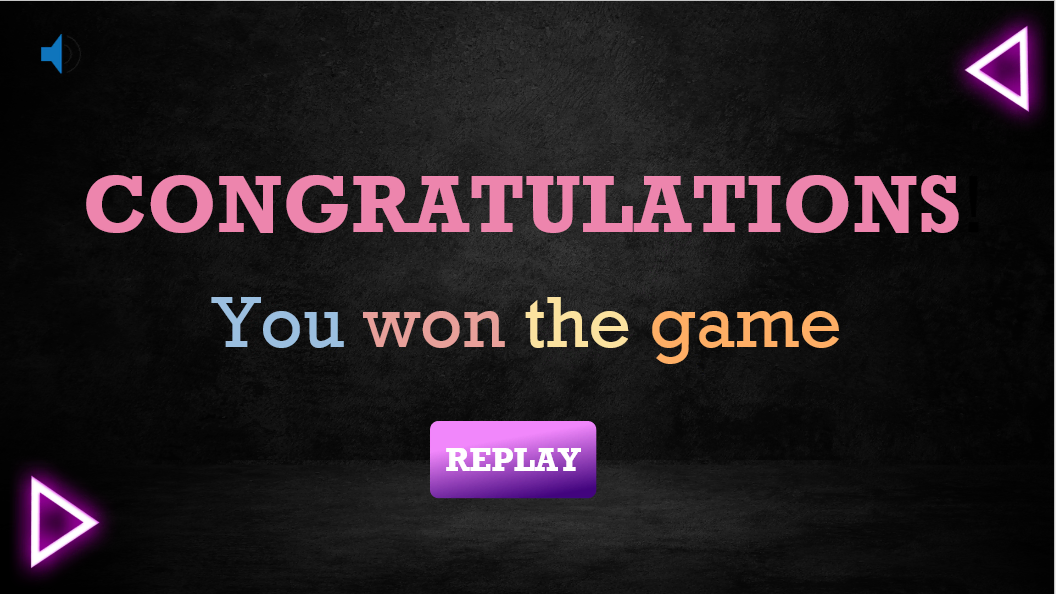
Step 4. Design Close Slide
The Close slide contains 2 parts: Text and Button. We need to add congratulations text for players who win the game and a Replay button to restart the game if they prefer. For text, do the same as you did before in the Open slide. For the Replay button, customize the same as the Start button with a slight difference when we add an action to this button (Properties pane > Interactivity > Events-Actions > Add the On Click event > Choose the Restart Presentation action).
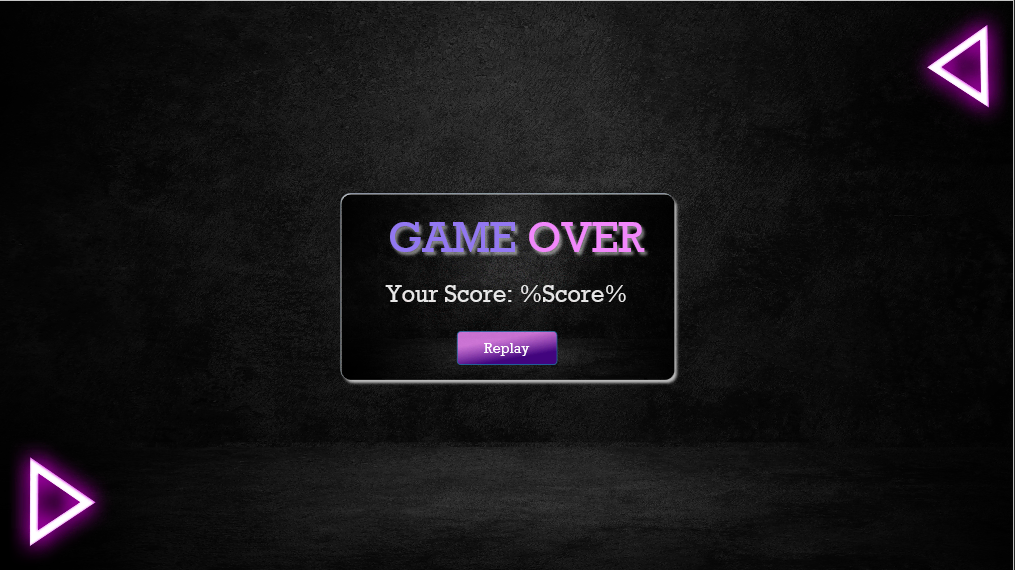
Step 5. Customize Feedback Layer for Color Blind Game
When time out or players pick the wrong answer, the Incorrect Feedback layer would show up as a Game-over message containing a Replay button for players wishing to replay the game.
5.1. Change the Layout of the Feedback layer
- Navigate to the View tab > Feedback Master > Incorrect Feedback Layer > Properties pane > Slide Properties > Background Fill > Choose to fill the color or image you prefer.
- Then change the text, color and size freely
5.2. Add Score in Feedback for Color Blind Game
In the text caption, rename it to “Your Score” and navigate to the Home tab > Reference > Choose Score variable > OK.
5.3. Add Action for the Replay Button
Customize Replay button action by navigating to the Properties pane > Interactivity > Events-Actions > Add the On Click event > Choose the Restart Presentation.
Step 6. Preview and Export Color Blind Game
At last, you are free to review your project by clicking the Export tab > HTML5 Preview and exporting it to HTML5, SCORM, or xAPI.

Feel free to download our Color Blind game demo here, but keep in mind that this project can only be viewed by ActivePresenter. No worries, you can download ActivePresenter with free trial for unlimited time.
Final Words
Apparently, Color Blind game could be applied as a color blind test and shared with your students and friends. Moreover, you could take advantage of this test as a warm-up activity for an educational lesson to check visual acuity for users. ActivePresenter is the best choice to help you create this game easily, not just limited to this Color blind test, but other games too. Follow our YouTube and Blog and hit the subscribe button to stay up-to-date with our interesting games introduced later on.
See more: