
If you’ve ever recorded a screen tutorial only to realize the narration is half a second out of sync, or watched your completion rates drop because learners tune out three minutes into a “watch and hope you remember” video, you already know the problem. Recording your PC screen with audio is the easy part. Turning that recording into something learners actually finish, interact with, and get tested on is where most workflows fall apart. This guide walks through both halves: getting a clean, properly synced recording, and then layering in the interactivity that separates a real training asset from a glorified screenshot.
Why “Just Recording” Your Screen Isn’t Enough Anymore
A flat MP4 walkthrough has a ceiling. Learners can skip ahead, zone out, or close the tab, and you’ll never know which part lost them. For teachers running flipped classrooms or L&D teams building compliance training, that’s a real problem — you need proof of completion, quiz scores, and engagement data, not just a view count.
This is exactly why the recording tool you choose matters more than it seems at first glance. A tool that only captures video locks you into that ceiling. A tool that captures screen, audio, and structure together lets you build something learners can click through, answer questions in, and that reports back to your LMS.
That’s exactly where ActivePresenter comes in. It bridges the gap between simple screen capture and powerful eLearning authoring. Instead of settling for a flat video, ActivePresenter lets you record your screen and instantly transform it into an interactive, trackable course.
Don’t just count views—measure real engagement. Try ActivePresenter today and give your training the upgrade it deserves.

What You Need Before You Hit Record
A few minutes of prep saves hours of re-recording later:
- A script or bullet outline — even a rough one prevents dead air and “um, let me check” moments that require re-takes.
- A microphone check — test levels before the real take, not during it.
- Decide if you need system audio — notification sounds, app audio, or media playback captured alongside your voice.
- Choose your recording mode upfront — this is the one decision that determines how much editing pain you’ll have later (more on this below).
How to Record PC Screen with Audio: Step-by-Step
Step 1 — Pick the Right Recording Mode
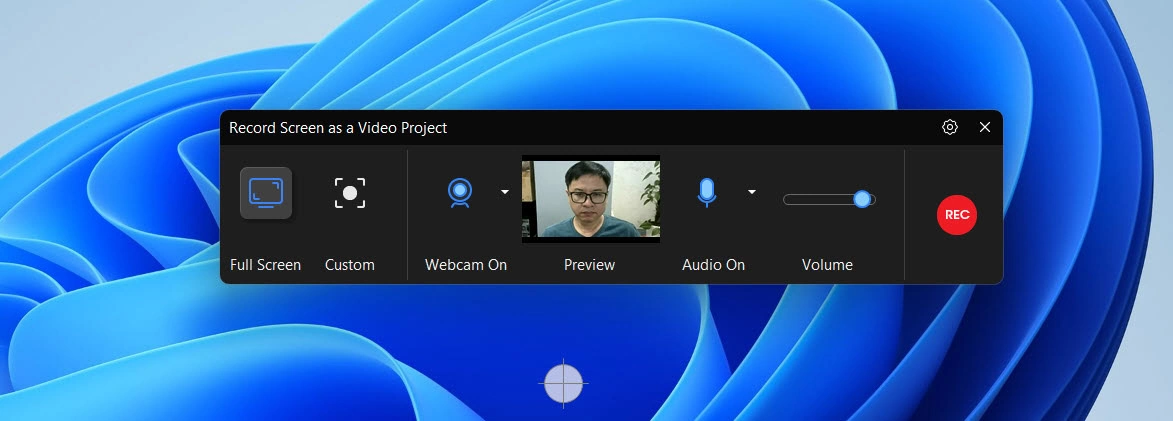
In ActivePresenter, go to Home tab > Record Screen as Video. But before you click record, decide: are you making a straightforward tutorial, or will this need clickable interactivity later? If it’s the latter, use Record Software Simulation instead. This single choice at the start avoids a huge amount of rework, because simulation mode automatically captures click locations and cursor paths that you’d otherwise have to build manually.
Step 2 — Configure Your Audio Sources
The recording dialog lets you select microphone input, system audio, and webcam independently. This matters because screen capture, webcam, mic audio, and system audio all record on separate tracks with independent level control — so if your mic is too quiet or a notification sound bleeds in, you fix it afterward without re-recording the whole session.
Step 3 — Start, Pause, and Stop Cleanly
Press REC to begin. When you’re done, Ctrl + End stops the recording (Windows). Pausing mid-recording to gather your thoughts is fine — you’ll trim any dead space in editing anyway.
Step 4 — Edit Non-Destructively
This is where the workflow either saves you time or costs you time. Because editing is non-destructive, your original recording is never altered — every cut, every effect is reversible. That matters enormously when a client or department head asks for “just one small change” three weeks after you thought the project was finished. Use the split video feature to break long recordings into microlearning chunks, and layer in cursor highlights, spotlight effects, zoom-n-pan, and text callouts to direct attention exactly where you want it.
👉 Want to try this pipeline yourself? Download the free trial of ActivePresenter and record your next tutorial start to finish — no watermark, no time limit on the features you need to evaluate.
Turning a Plain Recording Into an Interactive eLearning Video
Adding Hotspots and Clickable Interactions
If you recorded in Software Simulation mode, you already have hotspots and cursor paths built in — no manual annotation needed. This turns a passive screen capture into a clickable, interactive learning module without touching a line of code.
Inserting Quizzes at Specific Timestamps
Go to Questions tab > Question Settings, check the box allowing question insertion at a timestamp, then click OK. From there, insert a Multiple Choice Question directly into the timeline, customize the answer format, and double-click the correct answer to set it. Want the video to pause until the learner answers correctly? Set the Correct Feedback Layer to hide the feedback layer and continue only on the right answer — that’s real gatekeeping, not just a knowledge check for show.

Publishing to SCORM/xAPI for LMS Tracking
Once the project is polished, you’re not limited to a plain MP4. Package the same project as SCORM or xAPI content, ready to drop straight into your LMS — complete with tracking data on completion rates, quiz scores, and time spent. For teams producing training at volume, the AI Agent integration via MCP Connect can also draft narration scripts, generate slide summaries, or suggest quiz questions based on your recorded content — a genuine time-saver when you’re converting dozens of recordings into structured courses every month.
Final Thoughts & Next Step
Recording your PC screen with audio is a solved problem — most tools handle that part fine. The real differentiator is what happens after you stop recording: whether your project can grow into something interactive, trackable, and genuinely useful for the people watching it, without forcing you to rebuild everything from scratch in a second piece of software.
If you’re ready to see the full pipeline — recording, non-destructive editing, quiz insertion, and SCORM/xAPI publishing — in one workflow, download the free trial of ActivePresenter and put your next tutorial through it start to finish. And if you get stuck or want to compare notes with other course creators and trainers doing the same thing, the Atomi Systems community is a good place to ask.