
There’s nothing more frustrating than finishing a perfect tutorial take only to realize a massive watermark is blocking your UI or a hidden 5-minute timer killed the recording mid-sentence. Most “free” tools are just bait for quick clips, leaving you to wrestle with restrictive limits and disjointed editing workflows when you’re trying to build actual training content. This guide shows you how to master the full ActivePresenter pipeline—capture, edit, and publish—without the software getting in your way, so you can stop fixing technical headaches and actually get your projects out the door.
Why Your Desktop Screen Recorder Choice Matters More Than You Think
It’s tempting to treat screen recorders as interchangeable — hit record, save an MP4, move on. But the tool you pick determines your entire post-production workflow. Pick a recorder-only app, and you’re stuck exporting into a separate editor, re-syncing audio, and losing quality with every conversion. Pick something with forced watermarks or capped recording length, and you’re re-doing work you already finished once.
This is exactly why ActivePresenter exists as an all-in-one recorder and editor: it removes the friction between “I captured this” and “this is ready to publish.” Take a look at our tutorial below to see how you can easily capture your computer screen in ActivePresenter:

Getting Started: Setting Up ActivePresenter as Your Desktop Screen Recorder
Choosing the Right Mode (Video vs. Interactive Simulation)
Before you click record, decide what you’re actually building:
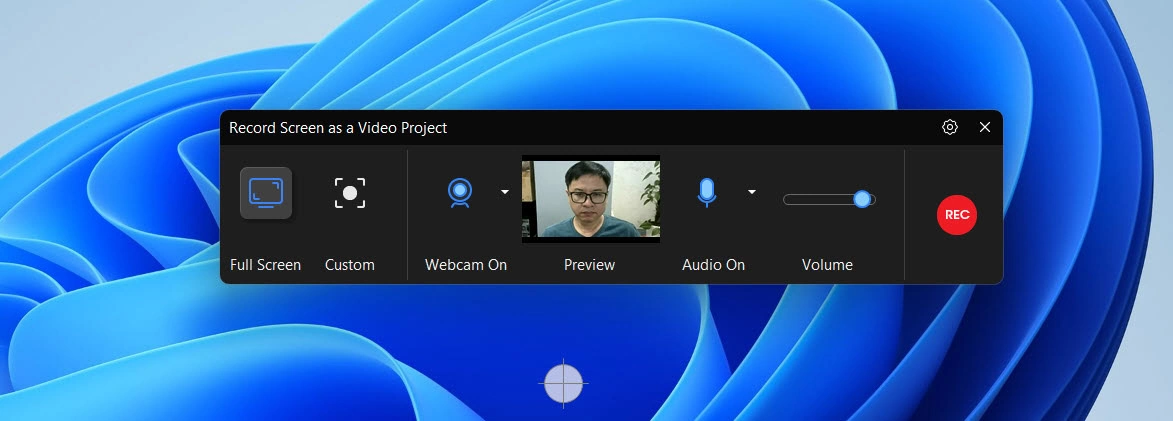
- Record Screen as Video — best when you need a standard tutorial with webcam overlay, voiceover, and traditional video pacing.
- Record Interactive Simulation — best when you want ActivePresenter to automatically generate a slide-based project with smart annotations, cursor paths, and clickable hotspots. Note: this mode doesn’t capture webcam, since it’s built for software walkthroughs, not face-to-camera content.
Picking the wrong mode upfront is the single most common mistake I see new users make — they record in Video mode, then manually try to recreate interactivity afterward, which takes far longer than just switching modes from the start.
Calibrating Audio and Webcam Before You Hit Record
In more than 10 years producing training video content, this is the habit that’s saved me the most editing time: always calibrate your microphone before recording, not after. A clipped or too-quiet audio track is fixable in post, but it never sounds as clean as getting the input level right at the source. If you’re adding a webcam overlay, do a 5-second test recording first to confirm framing and lighting — nothing wastes more time than re-shooting a 20-minute tutorial because your face-cam was cropped wrong.
Step-by-Step: How to Record with ActivePresenter Properly
Step 1 — Configure Capture Area & Sources
Select full screen, a specific window, or a custom region. Choose your audio sources: system sound, microphone, or both.
Step 2 — Record Screen, Audio, and Webcam
Toggle the webcam on if you want a corner overlay, then hit Record. A countdown gives you a moment to get ready.
Step 3 — Pause, Resume, and Segment Long Recordings
Made a mistake mid-take? Pause, collect yourself, and continue — you’ll trim it out in editing in seconds. For multi-step processes, recording in shorter segments and stitching them together on the timeline is often faster than fighting for one flawless long take.
When you’re done, hit Stop (or Ctrl+End on Windows), and your recording opens directly in the editing workspace — no importing, no waiting on file conversion.
Beyond Capture: Non-Destructive Editing That Protects Your Footage
Most recorders either offer zero editing or bury you in an interface that needs its own tutorial. ActivePresenter’s editing sits in the sweet spot: powerful enough for professionals, simple enough for a first-timer to use within minutes.
The key advantage is non-destructive editing — cuts, trims, and annotations are applied as instructions on top of your original file, not permanent changes. That means you can experiment freely without ever risking your source footage. Combine this with the Record Software Simulation feature, and you can turn a passive screen capture into a clickable, interactive learning module — complete with hotspots and cursor paths — without touching a single line of code.
Looking to package this into a real course? This is where the eLearning authoring tools kick in: quizzes, branching scenarios, and interactive objects can all be layered directly onto your recording.
Publishing Like a Pro: From MP4 to SCORM/xAPI
Here’s where ActivePresenter separates itself from screenshot-and-export tools. Once your project is polished, you’re not limited to a plain MP4. You can package the same project as SCORM or xAPI content, ready to drop straight into your LMS — complete with tracking data on completion rates, quiz scores, and time spent. If your training content needs to prove compliance or measure engagement, this single feature can save you from adopting a second piece of software entirely.
For teams pumping out a high volume of training content, the AI Agent integration via MCP Connect is worth exploring too. It can automate repetitive tasks like drafting narration scripts, generating slide summaries, or suggesting quiz questions based on your recorded content — a genuine time-saver when you’re converting dozens of recordings into structured courses every month.
👉 If you want to see this whole pipeline in action,download the free trial of ActivePresenter and record your next tutorial start to finish — no watermark, no time limit on the features you need to evaluate.

Pro Tips from a Decade of Screen Recording & eLearning Production
- Use Record Software Simulation from the start if you know you’ll need interactivity. Trying to bolt on annotations after recording in plain Video mode almost always takes longer than starting in the right mode.
- AI credits are pooled across your license, not per device. If your license key is activated on multiple computers, all AI Agent usage draws from the same shared credit pool — so if you’re managing a team, keep an eye on collective usage rather than assuming each machine gets its own allowance.
- Calibrate audio before, not after. It’s the cheapest insurance against re-recording an otherwise perfect take.
- Segment long recordings. Stitching 3–4 shorter clips on the timeline is almost always faster than nailing one long uninterrupted take.
Pros & Cons of Using ActivePresenter as Your Desktop Screen Recorder
Pros:
- All-in-one recording + non-destructive editing, no app-switching
- No forced watermark or time limit, even on the free version
- SCORM/xAPI export — a real differentiator for L&D and training teams
- AI Agent via MCP Connect speeds up high-volume content production
- Available on Windows and macOS
Cons:
- Not available on Linux (OBS Studio remains the go-to there)
- The eLearning authoring depth means a slightly steeper learning curve than bare-bones recorders like ScreenPal
- Interactive Simulation mode doesn’t capture webcam, so it’s not a fit for face-to-camera content
Evaluation Criteria: How to Judge Any Desktop Screen Recorder
Before committing to any tool, run it through this checklist:
- Watermark policy — Does the free tier force a logo onto your export?
- Time limits — Can you record a full-length training session, or are you capped at a few minutes?
- Editing capability — Is editing built in, or do you need a second app? Is it non-destructive?
- Export formats — Does it support SCORM/xAPI/HTML5, or only MP4?
- Platform support — Windows, macOS, Linux — does it match your team’s hardware?
- Automation/AI features — Can it help with scripting, summaries, or quiz generation at scale?
Final Thoughts
A desktop screen recorder should get out of your way, not add extra steps between capture and a finished, publish-ready video or course. If you’re a trainer, IT professional, or content creator tired of juggling separate apps for recording, editing, and publishing, this is exactly the gap ActivePresenter is built to close.
Ready to see it for yourself? Download ActivePresenter for free — no watermark, no time limit, no credit card required — and record your next tutorial from start to finish in one sitting. If you get stuck or want workflow advice from other trainers and course creators, the Atomi Systems community forum is a great place to swap tips and troubleshoot together.