
A software tutorial needs to make each action easy to follow. For instructional designers and course creators, it also needs to reach learners through an LMS and report the results that matter. This guide explains how to create a software tutorial with Smart Studio in ActivePresenter 10.6, then export it as SCORM 1.2 or SCORM 2004.
We’ll cover recording your workflow, enhancing it with Smart Studio, adding a knowledge check, configuring SCORM output, and uploading the package to your LMS. You’ll also learn how to verify scores, completion, and resume behavior before releasing the course.
Start with one short software task. A focused pilot makes the entire publishing workflow easier to check. Before continue reading the instruction, spend a minute downloading our winning star ActivePresenter, an all-in-one AI-powered eLearning software for professionals down below:

Why Use Smart Studio and SCORM for Software Training?
Small interface details can be difficult to follow in a screen recording. Smart Studio helps direct attention with automatic zoom, cursor adjustments, and keyboard shortcut overlays. These features are part of the ActivePresenter 10.6 release.
SCORM serves a different purpose: it packages your course for delivery and reporting through a compatible LMS. Together, these capabilities let you improve the tutorial’s presentation and collect learning results.
Keep the instructional goal clear. Watching a polished demonstration does not automatically prove that someone can perform the task. Add a relevant assessment when you need evidence of understanding.
Also, “embedding into an LMS” means importing the SCORM package and displaying it through the LMS’s supported player. Uploading an MP4 or inserting a generic webpage iframe does not, by itself, establish SCORM tracking.
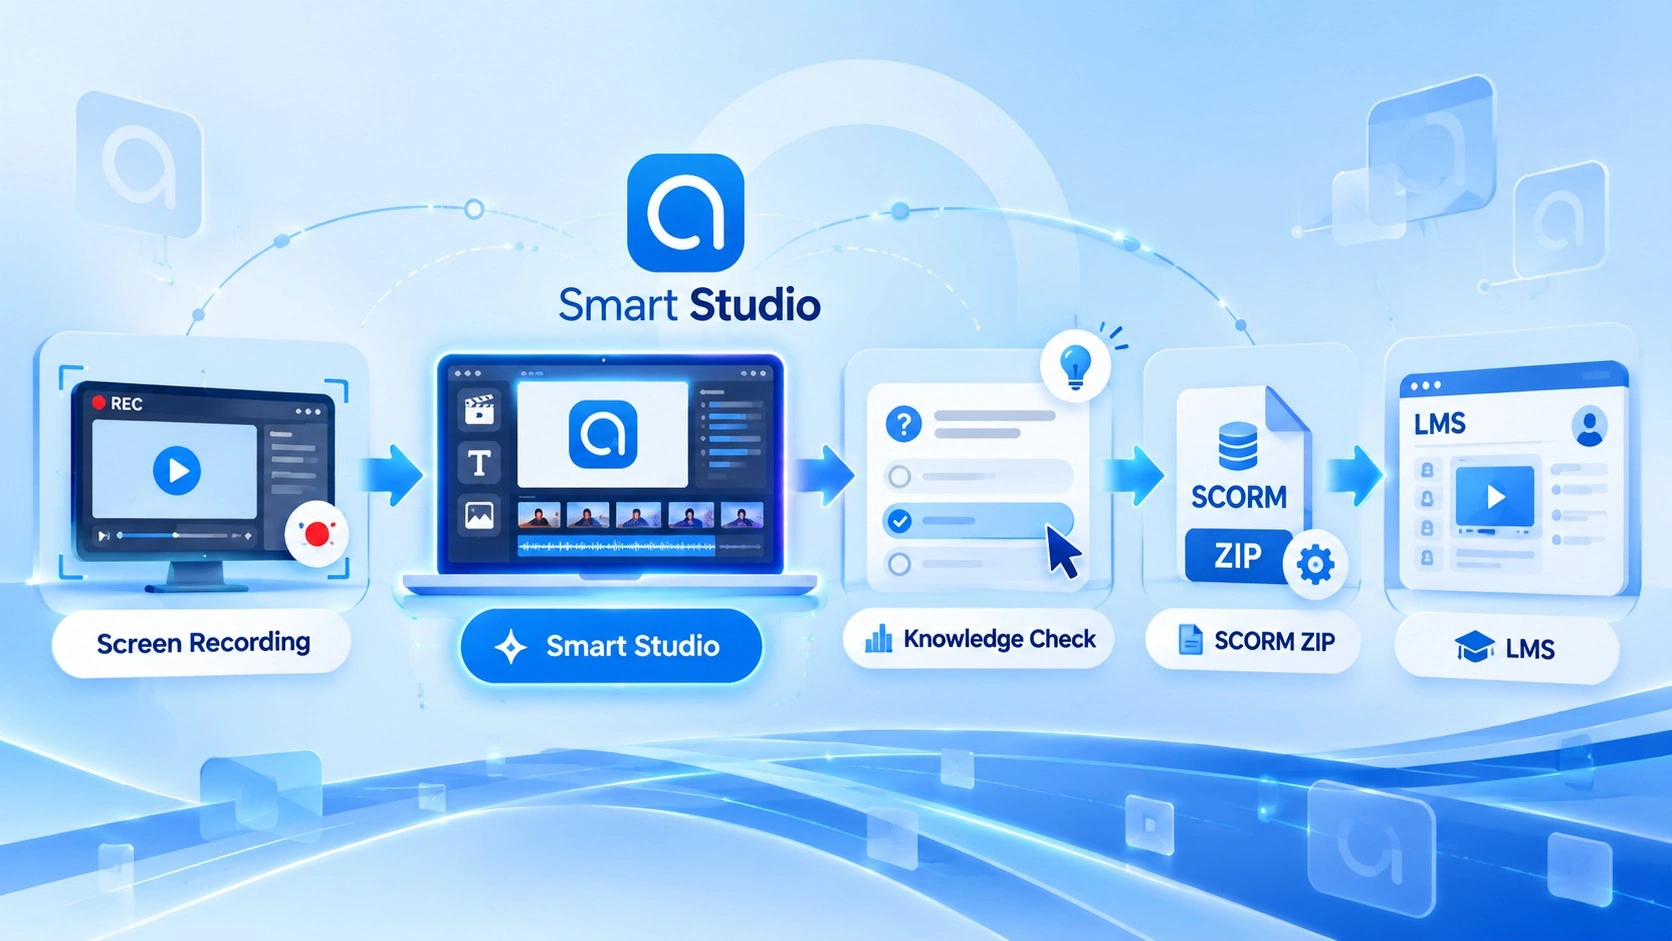
Step-by-Step: Create a Smart Studio Software Tutorial and Publish It to Your LMS
Step 1: Define the Task and Prepare Your Recording
Choose a specific outcome, such as “Create and assign a support ticket.” Outline the actions learners need to see, including the starting screen and the expected result.
Before recording:
- Prepare demonstration data and close distracting windows.
- Confirm which SCORM versions your LMS supports.
- Check your LMS upload permissions and package size limit.
- Decide whether the course needs completion tracking, a scored assessment, or both.
On ActivePresenter’s Start Page, select Record Screen as Video. From an open project, use File > Record Screen as Video.
Choose Full Screen or configure a Custom recording area. Capture enough of the application to include menus, dialogs, and surrounding context.
In Recording Settings > Cursor, keep Record Mouse Cursor selected. Smart Studio requires the cursor-path and action data captured with the recording.
Pro tip: Avoid recording only a small button or field. Smart Studio can focus on captured details, but it cannot recover anything outside the original recording area. If you’re new to ActivePresenter, watch below tutorial video for more tips and settings:

Step 2: Record the Software Workflow
Set your microphone, system audio, and optional webcam according to the lesson. Record a short sample to check that interface text and narration are clear.
Then capture the task:
- Start from the screen learners will recognize.
- Perform the workflow in a logical order.
- Pause briefly around important actions.
- Show the successful result.
- Stop recording and save the project.
Review the recording before adding effects. Check for missed steps, unexpected notifications, and menus that opened outside the capture area.
For example, an IT onboarding tutorial might show employees how to open the help desk portal, describe a problem, and submit a ticket. End by showing the confirmation screen so learners know what success looks like.
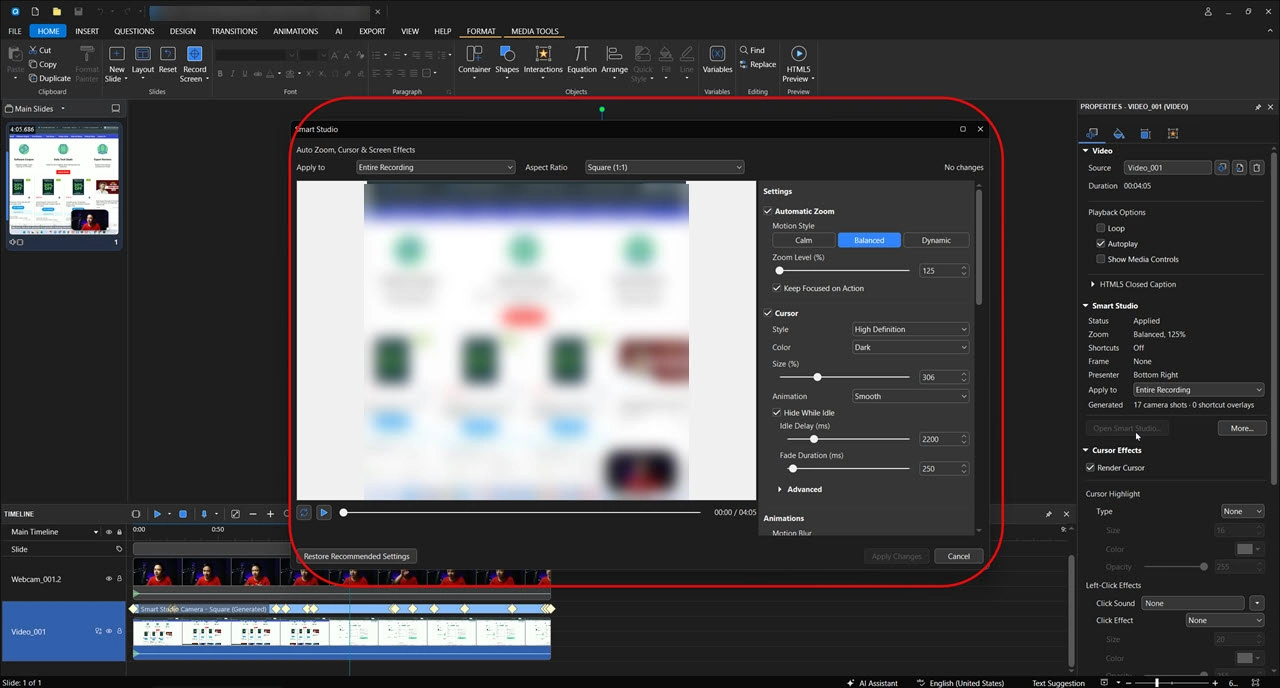
Step 3: Open Smart Studio and Enhance the Recording
Select exactly one screen-recording video on the Canvas or Timeline. Then open:
Properties > Media > Smart Studio > Open Smart Studio…
The selected video must be an eligible ActivePresenter screen recording containing cursor-path and action data. An ordinary imported video or webcam-only recording is not eligible. Green Screen must also be disabled on the recording.
Inside Smart Studio:
- Choose the Apply to scope. Use Entire Recording when you want consistent settings across its split clips.
- Keep Aspect Ratio aligned with your project.
- Adjust Automatic Zoom to make important actions easier to follow.
- Configure Cursor size and movement for visibility.
- Enable Show Keyboard Shortcuts when shortcuts are relevant.
- Add a Frame or choose a Presenter layout if a companion webcam is available.
Play or scrub through the preview. Check that zooms preserve useful context and that overlays do not obscure important fields.
Click Enhance Recording to apply the setup. When revising an enhanced recording, use Apply Changes.
Pro tip: Judge zoom settings at the size learners will actually see in the LMS. An effect that looks clear in a large editor window may feel cramped in a smaller course player.
Step 4: Add Instructional Support and a Knowledge Check
Now shape the recording into a lesson. Trim unnecessary waiting, add concise annotations, and check narration timing. Include captions and review software names, abbreviations, and keyboard commands carefully.
Use a knowledge check when it supports the learning objective. ActivePresenter’s interactive quiz tools let you add questions with feedback and scoring.
For example, a CRM tutorial could demonstrate creating a customer record, highlight the save shortcut, and then ask which information must be entered before saving.
Select the question or interaction and review Properties > Interactivity > Score & Reporting. Set points deliberately, and make feedback explain the correct action.
Smart Studio enhances the recording’s presentation. To let learners practice clicking or typing themselves, author the corresponding interactions or create a Software Simulation.
Step 5: Configure Scoring and Preview the Course
Decide what a successful attempt should look like before exporting. A viewing activity and an assessed tutorial need different expectations.
For a scored lesson, check that:
- Questions have appropriate points.
- Learners can submit their answers.
- Feedback and navigation work as intended.
- The pass requirement matches the assessment.
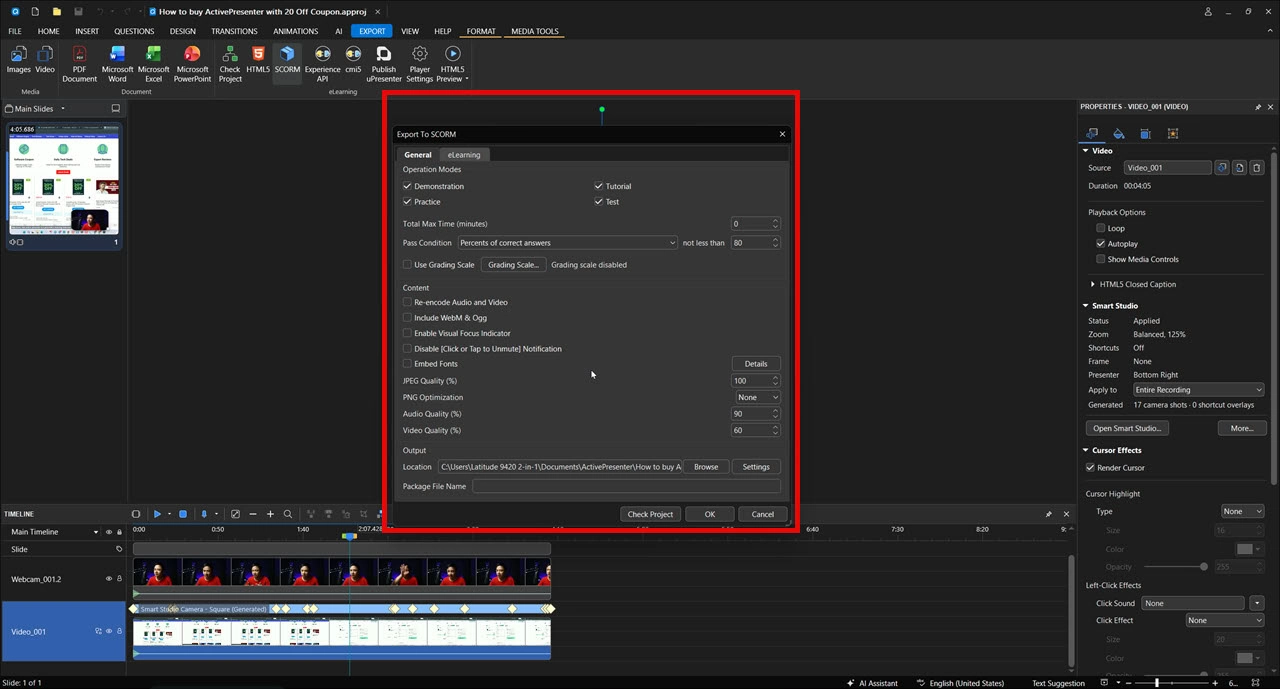
Open Export > SCORM and review General > Operation Modes. Select the mode intended for delivery and check Pass Condition. Available conditions include percentage of correct answers, points gained, number of correct answers, and slides viewed.
If Use Grading Scale is enabled, the lowest passing grade determines the pass condition.
Run Export > Check Project and address relevant findings. Then use HTML5 Preview to test the course from the beginning.
Pro tip: Write a test expectation before you start: “Four correct answers out of five equally weighted questions should produce 80%.” This makes reporting errors easier to identify.
Preview checks playback and interaction. You still need to test the exported package in the LMS.
Step 6: Export as SCORM 1.2 or SCORM 2004
Go to Export > SCORM. The export dialog contains General and eLearning tabs.
On General, review your operation mode, pass settings, media options, and output location. In Package File Name, enter a clear name such as support-ticket-training-v1.zip.
Next, open eLearning > SCORM Options > SCORM Version and select the format accepted by your LMS.
| Setting | SCORM 1.2 | SCORM 2004 |
| Version selection | Use when required or supported by your LMS | Use when supported by your LMS and suitable for its reporting requirements |
| Score normalization | Reported scores are normalized to 0–100 | Includes a Report the score in percentage option |
| Validation | Check the recorded score and status | Check the recorded score and status |
Do not assume that selecting a newer standard will fix an LMS reporting issue. Follow the destination platform’s documented requirements.
Review the package information:
- Identifier: Identifies the manifest to the LMS.
- Version: Distinguishes versions with the same identifier.
- Organization Title: Names the organization represented in the package.
- Item Title: Provides the title learners see for the content.
If exporting several operation modes, consider the option to create a separate package for each mode. For a first pilot, one intended mode simplifies testing.
Additional Report configures separate reporting methods; ordinary SCORM reporting does not require an additional HTTP report.
Complete the export and locate the generated ZIP. Keep the package intact for upload. See the official SCORM export tutorial for further explanation of the settings.
Step 7: Upload and Display the SCORM Package in Your LMS
LMS menu names vary, but the general process is similar:
- Sign in with course editing permissions.
- Open the destination course.
- Add a SCORM activity or select the platform’s SCORM import option.
- Upload the exported ZIP file.
- Set the activity title and availability.
- Review attempts, grading, and completion options where supported.
- Save the activity.
If your LMS offers display options, choose an embedded player or a separate launch window. Check that the selected layout leaves enough room for the tutorial and its controls.
Launch the activity from the learner-facing course page. This establishes the LMS context needed for SCORM communication.
Avoid placing the ZIP in a general downloads area or opening its extracted launch page directly. Those actions do not replace the platform’s SCORM import and launch process.
Step 8: Verify Learner Results Before Release
Use a test learner account and launch the course from the LMS. Complete a normal attempt, then inspect the recorded result.
Test the following:
| Test | What to check |
| Successful attempt | Expected score and completion or success status |
| Failed assessment | Expected failure result and retry behavior |
| Interrupted attempt | Saved progress and resume behavior on relaunch |
| Course exit | Results remain available after leaving the activity |
| Playback | Readable text, audible narration, captions, and usable controls |
For an HR portal tutorial, first leave before finishing. Relaunch to check resume behavior, then complete the assessment and compare the LMS report with the expected result.
Remember that completion and passing represent different outcomes, although the way they appear depends on the SCORM version and LMS.
For more reporting guidance, consult Track Training Courses in an LMS with ActivePresenter.
Best Practices and Troubleshooting for Smart Studio SCORM Tutorials
A reliable software tutorial balances clarity, manageable file size, and predictable reporting.
- Keep each lesson focused. Teach one workflow and remove unnecessary waiting while allowing learners time to understand important actions.
- Review accessibility and readability. Check captions, keyboard navigation, focus visibility, overlays, and text at the intended player size.
- Align assessment and reporting. Make question points, pass requirements, and LMS grading settings reflect the same learning objective.
- Retest after meaningful changes. Replacing questions, changing navigation, or modifying export settings warrants another learner test.
Use these checks when something goes wrong:
| Symptom | First checks |
| Smart Studio is unavailable | Select one eligible recording; confirm action data is present and Green Screen is disabled |
| Package fails to import | Check the supported SCORM version, upload limit, and selected ZIP |
| LMS API error appears | Launch through the LMS’s SCORM activity |
| Score or status is unexpected | Review points, pass condition, operation mode, and LMS grading settings |
| Tutorial is difficult to read | Review recording resolution, zoom framing, and player dimensions |
If the ZIP exceeds the LMS limit, remove unnecessary footage and review media quality settings. Recheck small interface text after reducing video quality.
Conclusion & Next Steps
Creating a software tutorial with Smart Studio in ActivePresenter 10.6 combines clear recording, focused visual enhancements, and deliberate instructional design. Exporting the course as SCORM makes it available for delivery and reporting through a compatible LMS.
Start with one task, publish a pilot, and verify the learner experience before expanding your course library.
Ready to begin? Download ActivePresenter and turn a software workflow into your first LMS-ready tutorial.