
Viewers can follow your cursor across the screen, but they cannot see your keyboard. When a panel opens or an object moves without a mouse click, they may have to pause the tutorial and work out what you pressed.
A keyboard shortcut overlay shows viewers which keys you used. Paired with a brief explanation, it helps them connect the command with its result and repeat the procedure themselves.
In this guide, you’ll learn how to show keyboard shortcuts in tutorial videos with ActivePresenter, from generating editable overlays with Smart Studio to adding labels to existing footage. We’ll also cover a separate option for displaying keystrokes during live demonstrations on macOS.
Choose How to Display Keyboard Shortcuts
The right method depends on whether you need shortcuts to appear during a live demonstration or want to add and refine them after recording.
| Method | Best for | Editing considerations |
| ActivePresenter Smart Studio | Generating shortcut overlays from compatible ActivePresenter recordings | Adjust individual overlays after recording |
| ActivePresenter Text Captions | Adding shortcut labels to imported videos or explaining selected commands | Create and synchronize each label manually |
| KeyCastr on macOS | Displaying keystrokes during a live demonstration or recording | Captured overlays become part of the video image |
When comparing screen recording tools, check whether shortcut overlays can be generated automatically or need to be added manually.
Whatever method you choose, connect the displayed shortcut with its purpose. For example, showing Ctrl+V while explaining “Paste the copied contents here” makes a spreadsheet tutorial easier to follow than displaying the combination without context.
How to Show Keyboard Shortcuts with ActivePresenter Smart Studio
ActivePresenter combines screen recording and editing in the same project. Smart Studio uses action data saved with a recording to generate shortcut overlays at the corresponding moments.
Before you begin: This guide uses ActivePresenter 10.6. Smart Studio is included in the Standard and Pro editions. You can try it in the Free edition, but output using this feature includes a watermark. The examples below use Windows shortcuts; ActivePresenter also supports macOS.
Smart Studio generates shortcut overlays after recording. If you already have a compatible ActivePresenter recording, open the project and continue to Step 3.
Step 1: Prepare Your Demonstration and Recording Settings
Choose a short task and identify the shortcuts learners need to see. In this example, we’ll copy spreadsheet data to another cell and undo the change:
- Ctrl+C: Copy the selected contents.
- Ctrl+V: Paste them into the destination.
- Ctrl+Z: Undo the last change.
Open the application and prepare sample content before recording. Keep enough of the interface visible to show the selected cells and the result of each command.
Then configure ActivePresenter:
- On the Start Page, click Record Screen as Video.
- Choose Full Screen or Custom for the recording area.
- Open the Settings menu and select Recording Settings….
- Open the Cursor tab.
- Enable Record Mouse Cursor to preserve the cursor-path and action data required by Smart Studio.
- Confirm the settings and check your microphone if you are recording narration.
Tip: Make a short test recording containing one shortcut. Confirm that Smart Studio can generate its overlay before capturing the full lesson.
Step 2: Record the Keyboard Actions
Start recording and wait for the countdown.
Select the source cell, explain that you are copying its contents, and press Ctrl+C. Then select the destination, press Ctrl+V, and pause briefly so viewers can see the pasted data.
Finally, press Ctrl+Z and explain which change it reverses. Stop recording when you finish, then save the project.
Explain each command as you perform it. Avoid pressing several shortcuts in quick succession unless the sequence itself is part of the lesson. Otherwise, viewers may struggle to match each combination with its result.
Step 3: Open Smart Studio
When the recording opens in the editor, make sure it contains the required cursor-path and action data and that Green Screen is turned off.
To open Smart Studio:
- Select exactly one screen-recording video on the Canvas or Timeline.
- Open the Properties pane.
- Navigate to Media > Smart Studio.
- Choose the appropriate Apply to scope.
- Click Open Smart Studio….
The scope determines which clips receive the settings:
| Apply to | What it affects |
| Entire Recording | Eligible clips sharing the same recording source, including split clips on other slides |
| Current Slide | Eligible clips from the same recording source on the current slide |
| Selected Clip | Only the selected screen-recording clip |
Choose Selected Clip when trying the settings on one section. Use Entire Recording when related clips need consistent styling. If your scope includes several clips, make sure Green Screen is disabled on all of them.
Smart Studio uses recorded metadata; it does not detect keystrokes from the video image. An ordinary imported MP4 does not contain the required ActivePresenter action data. For that footage, use the manual-caption method later in this guide.
Step 4: Enable Keyboard Shortcut Overlays
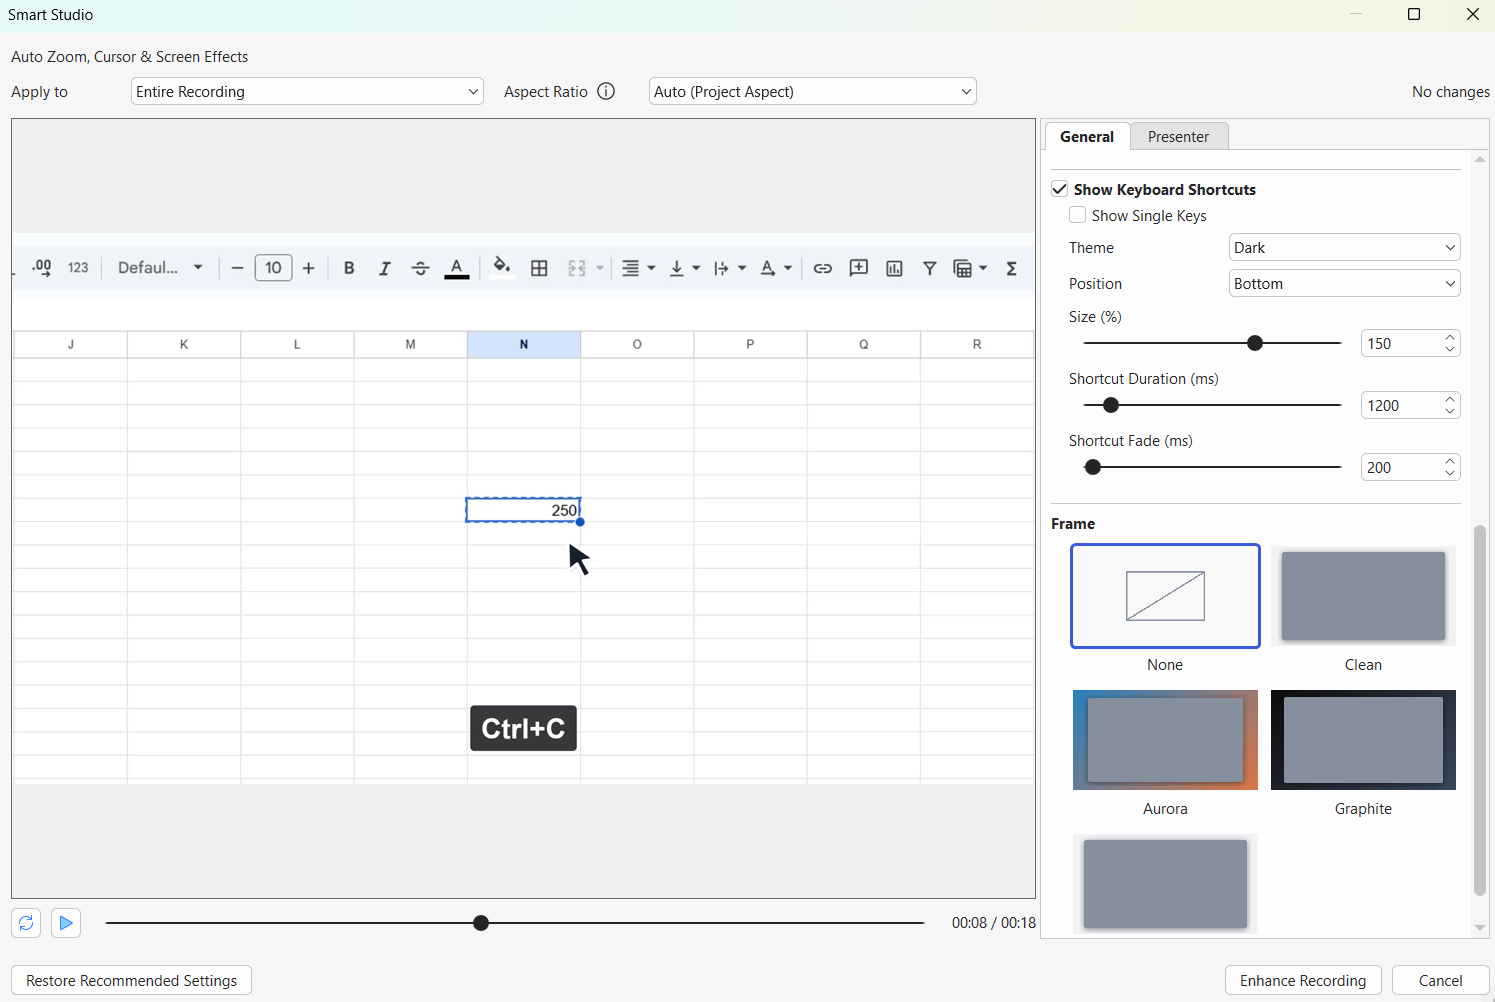
In the Smart Studio editor, find Show Keyboard Shortcuts in the Settings pane on the right and enable it.
Scrub through the preview. In the spreadsheet example, check that Ctrl+C, Ctrl+V, and Ctrl+Z appear with the corresponding actions.
Enable Show Single Keys if the tutorial also needs supported action keys, such as Delete or function keys.
Ordinary text typing is excluded from these shortcut overlays. If your lesson teaches character-by-character input, add explanatory labels where needed or use a suitable live input display.
Before applying the changes, review the other Smart Studio settings and keep only the enhancements your demonstration needs.
Step 5: Customize Appearance and Timing
Adjust the shortcut settings so viewers can read the combinations without losing sight of the demonstrated action.
| Setting | What it controls |
| Theme | Dark or Light appearance |
| Position | Bottom, Center, or Top placement |
| Size (%) | Scale of the shortcut display |
| Shortcut Duration (ms) | Total display duration |
| Shortcut Fade (ms) | Fade duration |
Choose a theme that contrasts clearly with the application background. Adjust Size (%) with the final playback size in mind.
Start with a 1,200-millisecond duration and a 200-millisecond fade. Extend the duration if learners need more time to read an unfamiliar combination.
Check placement throughout the sequence. A bottom overlay may overlap captions, while a centered overlay may cover a dialog box or the result of an action.
Step 6: Apply and Refine Individual Overlays
When the preview is ready, click Enhance Recording. When revising an already enhanced recording, click Apply Changes.
Back in the main editor, you can adjust individual shortcuts:
- Select a shortcut overlay on the Timeline.
- Find the contextual Keyboard Shortcut section in the Properties pane.
- Adjust its theme, position, size, duration, or fade.
- Drag its Timeline bar to change the start time.
- Clear Show This Shortcut to hide an unnecessary overlay.
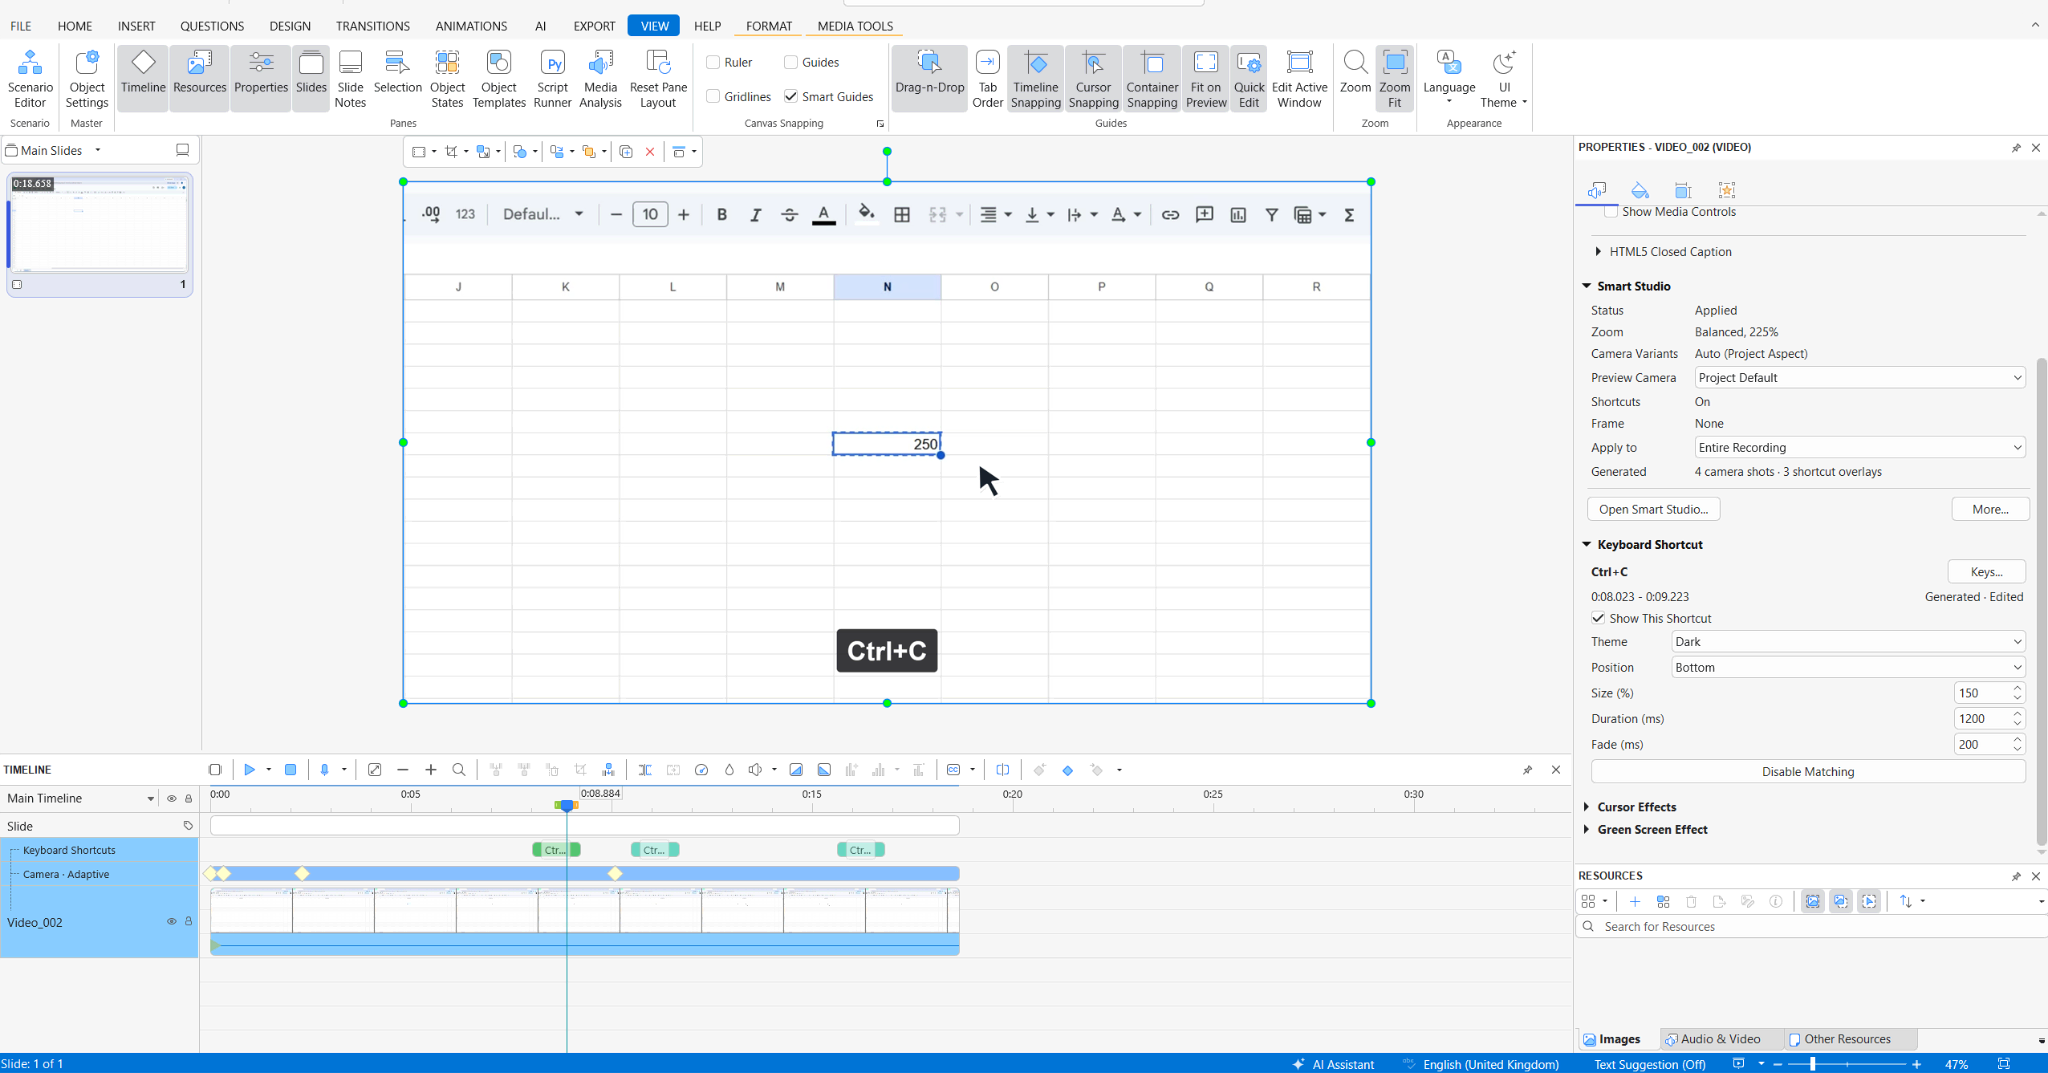
Disable Matching hides all overlays with the same key combination in the current clip, including the selected overlay.
To keep the first occurrence and hide only later repetitions, select those overlays individually and clear Show This Shortcut. This can help when a design tutorial repeats the same grouping command several times.
If a shortcut is missing, place the playhead at the relevant moment and choose More… > Add Shortcut… in the Smart Studio section. To correct an existing combination, select its Timeline bar and click Keys… in Properties.
After trimming footage or changing playback speed with the built-in video editor, review the affected shortcut sequences again.
Step 7: Export and Review the Video
To export the finished tutorial:
- Open the Export tab and select Video.
- Choose MP4 under Format.
- Specify the output file name and save location.
- Review the video dimensions and keep the output aspect ratio consistent with your Smart Studio setup.
- Click OK to export.
Open the exported file and check that each shortcut appears with the correct action, remains readable, and leaves essential controls visible.
Watch at the size learners are likely to use. If the tutorial will appear inside an LMS, use a similar player size for this final check.
How to Add Shortcut Labels to an Existing Video
Use manual labels when footage lacks the required Smart Studio action data or when you want a descriptive label such as Ctrl+S — Save.
To add a shortcut label in ActivePresenter:
- Open a Blank Project.
- Drag the video file from your computer onto the Canvas.
- Move the playhead to the relevant action.
- Select Insert > Text Caption.
- Enter the shortcut and, if helpful, a short description.
- Adjust the text’s appearance and position.
- Align the caption’s time bar with the action on the Timeline.
- Adjust its duration and preview the sequence.
Use a consistent appearance for subsequent labels. If the text is difficult to distinguish from the footage, add a contrasting background using the caption’s fill settings.
For example, an existing image-editing tutorial may show a layer being duplicated without explaining the keyboard command. A timed caption can identify the shortcut while the narration explains why a duplicate is needed.
These labels are added manually, so verify each combination against the application and operating system shown. Recheck their timing whenever you rearrange or retime the footage.
Optional: Display Keystrokes Live on macOS with KeyCastr
If viewers need to see shortcuts during a live demonstration, KeyCastr is a separate macOS keystroke visualizer.
To configure it:
- Download the latest KeyCastr release from GitHub, install it, and launch the app.
- Open System Settings > Privacy & Security > Input Monitoring.
- Enable KeyCastr and restart it if prompted.
- Choose whether to display command keys, modified keys, or all keystrokes.
- Position the display inside your recording area.
- Make a short test recording to confirm it is captured.
If the KeyCastr overlay is captured in your recording, it becomes part of the video image and cannot be edited separately afterward. Smart Studio overlays remain individually adjustable within the ActivePresenter project.
Best Practices for Clear Shortcut Displays
Explain What the Command Does
Pair the displayed combination with a brief explanation. For example, say “Press Control and Z to undo the last change,” then let viewers see the result.
Provide accurate captions or a transcript so the visual overlay is not the only source of instruction.
Identify the Operating System
State whether the demonstration uses Windows or macOS. Explain unfamiliar modifier symbols when your audience may not recognize them.
Verify application-specific alternatives before presenting them. Replacing Ctrl with Command does not produce the correct equivalent for every shortcut.
Show Commands That Support the Lesson
Hide accidental presses and unnecessary repetitions. Show a shortcut again when the reminder helps learners follow a later step.
For example, an IT tutorial might display Delete when teaching how to remove a sample file. Routine navigation keys do not need the same emphasis unless they are part of the procedure being taught.
Use Sample Information
Prepare sample text and accounts for demonstrations, especially when a live visualizer displays all keystrokes. Review the recording for unintended text exposure before publishing.
Common Problems and How to Fix Them
| Problem | What to check |
| Smart Studio is unavailable | Select exactly one eligible ActivePresenter recording containing cursor-path and action data. Make sure Green Screen is turned off. |
| An expected key is missing | Check Show Keyboard Shortcuts, Show Single Keys, and the individual overlay’s visibility. Add a missing shortcut manually if needed. |
| A shortcut shows the wrong combination | Select its Timeline bar and use Keys… in Properties to correct it. |
| A label appears too early or late | Adjust its Timeline position and review the surrounding action. |
| An overlay covers important content | Change its position, size, or duration. |
| Too many commands appear | Hide individual overlays, disable matching combinations, or adjust the live visualizer’s display settings. |
| KeyCastr is absent from the recording | Check whether the capture mode includes its separate overlay window. |
| A shortcut differs for viewers | Verify the application, operating system, keyboard layout, and customized bindings. |
Make Keyboard Actions Easy to Follow
Keyboard shortcut overlays help viewers connect a key combination with the action it performs. Use Smart Studio to generate editable overlays from compatible ActivePresenter recordings, or add text captions to existing footage.
Download ActivePresenter and try the workflow with a short tutorial of your own.
