Flip card is a kind of e-flashcards, which helps learners quickly recall information, reinforce and test their knowledge in an eLearning course. Learners will be able to click one side of a card to reveal corresponding concepts such as description, images, cues on the other side. There is only one thing that makes a flip card different from other types of e-flashcards is this card has a flip transition while the others don’t.
You might be thinking that creating such interactive elements requires complex coding skills. Not anymore! The beauty of modern eLearning authoring tools, like ActivePresenter, is that you can build engaging interactive flip cards in just a few clicks. Forget wrestling with lines of code; you can now focus on crafting compelling content that truly resonates with your learners.
So, in today’s article, we will continue introducing you to the way to create a flip card that contains the flip transition. It can be easily done by using the technique of showing/hiding objects. Let’s get started.
Before we dive into the step-by-step guide, make sure you have the essential tool at your fingertips: don’t forget to download ActivePresenter (free & no sign in required). With the software installed and ready, you’ll be perfectly positioned to follow along and showcase your eLearning course in no time. Let’s get started!

Create One Basic Flip Card Using Events – Actions
Similar to other types of e-flashcards, a flip card also normally consists of 2 sides: the front side and the back side. You can insert only one object in a slide. Then, use the Object States feature to create 2 sides of a card. But that way doesn’t allow you to create transitions when flipping between the 2 sides.
So you should insert two separate objects in a slide and use them as 2 sides of the card. And then use actions to show or hide the corresponding object to flip the corresponding side. To be more precise, the Show/Hide Object actions let you set up the showing/hiding effect so as a flip effect. Just follow my lead in a typical example:
Step 1: Create Two Sides of the Flip Card
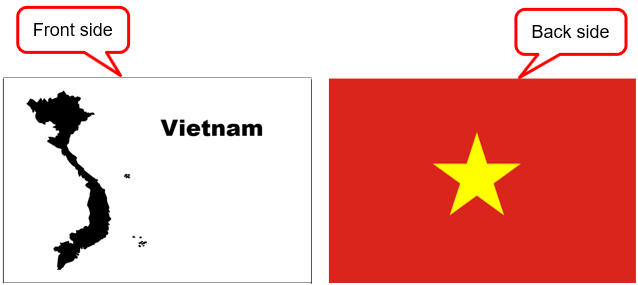
As said earlier, today’s main technique will be showing/hiding objects. So, to use this technique, you need to create each side of the card with a separate object such as an image or shape. You can insert all the objects you need in the Insert tab. For example, I am making a flip card about the map and the flag of Vietnam. So I’ve prepared two images, which are, the map as front side and the flag as back side as follows:
Step 2: Add Show/Hide Object Action to Each Side
The next step is adding the Show/Hide Object action to each side to flip the other side when learners click on it. For that to happen, on the front side, do the following:
- Insert On Click event.
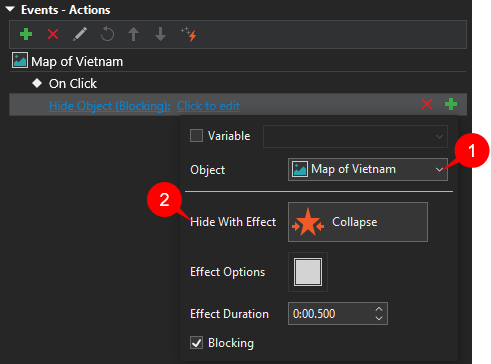
- Add Hide Object action > hide the front side (1) > choose the Collapse hiding effect (2).
- Add Show Object action > show the back side (3) > choose the Stretch showing effect (4). Remember to deselect the Hide After check box so that the image will not disappear after being shown for a period of time.
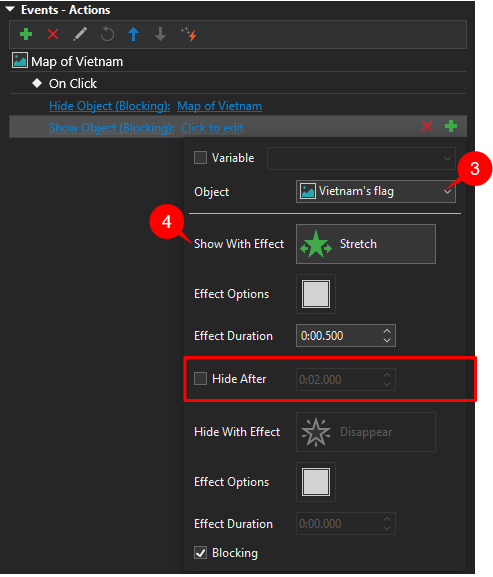
Note that to make this Show Object action work properly, you should hide the back side as soon as the project starts. To get it done, you can right-click it in the Timeline or on the Canvas, then select Initially Hidden.
Similarly, you can add the On Click event to the back side. Then add the Hide Object action to hide itself and the Show Object action to show the front side again. All settings should be the same as on the front side.

You can refer to work with events-actions for more reference.
Create A Set of Flip Cards Using Advanced Actions
If you want to create a large number of flip cards at a time, the Advanced Actions feature is here to help. It allows you to execute multiple actions at one time without repeating the same steps for each card. Thus, you can minimize your workflow and save yourself a lot of time and effort. Specifics are as follows:
Step 1: Create Advanced Actions
To create a new advanced action, click Advanced Actions in the Questions tab or the Properties pane. I’m going to add values for 3 sections, namely, Action Name, Parameters, and Actions in the Advanced Actions dialog in turn:
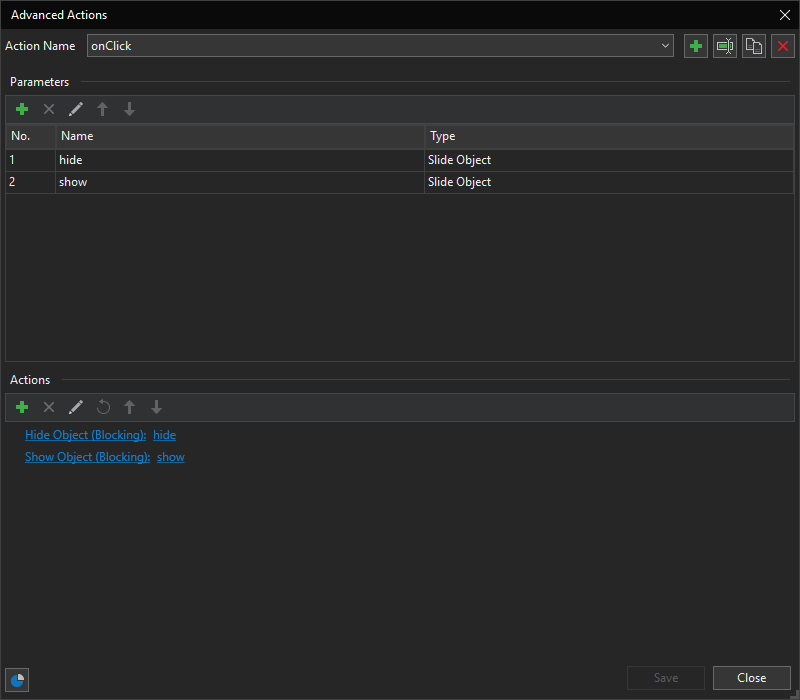
- Give a name for the advanced action, such as “onClick”.
- Add two parameters with their corresponding types. For example, I create two parameters and name them “show” and “hide”, and select the Slide Object type for each of them. This type can be used for the Show/Hide Object action that will be mentioned in detail in the Actions section right below.
- Add 2 actions using parameters created above. Particularly, add the Hide/Show Object action and apply for parameter “hide”/”show”, accordingly.
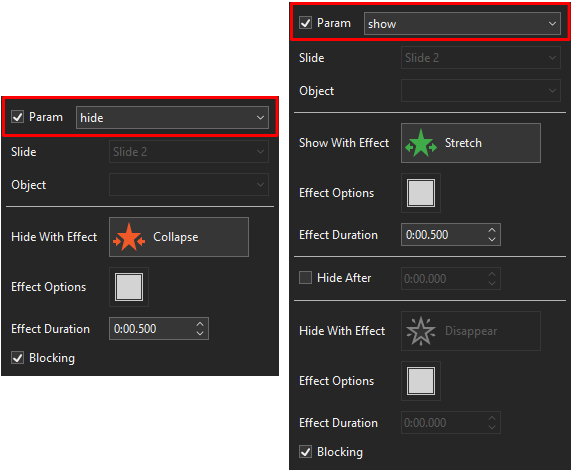
After all, click Save and Close to save the advanced action and close the dialog.
Step 2: Apply Advanced Actions to Events
Applying the advanced action to each side of a card will be the last step to complete the task of creating a set of flip cards.
To do that, on each front side, navigate to the Properties pane > Interactivity tab > Events – Actions. Here, you need to add On Click event and apply the advanced action “onClick” as the image below:
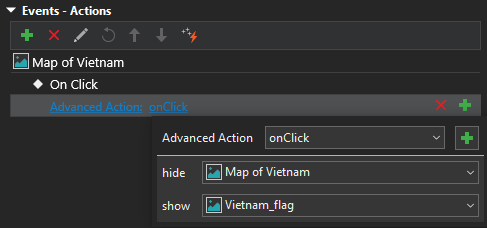
Then, reference the parameter “hide” to hide the front side. And reference the parameter “show” to show its corresponding back side.
Similarly, on each back side, you can inversely change the parameter to hide the back side and show its front side again.
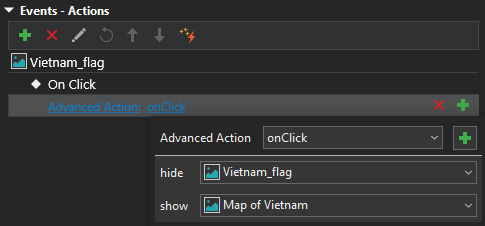
For other front sides or back sides, you just need to copy and paste the action and change the parameters.
Let’s take a closer look at Work with Advanced Action for further information.
That’s all. You have learned how to create interactive flip cards with ActivePresenter. Now, you can click HTML5 Preview in the Export tab to see the result. It will surprise you for sure. So, don’t hesitate to try it and share with us your result.
Summary
Say goodbye to static information and hello to engaging, self-paced learning experiences that truly resonate with your audience. Beyond interactive flip cards, ActivePresenter also offers a wealth of other interactive game templates and features you can explore for even more engaging learning activities. You can learn more about ways to create other engaging eLearning examples with ActivePresenter, don’t forget to follow our YouTube channel.