
In ActivePresenter 10.5, we fundamentally reimagined how instructional designers and developers interact with an eLearning authoring space. Instead of dividing these capabilities into a single, bloated system, we split our AI architecture into two separate, dedicated functions targeting completely distinct workflow bottlenecks within modern eLearning authoring tools .
In this tutorial, we’re going to show you how to use the new ActivePresenter AI Assistant in version 10.5. We’ll also guide you through how to connect with Claude Code, Codex or Gemini CLI via an MCP to get the most out of your course creation software .
If you don’t have the latest version of ActivePresenter, download it at the link below.

Part 1: The All-New AI Assistant (For Natural Language Authoring)
Traditional eLearning workflows often require navigating deep menus, sub-panels, and timeline setups just to execute standard design tasks. We integrated the built-in ActivePresenter AI Assistant to replace menu-hunting with conversational, natural language commands.
- The Goal: Speed up core content creation for all authors.
- How it helps: Operating directly within a dedicated sidebar panel, it acts as a context-aware co-creator. By shifting between safety-first profiles like Consultative (Chat Only), Smart, or Auto Approve, the built-in assistant can analyze slide variables, translate full projects, rewrite narration, and automatically inject physical objects directly onto your active canvas based on a simple chat prompt.
Here are a few steps to help you familiarize yourself with ActivePresenter 10.5 new AI Assistant:
Step 1: Open the New AI Assistant Pane
ActivePresenter 10.5 features a completely overhauled AI workspace panel designed for conversational authoring.
- Launch ActivePresenter 10.5 and open or create a project.
- Navigate to the top ribbon and select the AI tab.
- Click on AI Assistant to toggle open the dedicated chat sidebar pane.
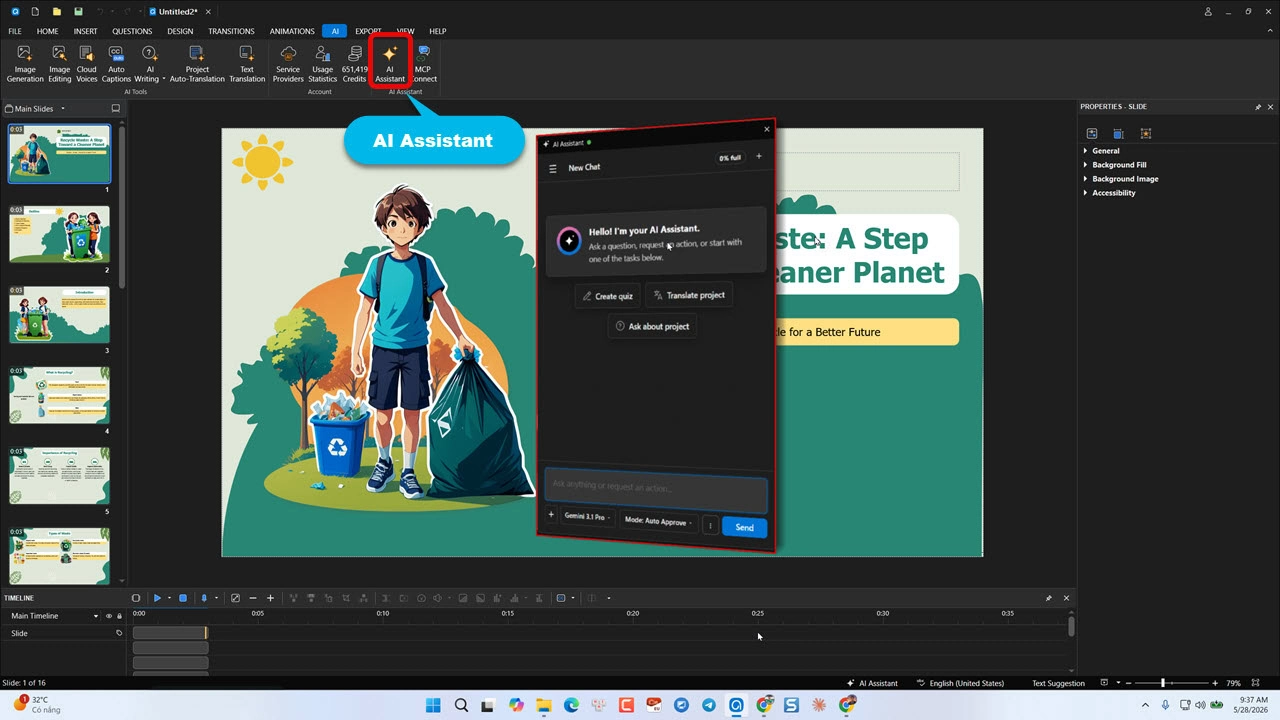
Step 2: Configure Your Permission Mode
To balance speed and safety when the AI interacts with your slides, choose a permission profile at the top of the AI Assistant pane:
| Mode | Behavior | Best Used For |
| Consultative (Chat Only) | The AI can analyze project data to answer questions or write code scripts inside the chat box, but cannot make direct modifications to your project files. | Ideation, scaffolding scripts, or structural reviews. |
| Always Ask | The AI generates solutions and explicitly prompts you to click “Approve” before any changes are executed on your active canvas. | Precision slide editing and layout adjustments. |
| Smart | The AI acts autonomously for routine layout edits but pauses to ask for confirmation during critical or structural project changes. | Rapid course building and continuous asset generation. |
| Auto Approve | The AI executes all actions, edits, and script injections seamlessly without pauses. | Power users automating heavy layout shifts or mass question imports. |
🌟 New Advanced Capabilities in Version 10.5:
- Flexible LLM Model Selection: ActivePresenter 10.5 gives you granular control over the “brain” behind the assistant. Using the built-in model selector, you can switch between leading Large Language Models (LLMs) from Google, Anthropic, and OpenAI directly inside the chat panel. This allows you to choose specific models optimized for speed, context size, or advanced logic, and even control the Thinking Level (adjustable reasoning depth) based on the complexity of your request.
- Multimodal Input (Analyze Text, Audio, and Video): The AI Assistant now acts as a comprehensive project auditor. Beyond standard text prompts, you can input or attach diverse file types—including documents, images, audio clips, and video files—directly into the panel. The assistant can listen to raw audio to suggest perfect closed caption timings, analyze video segments for asset consistency, or process complex storyboards to generate full interactive quizzes instantly.
📌 Important Notes & Prerequisites:
- ActivePresenter Pro License Required: These premium AI Assistant features are exclusively available to users with a valid, activated ActivePresenter Pro license. You cannot test or access it in the Free or Trial editions, as third-party AI service capabilities are restricted to licensed environments.
- AI Credits Consumption: Every action performed by the native AI Assistant (such as layout generation, content writing, or multimedia asset analysis) consumes AI Credits.
- Shared Infrastructure: If you have multiple computers activated under a single license key, your allocated ActivePresenter AI cloud credits are shared dynamically across all activated devices. Once your credit pool is exhausted, you can top up your balance, or seamlessly offload massive code tasks to your own developer subscriptions using MCP Connect.
Part 2: MCP Connect (For External Power-User Automation)
While the native AI Assistant is optimized for rapid content production and quick layout edits, advanced developers frequently require specialized programming engines to build complex, conditional logic or custom HTML5/xAPI scripts. We integrated MCP Connect to transform ActivePresenter into a localized Model Context Protocol (MCP) environment.
- The Goal: Leverage the full analytical, coding, and automated execution power of leading AI frameworks to control your authoring environment.
- How it helps: Instead of relying strictly on standard text generation, external AI developer agents (via MCP Connect) gain direct access to ActivePresenter’s internal application control tools. This allows the AI to act as an external operator that can fully automate heavy design pipelines directly inside your software—such as generating complete courses from structured text documents, auto-generating complex interactive quizzes, or mathematically aligning and designing slide layouts without you needing to click a mouse.
🚀 How to Establish an MCP Connect Bridge
Because ActivePresenter 10.5 functions as a standard, compliant local MCP server, you can pair it with external developer frameworks using terminal environments. Follow these step-by-step connection workflows for the three supported agents:
🛠️ Common Prerequisite Step
Before connecting any individual agent, you must initialize ActivePresenter’s local communications pipeline:
- Open ActivePresenter 10.5 and navigate to the AI tab on the top ribbon.
- Click MCP Connect to open the panel, then open Settings > MCP Connect.
- Toggle the connection switch to START (this starts the local server listener, exposing the project context securely to your system loop).
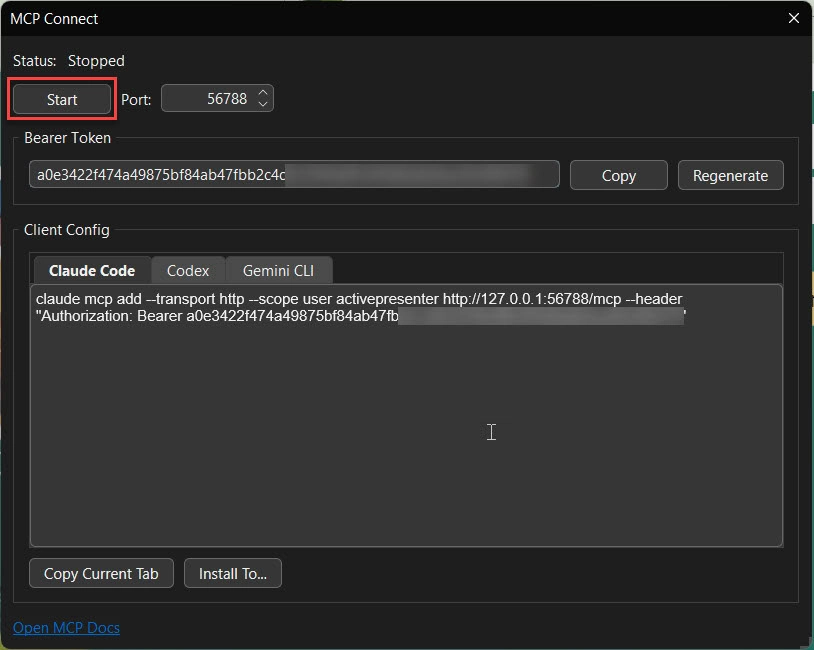
Follow these step-by-step connection workflows for your preferred developer agent:
1. Connecting & Controlling via Claude Code
Claude Code is exceptionally powerful at understanding deep project contexts, auditing instructional schemas, and executing multi-step automation sequences to design slides or compile course assets.
In order to install Claude Code on your device, follow the instructions at this url: https://code.claude.com/docs/en/quickstart
Once your Claude code is ready, you can simply check if Claude Code is connected to ActivePresenter or not with a simple prompt: “check MCP Connect with ActivePresenter”
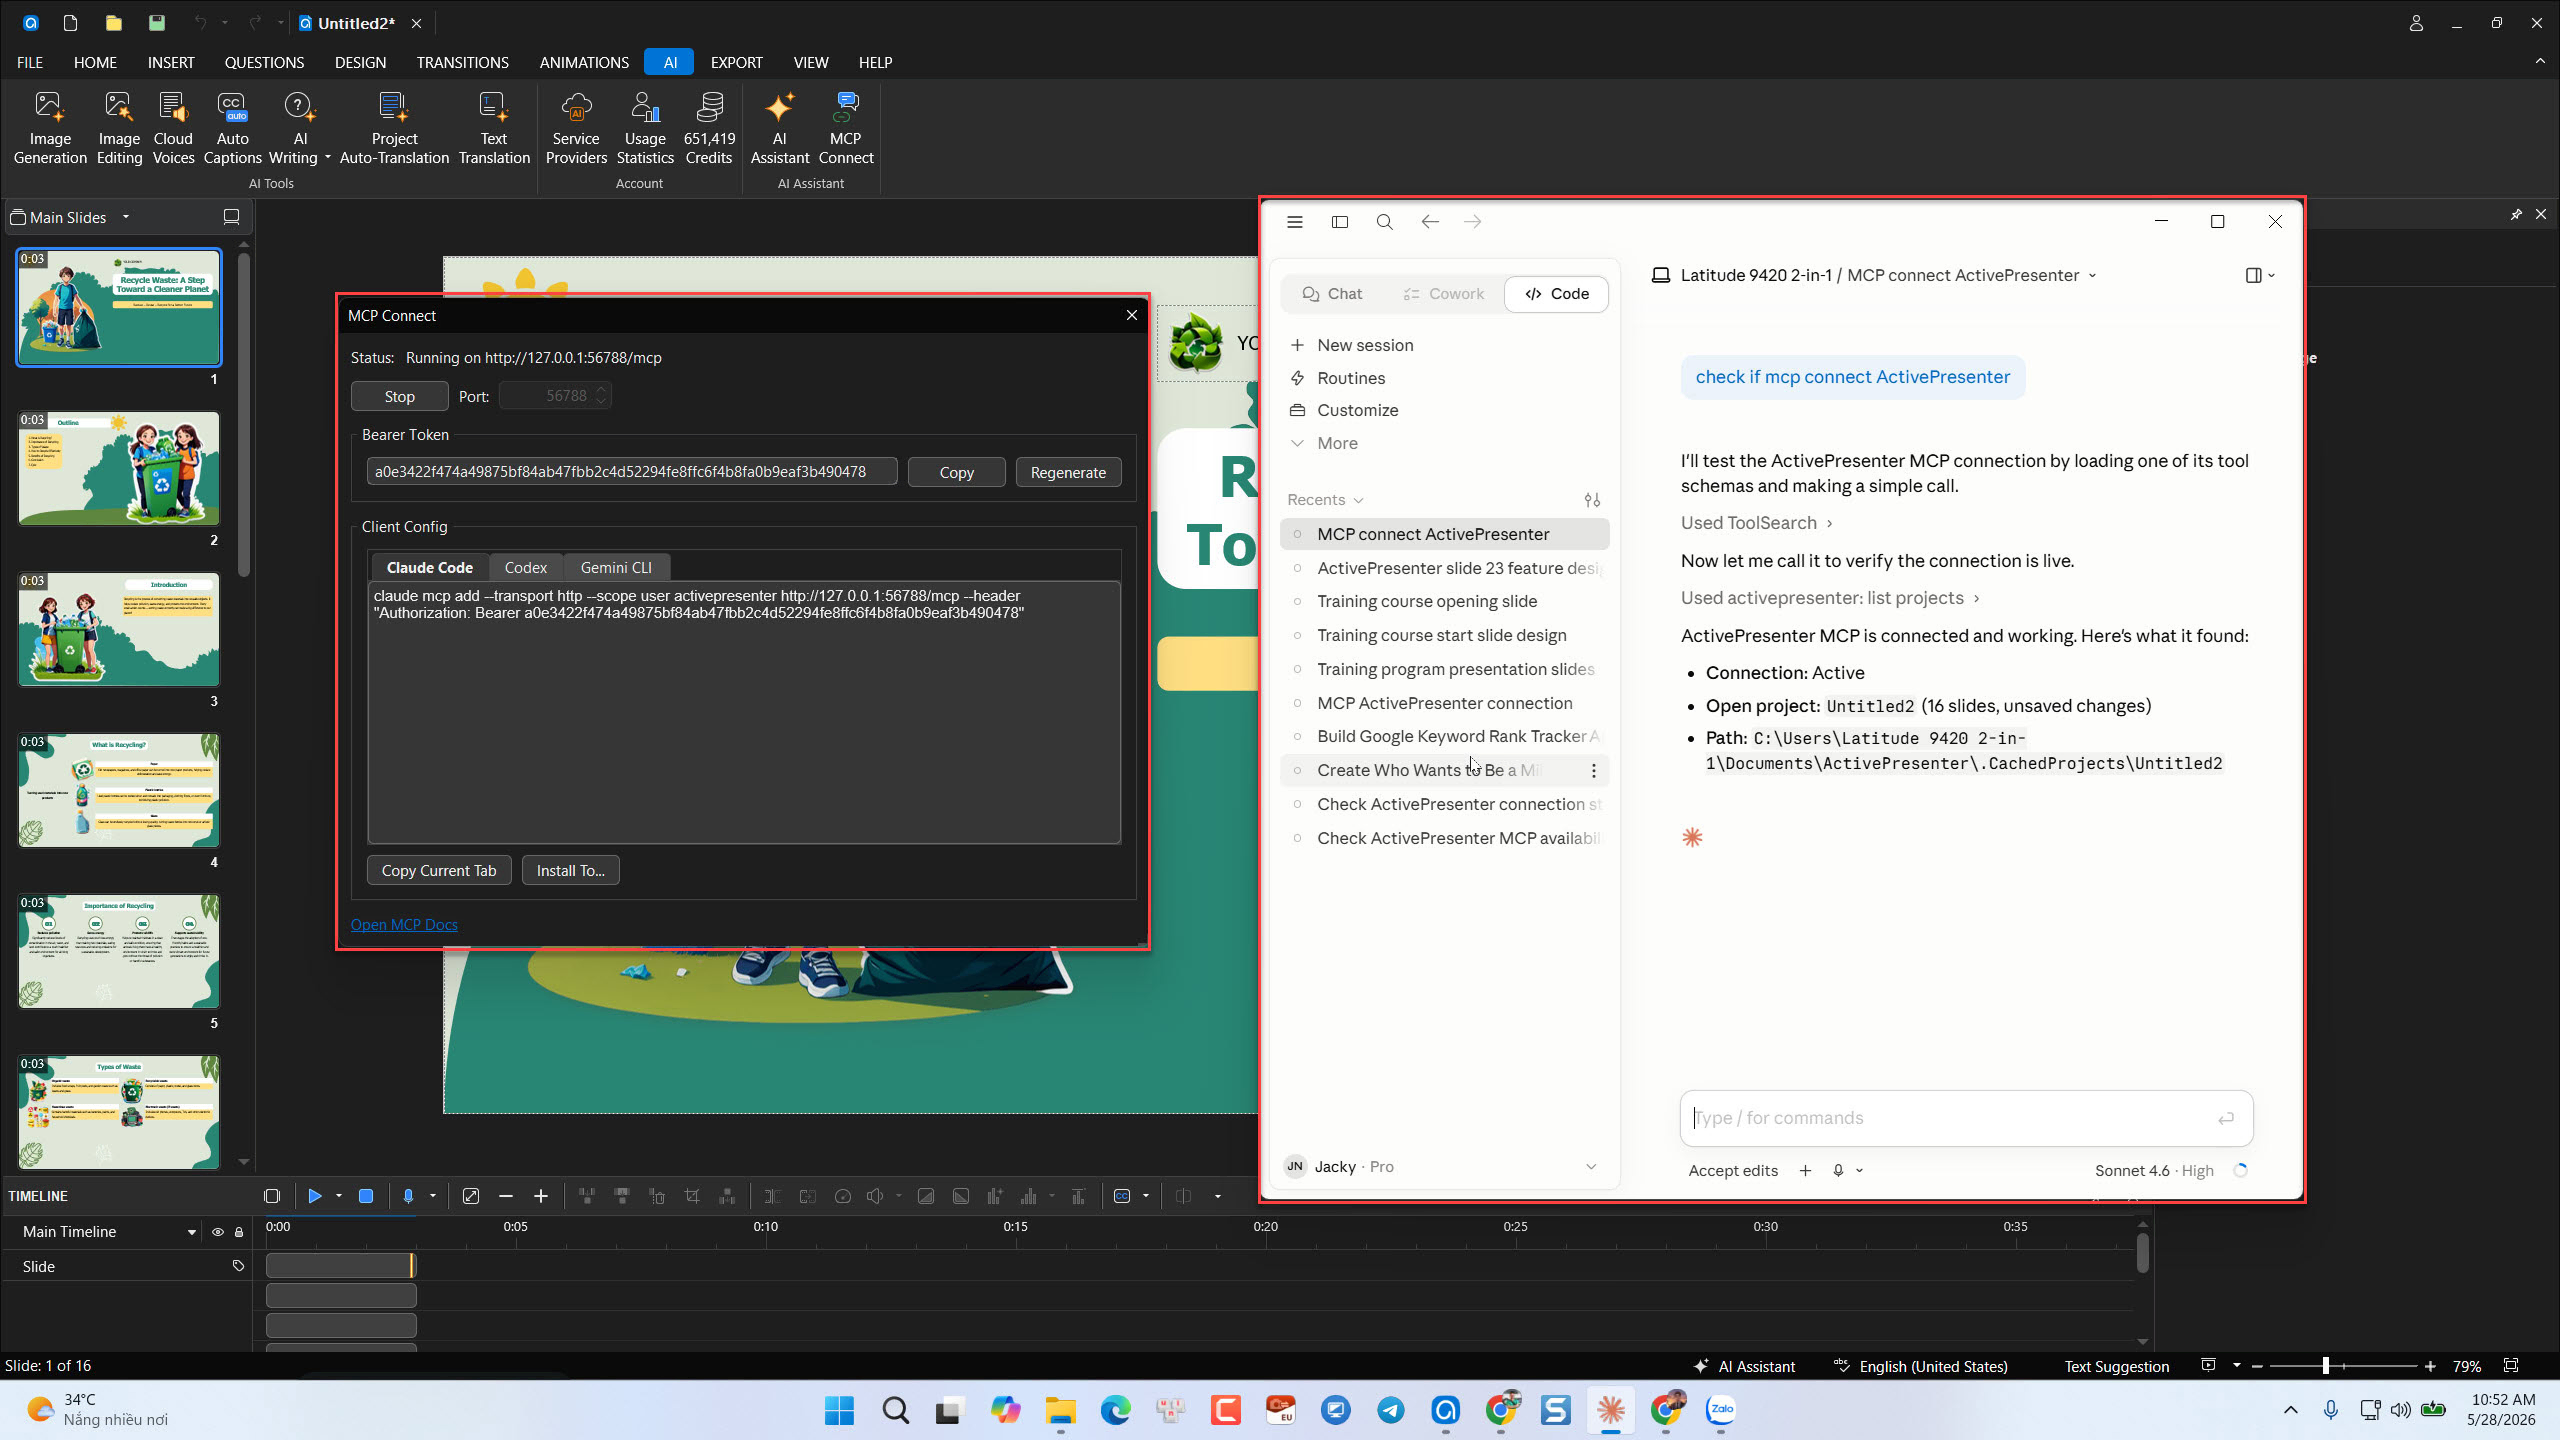
⚠️ Special Notes for Claude Code Integration:
- ActivePresenter Server Verification: Before running your connection scripts in the terminal, check the configuration window you opened via AI > MCP Connect and make sure the MCP status explicitly reads “Running”. If the local server pipeline is not actively running, the external agent will not be able to find or sync with your project canvas.
- Anthropic Account Subscription Requirements: Claude Code is not accessible on standard free-tier Anthropic accounts. To utilize this command-line tool, you must have an active paid developer subscription tier (Claude Pro or Claude Max) with available usage balance under your Anthropic account.
2. Connecting & Controlling via OpenAI Codex
OpenAI Codex specializes in transforming complex, natural language instructional logic into interactive slide builds and fully mapped, variable-driven quiz modules.
In order to install OpenAI Codex on your device, follow the instructions at this url: https://platform.openai.com/docs/guides/code-generation
Once your OpenAI Codex is ready, you can simply check if OpenAI Codex is connected to ActivePresenter or not with a simple prompt: “check MCP Connect with ActivePresenter”
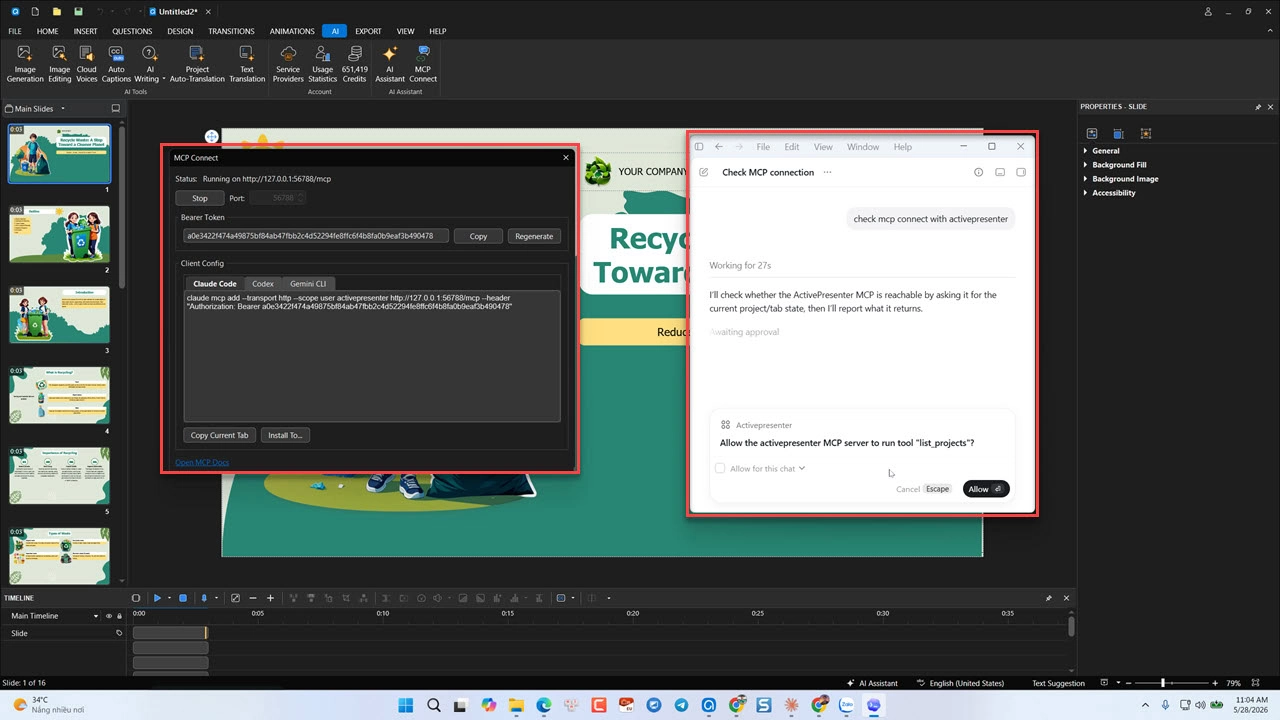
⚠️ Special Notes for OpenAI Codex Integration:
- ActivePresenter Server Verification: Before running your connection scripts in the terminal, check the configuration window you opened via AI > MCP Connect and make sure the MCP status explicitly reads “Running”. If the local server pipeline is not actively running, the external agent will not be able to find or sync with your project canvas.
- OpenAI Account & API Key Requirements: OpenAI Codex requires a ChatGPT account or valid API Key linked to an active developer account. To utilize this integration seamlessly without hitting standard rate limits, you must have an active paid tier account with an available usage balance or credit tokens under your OpenAI platform billing profile.
3. Connecting & Controlling via Gemini CLI
The Google Gemini CLI pipeline thrives on processing massively long context strings, making it the ideal choice when you want the AI to read an entire e-book or massive technical manual and instantly map out an organized course architecture.
In order to install Gemini CLI on your device, follow the instructions at this url: https://geminicli.com/
Once your Gemini CLI is ready, you can simply check if Gemini CLI is connected to ActivePresenter or not with at the command prompt:
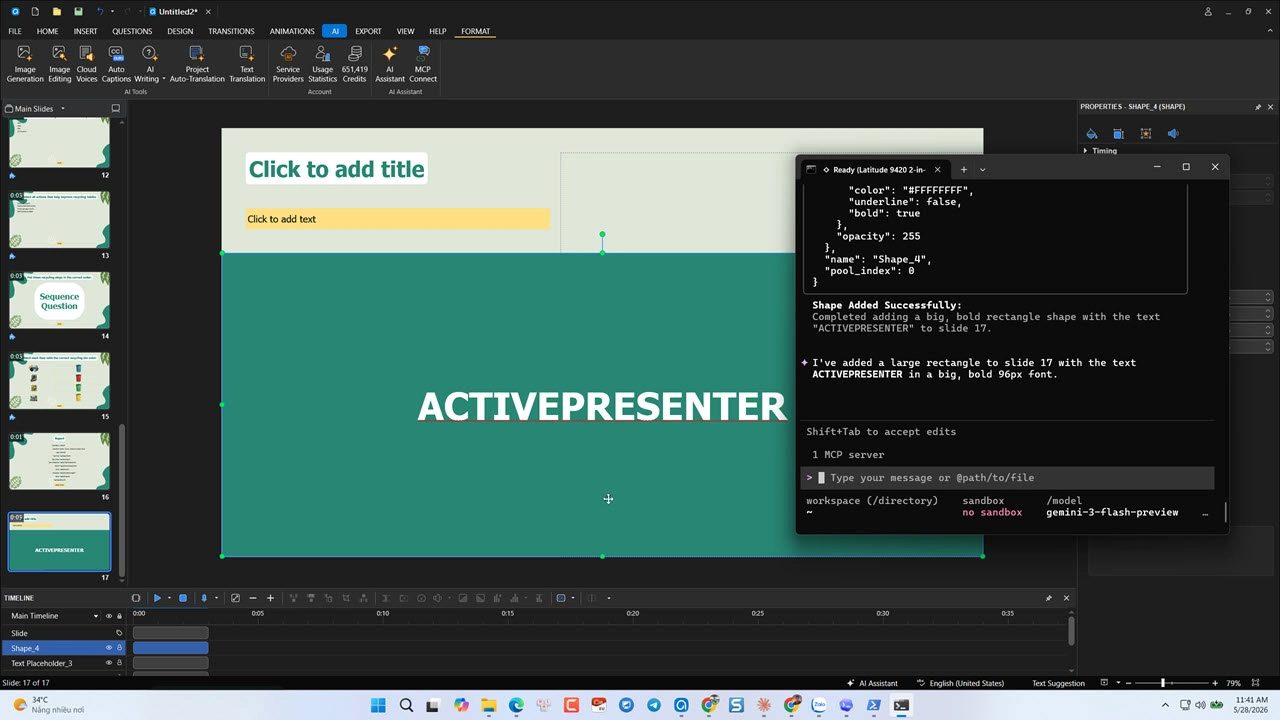
⚠️ Special Notes for Gemini CLI Integration:
- ActivePresenter Server Verification: Before running your connection scripts in the terminal, check the configuration window you opened via AI > MCP Connect and make sure the MCP status explicitly reads “Running”. If the local server pipeline is not actively running, the external agent will not be able to find or sync with your project canvas.
- Google AI Studio / Cloud Requirements: The Gemini CLI relies on active project authentication. You must have a verified Google AI Studio account or Google Cloud Project with the Gemini API enabled, alongside a valid API token or billing setup to handle advanced automated tasks.
Conclusion:
The addition of the native AI Assistant and MCP Connect features in ActivePresenter 10.5 marks a massive shift in how courseware is built. Whether you prefer using natural language to rapidly build out slides directly inside the app, or leveraging the automated coding power of tools like Claude Code, OpenAI Codex, and Gemini CLI to script complex interactivity, your development workflow will never be the same.
By eliminating technical bottlenecks and opening up direct tool-driven automation, ActivePresenter 10.5 gives you the freedom to focus entirely on what matters most: delivering impactful, high-quality learning experiences.
Ready to build smarter, faster courses?
Don’t let rigid menus or complex coding workflows slow down your creativity. Take your instructional design to the next level and experience the full power of agent-driven automation today.