Ever played those cool picture reveal games where a hidden image slowly appears as you wipe away layers? Guess what? You can totally make those yourself using a super handy eLearning authoring tool called ActivePresenter!
It’s like having a magic toolbox for creating awesome interactive stuff, and yes, that includes making your very own picture reveal games. It’s easier than you might think, and you can get super creative with it.
Let’s dive in and see how you can create your own picture reveal game to life!
Description
Picture Reveal Game is a popular game that consists of 4 puzzle pieces covering a complete picture. To get clues, players have to answer corresponding questions on the board correctly. Their job is to try to open the pieces to guess what the picture is.
In case you haven’t downloaded ActivePresenter yet (free & no sign in required), go head and follow this tutorial step-by-step!

How to Play
4 pieces are 4 clues of the keyword related to the hidden picture. Players click a puzzle piece to open a question. If they answer it correctly, the corresponding piece will open. If the answer is incorrect, no piece will open and the players are unable to answer it again.
To submit the keyword, the players type their answer into the answer box, then press Enter or click the Submit button.
Steps to Create Picture Reveal Game
Below are steps to create this game:
- Create Puzzle Slide
- Create 4 Question Slides
- Customize Feedback Layers
- Add Interactivity
- Preview and Export Game
Step 1: Create Puzzle Slide
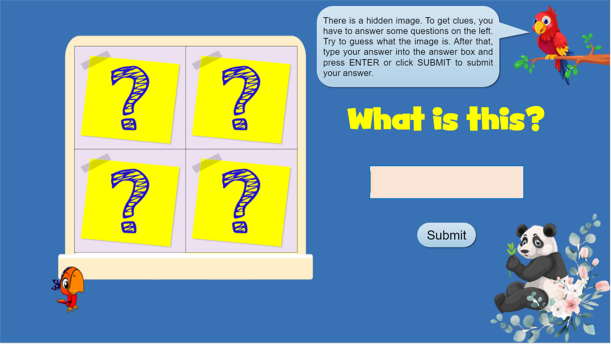
This slide includes three main parts, the instructions, puzzle question, and 4 pieces with a hidden picture. To create this slide, perform the following:
1.1. Insert a Question with Media slide. (Home tab > New Slide > Question with Media).
1.2. Insert other objects such as the picture, 4 pieces, animal images for decoration, and instructions. (Insert tab > Image). Then, customize the sizes and drag them to the suitable position.
1.3. Add the puzzle question content, style the font, size and set its correct answer.
- Select Insert Fill in Text Entry Question.
- Double-click the question title to type text into it.
- Style the font and size of the text in the Home tab > Font section.
- Set the correct answer in the Properties pane > General > click the Add Value button and type the correct answer. Uncheck the Case Sensitive option in the Score & Reporting section.
For more information, please visit How to Create Fill in Text Entry Question.
Step 2: Create 4 Question Slides
In this Picture Reveal game, there are 4 pieces of puzzle equivalent to 4 questions, so we need to add 4 slides. To save time, we use Slide Master to create a question slide layout for all of these 4 questions.
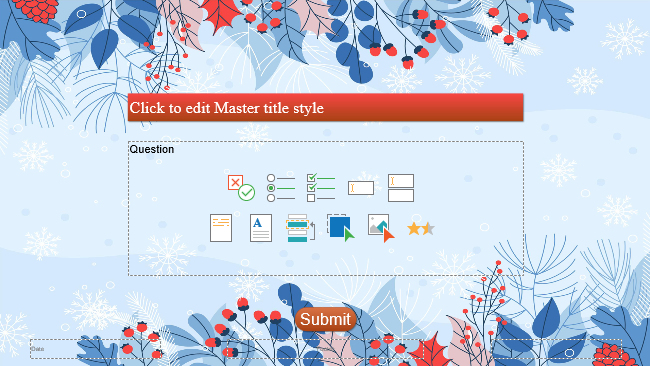
2.1. Open Slide Master. (View tab > Slide Master).
2.2. Select the Question Layout and customize it. For example, I add a background image (Properties pane > Slide Properties tab > Background Fill > Image Fill > select an image from the computer), edit the text size and color of the question.
2.3. Add slide transition. (Transitions tab)
2.4. Close Slide Master after having done creating the question slide layout.
2.5. In normal view, add the slide layout you have created in Slide Master to add new questions.
For more information, please visit Use Slide Masters.
Step 3: Customize Feedback Layers
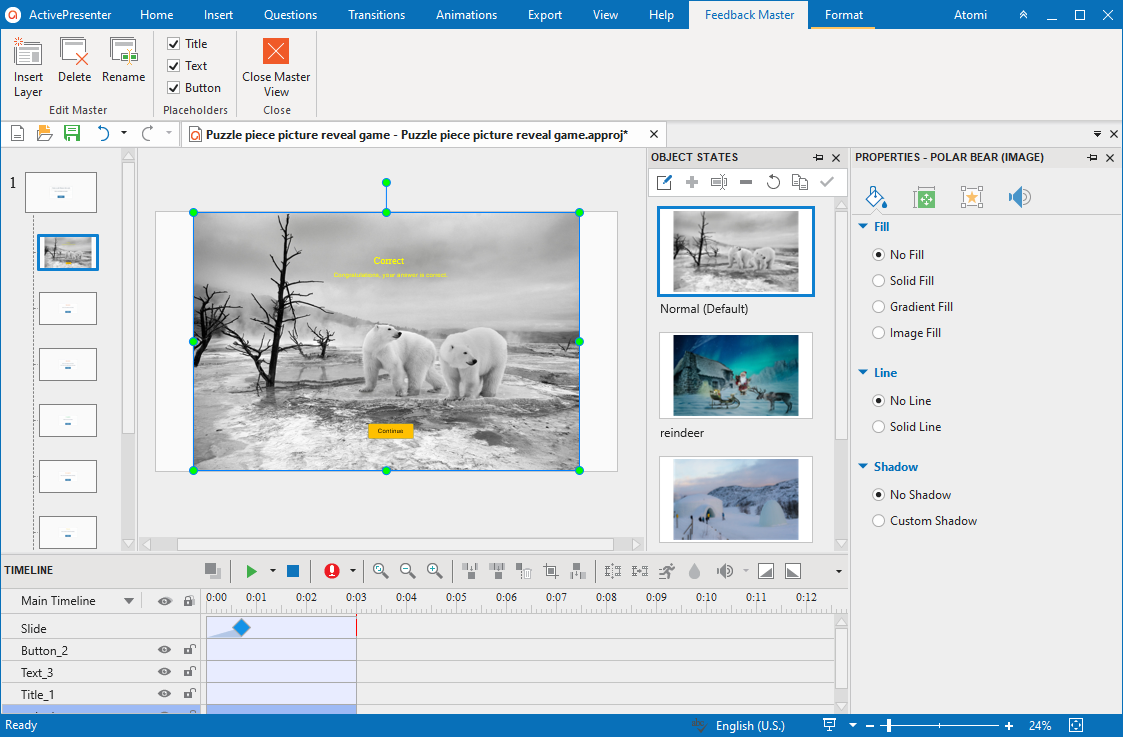
Since I would like to show an illustrating image for a correct answer, I will customize the correct feedback layer as follows:
3.1. Select the Correct Feedback Layer. (View tab > Feedback Master > Correct Feedback Layer).
3.2. Add an illustrating image for the first question. (Insert tab > Image).
3.3. Add states for this image. 3 states are images of the other questions. (View tab > Object States > Add > name new states.
3.4. Edit color, font.
3.5. Add Go to Slide 1 action to the Continue button.
3.6. Add slide transition to this layer. (Transitions tab > Wipe > From Bottom-Left).
3.7. Add Go to Slide 1 action to the Continue button of the Incorrect Feedback Layer.
3.8. Perform similar steps for other feedback layers if you want.
3.9. Close the Feedback Master.
For more information, please visit Use Feedback Layers.
Step 4: Add Interactivity to Picture Reveal Game
After having created all the objects of the Picture Reveal game, we need to add interactivity to them. This is also the most important part that can help the player to be able to interact with the game.
4.1. Interactivity for the instructions: show detailed instructions and voice commands when players click the instruction board.
When the game starts, there is an instruction board appearing at the top right corner of the screen. When the player clicks this board, the detailed instruction is showing up while the board is disappearing.
To create a voice for the instructions, we use text to speech function. (In the Properties pane > Audio > Generate text to speech).
We add actions for this part as follows:
- Hide the detailed instruction initially. (right-click the object > Initially Hidden).
- Instruction board: Add the 2 following actions:
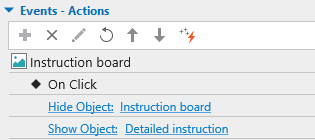
For more information, please visit Work with Events-Actions.
4.2. Interactivity for answer section of the puzzle question: show stars and audio voice.
Create an interactive timeline for the stars: Timeline 1. For more information, please refer to Use multiple timelines.
Create stars in this timeline:
- Insert tab > Shape > Star: 5-points.
- Fill color and add shadow to the stars (Properties pane > Style & Effects).
Add motion paths to the stars. (Animations tab > Motion Path). For more information, please visit Add and edit object motion paths.
Hide the stars initially. (right-click the stars > Initially Hidden).
Add 2 actions to the answer section as follows:
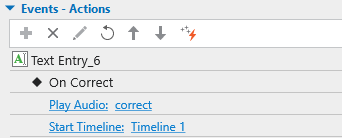
4.3. Interactivity to link between puzzle pieces and question slides
We add the Go to Slide action to the On Click event of each puzzle piece.
Piece 1: On Click > Go to Slide: Slide 2
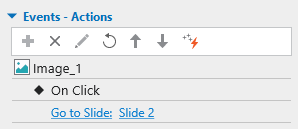
Similarly, piece 2: On Click > Go to Slide: Slide 3.
Piece 3: On Click > Go to Slide: Slide 4.
Piece 4: On Click > Go to Slide: Slide 5.
Now, we need to focus on the combination of actions of puzzle pieces in slide 1, answers of 4 questions, and each correct answer.
4.4. Interactivity after the players answer a question: open a puzzle piece or disable it.
A puzzle piece will open if the player answers a question correctly.
If the player answers incorrectly, the puzzle piece will change to the disabled state.
Here is how we style the disabled state:
- Add disabled state to a puzzle piece by using the Object States feature. (View tab > Object States.)
- Add icon to this state: Insert tab > Icons > draw an icon onto the Canvas > delete the icon. The icon now has been saved in the Resources pane.
- Navigate to the Object States pane > Add the Disabled state.
- Add icon to this state: Properties pane > Size & Properties section > Source > From Project…
- Add a borderline to this state: Fill > Solid Line.
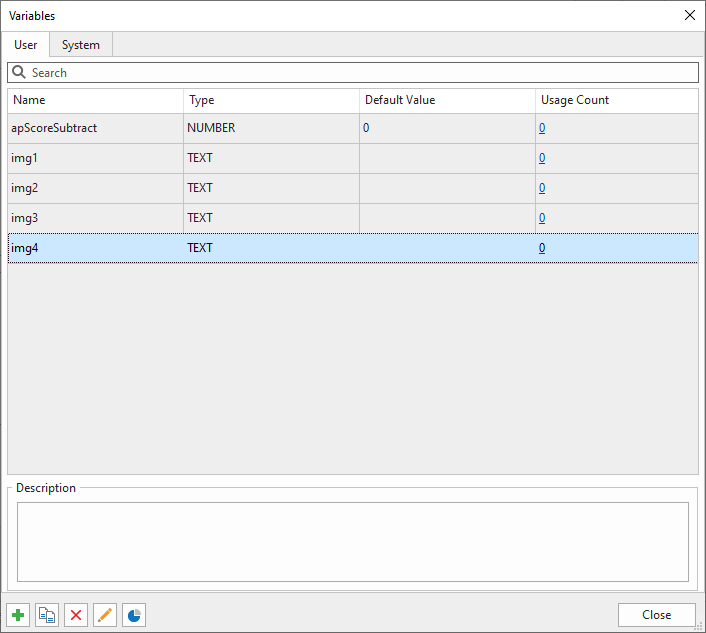
After that, we need to add variables and actions to each puzzle piece as follows:
Add text variable. (Home tab > Variables > click the Add button to add). For more information, please visit Use Text Variables.
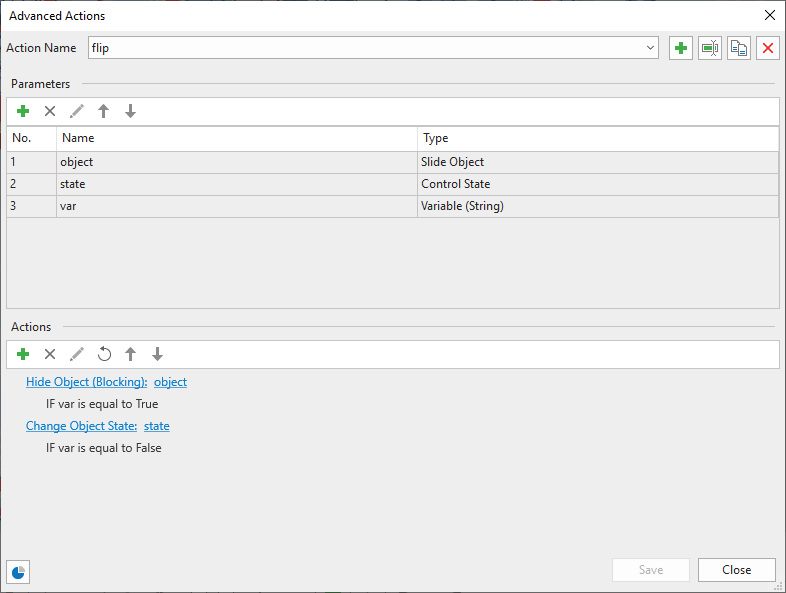
Add advanced action to Slide 1. For more information, please visit Work with Advanced Actions.
4.5. Interactivity for correct feedback layer
When players answer correctly, set the text variable to value True and show the image for illustration.
Since each correct answer shows a corresponding image for illustration, we use the True/False variable for each image. For example, set image 1 is equal to value True, the other images are equal to value False. If the answer is incorrect, then show image 1.
We create the True/False variables with the default values are False. For more information, please visit Use True/False variables.
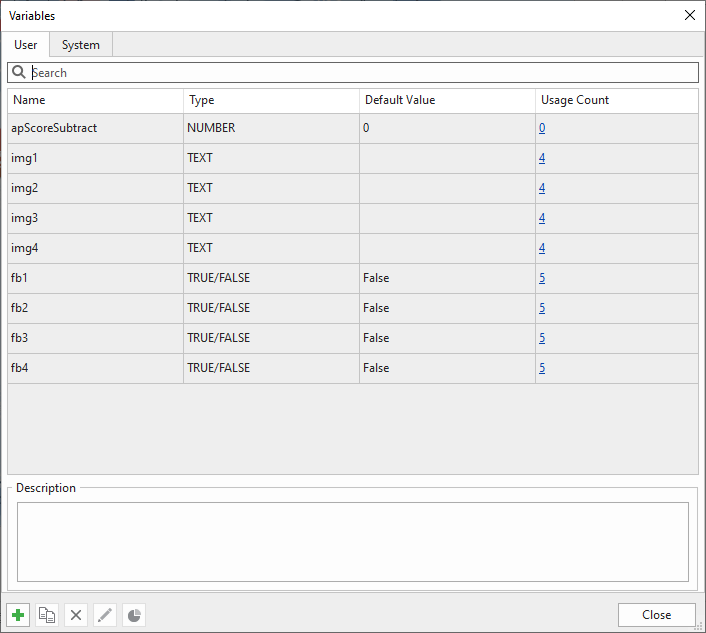
Then, we create advanced action for the On Correct event of each question as follows:
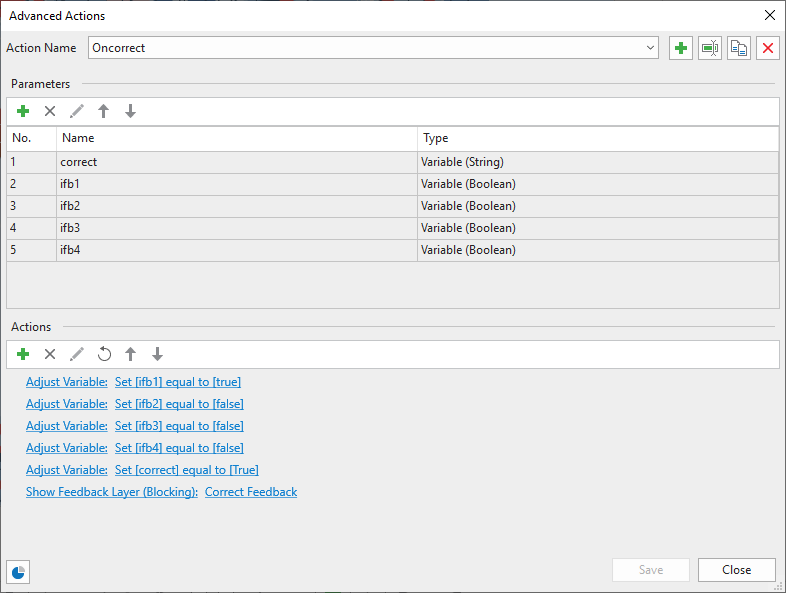
4.6. Interactivity for incorrect feedback
If players answer a question incorrectly, incorrect feedback will show up. So, we create the advanced action for this event like this:
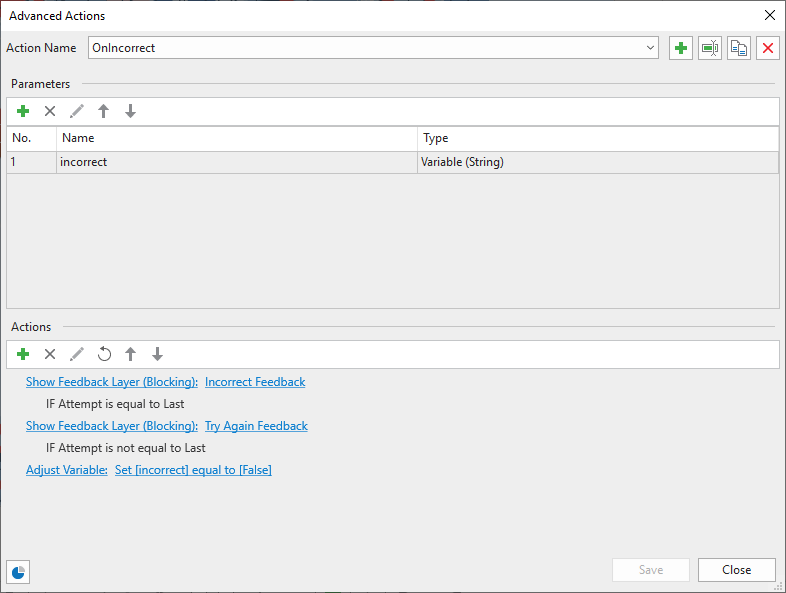
After that, we add the On Correct action to the 4 question slides:
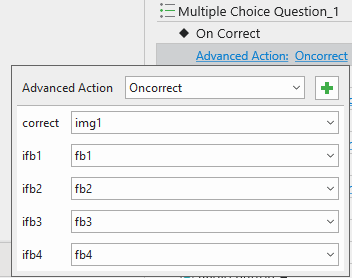
and the On Incorrect action like this:
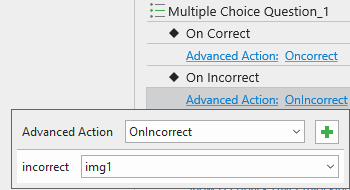
Finally, add the flip action to the OnLoad event of Slide 1:
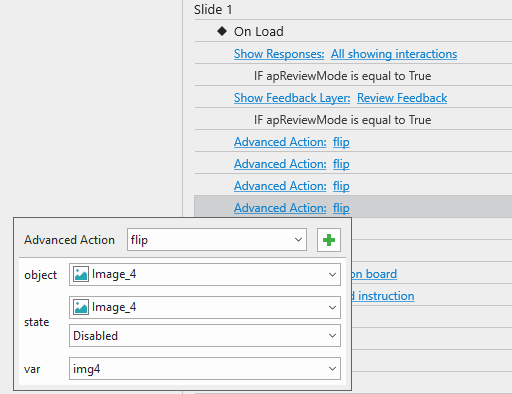
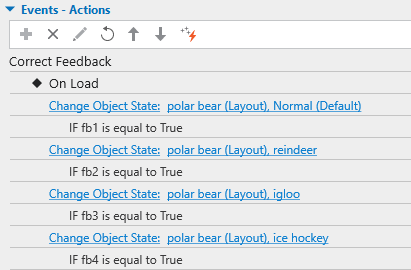
4.7. Customize images for correct feedback
Open the Feedback Master and add the following actions to the On Load event of the Correct Feedback Layer.
Step 5: Preview and Export Picture Reveal Game
The final step to complete this game is Exporting. HTML5 output will help the players interact with the game. Therefore, we will export the Picture Reveal Game to HTML5. However, one step right before that is to preview the game. This helps us to know how the game actually works by pressing F5 on the keyboard or clicking the HTML5 Preview button. The game then operates in a web browser and you can interact with it as when it has been published.

So, that’s all about how to create the Picture Reveal Game with ActivePresenter. Don’t forget to follow our blog to learn more about how to create other interesting eLearning games.
You can download the Picture Reveal Game here (make sure you have downloaded ActivePresenter)
See Also: