In the previous blogs, you’ve learned about creating some interactive games such as Hidden Objects, Picture Reveal in ActivePresenter.
For those who are new to ActivePresenter, it is an all-in-one authoring tool for creating interactive eLearning content. Its intuitive interface and powerful features empower users to design engaging learning experiences without requiring coding knowledge.
You can download ActivePresenter with no time limited for trial use and no sign in required and follow this step-by-step tutorial.

In today’s article, I want to introduce you to another game, that is Save the Beach. This game not only makes lessons become engaging but also helps students enhance their awareness of environment protection. Let’s keep reading to learn how to create the Save the Beach game.
This article covers:
- How to Play the Save the Beach Game?
- What Do We Need to Prepare?
- What’s the Game’s Layout?
- How to Create the Save the Beach Game?
How to Play the Save the Beach Game?
Our beautiful beach is gradually becoming polluted with rubbish, players are required to clean it. When players click any rubbish image, the game will navigate to a question slide and require them to answer. If they answer correctly, that selected rubbish image will disappear. Keep doing that until the beach becomes clean. By contrast, if players answer wrongly, they need to try again.
What Do We Need to Prepare?
Before creating the Save the Beach game, you need to prepare:
- Rubbish images
- Beach image as the background image
- Congratulations sound
- Wave sound as the background music
- A 10-slide project: Open the Home/Insert tab > New Slide to add new slides.
What is the Layout of the Save the Beach Game?
Before designing any game, you should think about the game’s layout first.
For this game, we will create a 10-slide project like this:
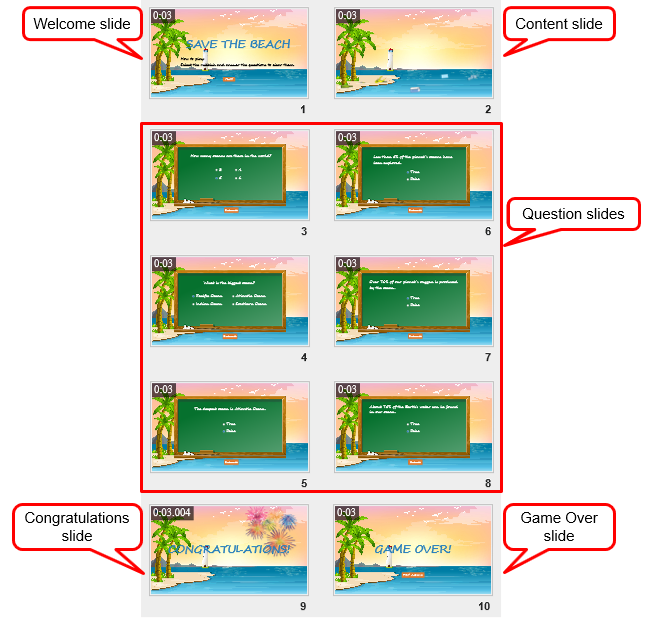
It includes:
- Welcome slide: Slide 1.
- Content slide: Slide 2
- Question 1,2: Slide 3,4 – Multiple Choice Questions. See How to Create Multiple Choice Questions for details.
- Question 3,4,5,6: Slide 5,6,7,8 – True/False Questions. See How to Create True/False Questions for details.
- Congratulations slide: Slide 9.
- Game Over slide: Slide 10.
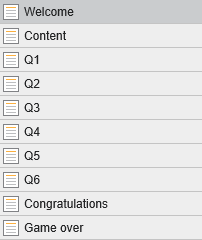
After adding 10 slides and creating the game’s layout, you should rename them. Thanks to that, you can easily work with and control them when creating the game. To rename slides, do as follows:
- Right-click the Slides pane > Slides In Titles.
- Double-click each entry and input a new name.
- Click OK to save and finish.
How to Create the Save the Beach Game?
This section walks through:
- Create Welcome Slide
- Set up Content Slide
- Create Question Slides
- Design Congratulations Slide
- Design Game Over Slide
- Add Transition Effects
1. Create Welcome Slide
Welcome slide is the first slide. It gives general information about the game.
1.1 Set up Welcome Slide
Set up the Welcome slide including: a background image, game’s name, instruction and the Play button.
- Add background image: In the Properties pane, Slide Properties tab > Fill section > Image Fill > select an image from your computer.
- Add the game’s name and instruction: Open the Insert tab > Text Caption > input your text. You can customize the Font Name, Font Size, etc., in the Home tab, or Fill, Shadow, etc., in the Format tab.
- Add the Play button: Insert tab > Button. When players click this button, it navigates to the next slide, then they can play the game.
- Deselect Auto Advance option: Open the Slide Properties tab > General section > uncheck this option. Thanks to that, the presentation doesn’t navigate to the next slide immediately when the current slide ends. Do the same to the Content, Congratulations and Game Over slide.
1.2 Add Events – Actions
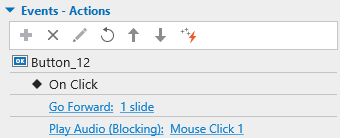
When players click the Play button, it navigates to the Content slide. Therefore, you need to add the On Click events to it.
- Select the Play button.
- Open the Interactivity tab of the Properties pane.
- Click Add Event button > On Click in the Events – Actions section.
- Select Add action > Go Forward, or Go to Slide > Content.
- Add Play Audio action (optional).
Additionally, you can add Entrance Effects to the game’s name, instruction and Play button (Animations tab > Entrance Effects).
1.3 Add Background Music
Background music can make the game become more engaging and interesting. To add background music, open the Insert tab > Audio > From File… > choose one audio file from your computer.
By this way, background music has been inserted into the Welcome slide only. To make it play over multiple slides, right-click it > Play over Multiple Slides > Top Layer.
In case the duration of background music is shorter than that of the presentation, you need to loop it. Do as follows:
- Select the background music > Media tab in the Properties pane > Playback Options sections > tick the Loop checkbox.
Note: You should select the Background Music checkbox to keep it playing when the presentation is paused to wait for user input.
- Right-click it > Play to End of Slide.
2. Set up Content Slide
The Content slide is the main slide containing rubbish image objects.
2.1 Design Content Slide
To add images, open the Insert tab > Image > choose rubbish images that you’ve prepared. Then, arrange them as you want.
Tip: For easy editing, you should rename the images. Select an image > Properties pane > Interactivity tab > General section > type a new name into the Name box.
2.2 Create Variables
To operate the Save the Beach game, an important part is creating number variables. Follow the steps below to create number variables:
- Open the Home tab > Variables.
- Click the Plus button (1) to add new variables.
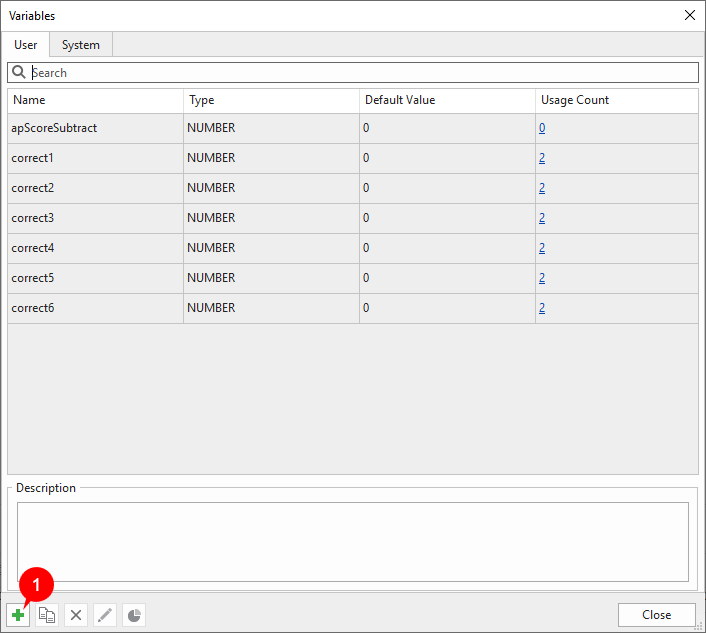
- Click Close to save and finish.
Here, number variables are used to assign points when players answer correctly. For example, if players answer question 1 correctly, the correct1 is assigned to 1.
2.3 Add Events – Actions
When players click any rubbish image object, it navigates to the corresponding question slide. So, add the On Click event > Go to Slide action > Q1. Do the same step with other rubbish image objects. See the image below for details:

In this game, if players answer correctly, the presentation will navigate back to the Content slide, the selected rubbish image object will disappear at the same time. Therefore, in the On Load event, add the Hide Object action with the condition as below:
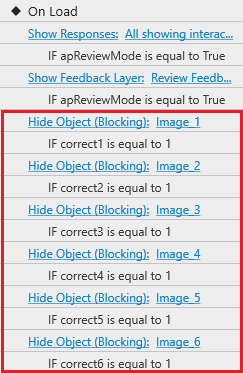
As mentioned above, if players answer correctly, the correct… is assigned to 1. When this condition is true, the Hide Object action will occur.
Tip: You can copy and paste the same events – actions to save time. Then, customize the objects and values inside.
3. Create Question Slides
Depending on the number of rubbish image objects in the Content slide, let’s prepare the same number of Question slides. For example, the Content slide contains 6 rubbish image objects, we need 6 Question slides.
ActivePresenter provides you with 11 types of questions. Feel free to add any type of questions as you want.

3.1. Add Question Slides
Open the Questions tab, or Home tab > Interactions, then select the question type you like.
For easy looking, you should change the background image for the Question slides.
3.2. Add Events – Actions
As you may know, ActivePresenter is set up with default events – actions to all question types. You can add more, customize or remove any events – actions you want.
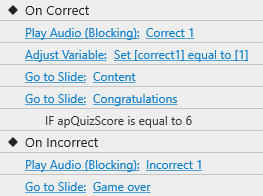
When players answer correctly:
- Adjust variable to 1. This action makes the condition in the On Load event become true.
- Play the correct sound.
- Navigate to the Content slide if it’s not the last question.
- Navigate to the Congratulations slide if it’s the last question. Players randomly select any rubbish images objects, so how we know if it’s the last question. By default, players get 1 point for each correct answer. If players pass 6 questions, they will get 6 points. So, add the condition that IF apQuizScore is equal to 6 to this action. It means that if players get enough 6 points, the presentation will navigate to the Congratulations slide.
When players answer wrongly:
- Play the incorrect sound.
- Navigate to the Game Over slide and require players to try again.
4. Design Congratulations Slide
If players pass all the questions and make the beach become clean, the Congratulations slide will appear to congratulate the winner.
To create the Congratulations slide, open the Insert tab, then select:
- Text Caption to add the Congratulations text caption.
- Audio to add a congratulations sound.
- Image to add some firework images for decoration.
5. Design Game Over Slide
In case players answer wrongly any question, the presentation will navigate to the Game Over slide. At that time, they are required to replay. Therefore, you need to insert a Try Again button into this slide. Then add the On Click event > Restart Presentation action. By this way, if players click the Try Again button, the presentation will restart, then they can replay the game.
6. Add Transition Effects
In order that the presentation goes smoothly, let’s add transition effects to slides.
Open the Transitions tab, select the effect you like. For some types of effects, you can customize the effect direction.
After that, the effect appears on the Timeline pane like the image below.
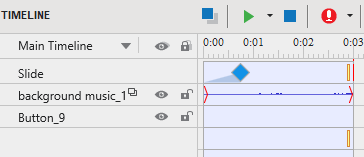
You can adjust the effect duration by dragging the blue diamond to your desired point.
Conclusion
You have learned how to create the Save the Beach game step by step. Hope that it helps you in teaching and creating eLearning content.
Recommended articles: