Stuck with finding out an easy way to make your Math lessons exciting? Then, do not miss out on how to play and create Sudoku Game with ActivePresenter 8.
Sudoku is a logic, reasoning and combinatorial number-placement puzzle game. With a long history from the 18th century in Europe, Sudoku has been popular and loved by millions of people all around the world. This puzzle game is appealing as it makes numbers more exciting and helps learners practice observing and analyzing skills. Therefore, it is regarded as one of the most effective brain training games for all ages and becomes more and more favorable.
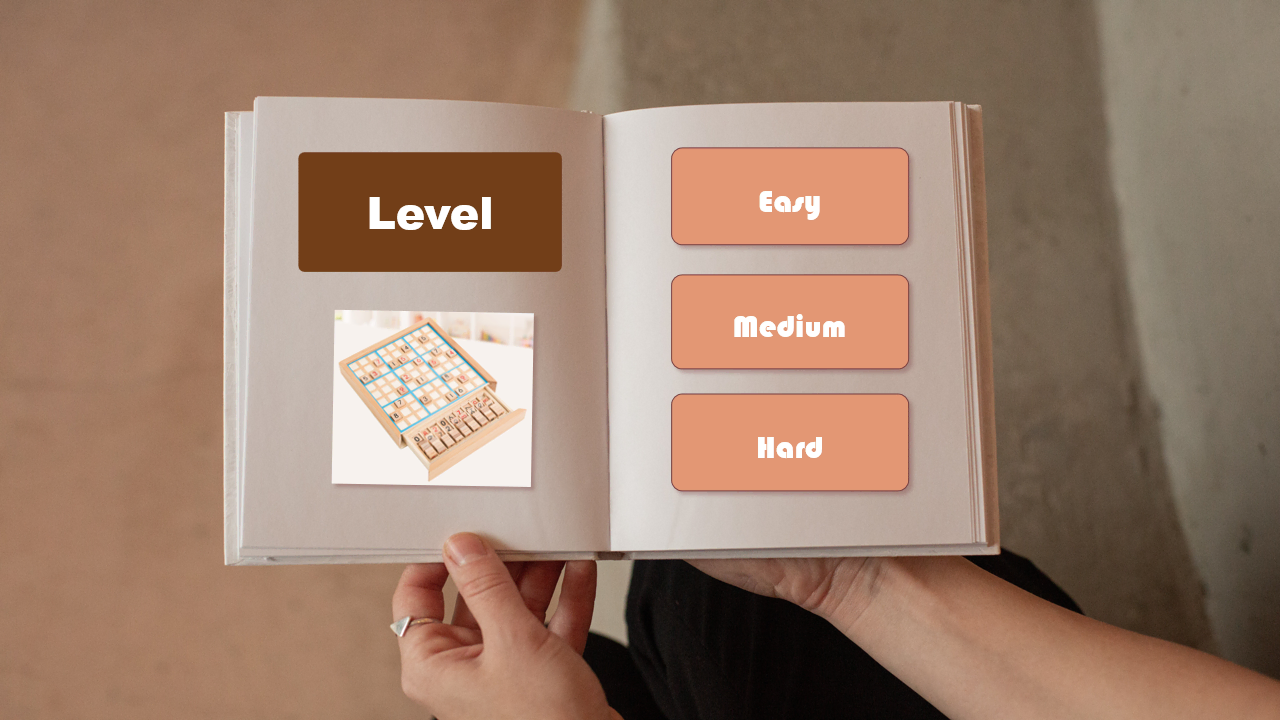
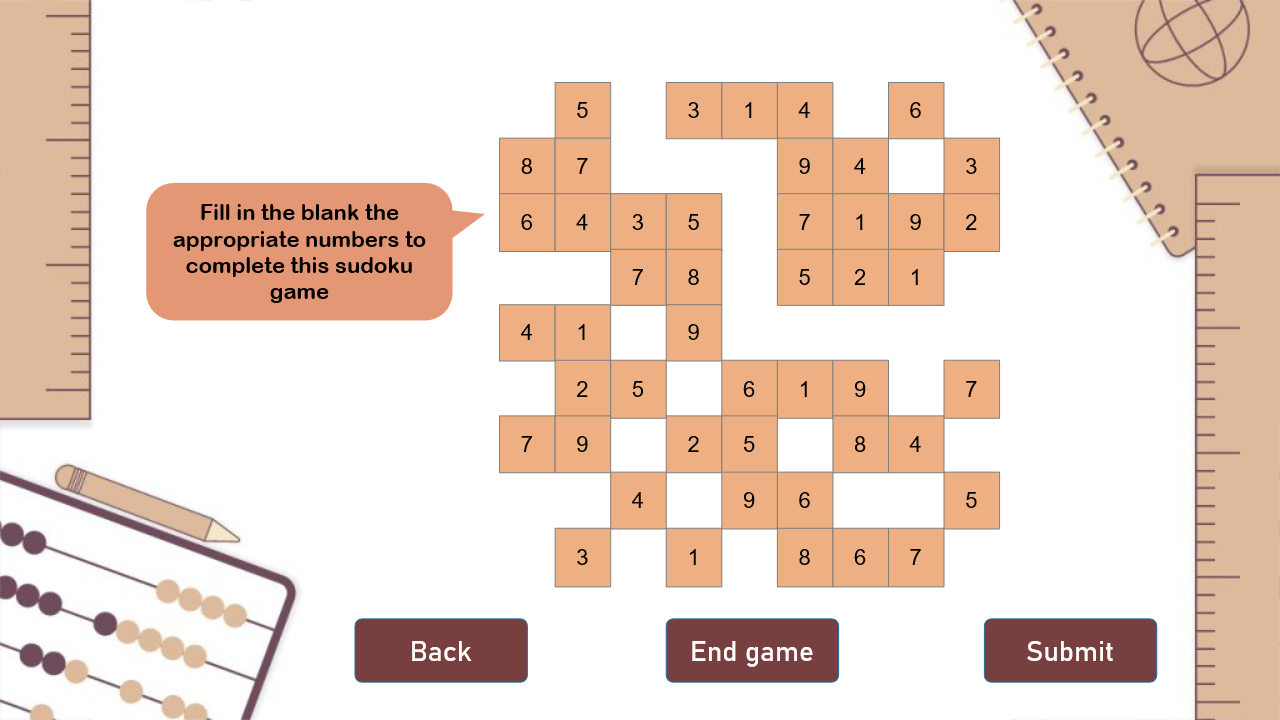
In this game, players can choose among 3 levels: Easy, Medium, and Hard. They need to click on the blank cells and fill in with the right numbers so that each column, each row, and each of the 9×9 subgrids contains all of the digits from 1 to 9. Select the Submit button to check the results, the Back button to choose another level, and the End Game button to end the game.
So, how to create a Sudoku Game for your own eLearning course? You need to complete these 6 steps below. Added to that, you’ll need our winning star, the most powerful eLearning authoring software, ActivePresenter. So, click the link below to download ActivePresenter first:

- Prepare for Sudoku Game
- Create Welcome Slide of Sudoku Game
- Create Level Slide of Sudoku Game
- Create Question Slides of Sudoku Game
- Design Ending Slide of Sudoku Game
- Preview and Export the Game
Now, let’s start making your own Sudoku right away!
Prepare for Sudoku Game
Customize Slide Master
First, to save time and make sure of the consistency of the layout appearance, let’s use Slide Master to create your own Sudoku game.
Navigating to the View tab > Slide Master. After that, you are able to change the background image by accessing the Properties pane > Slide Properties tab > Background Fill > Image Fill > Import image.
Next, we access the Properties pane > Slide Properties > General > Untick the Auto Advance checkbox to avoid auto-moving slides. Then click Close Master View to return to the main working Canvas.
Remember to add a new slide after having finished designing one.
Add Background Music
Background music is used to boost players’ mood when playing the game. Therefore, you should add some music to create a more appealing sudoku game.
Navigate to the Insert tab > Audio. Right-click on the audio symbol, choose Play over Multiple Slides, and choose what you prefer: Top Layer or Bottom Layer. Navigate to the Properties pane > Tick the Loop checkbox and Background Music checkbox so the audio would play smoothly between slides.
Above is the preparation part of the game. Sudoku Game includes a Welcome slide, a Level slide, 3 Question slides, and an Ending slide. Now, let’s design slides one by one.
Create Welcome Slide of Sudoku Game
Just perform the steps below to complete this slide.
- Open the Insert tab > Text Caption > enter the game title. After that, you can customize the text style in the Home or Format tab.
- Select Button in the Insert tab to add the Start button. Then, add the On Click event > Go to Slide at Index: 2.

Create Level Slide of Sudoku Game
In this slide, players can choose the appropriate level they want to try. Select the level button they want to play and click on it. Then they will be directed to the slide corresponding to the level.
- Select Button in the Insert tab to add the level buttons. Customize the font, text size and color as you want. Then copy into 3 more buttons for 3 levels.
- In each button, add the On Click event > Go to slide at Index: 3 (Easy) (similarly change to 4 with Medium and 5 with Hard).
Create Question Slides of Sudoku Game
Next, the question slides are the main slides in the game. You can follow the procedure below:
- Create Sudoku Game Layout and Grid boxes
- Set up Fixed Cells of Sudoku Game
- Set up Blank Cells of Sudoku Game
- Submit and Get results
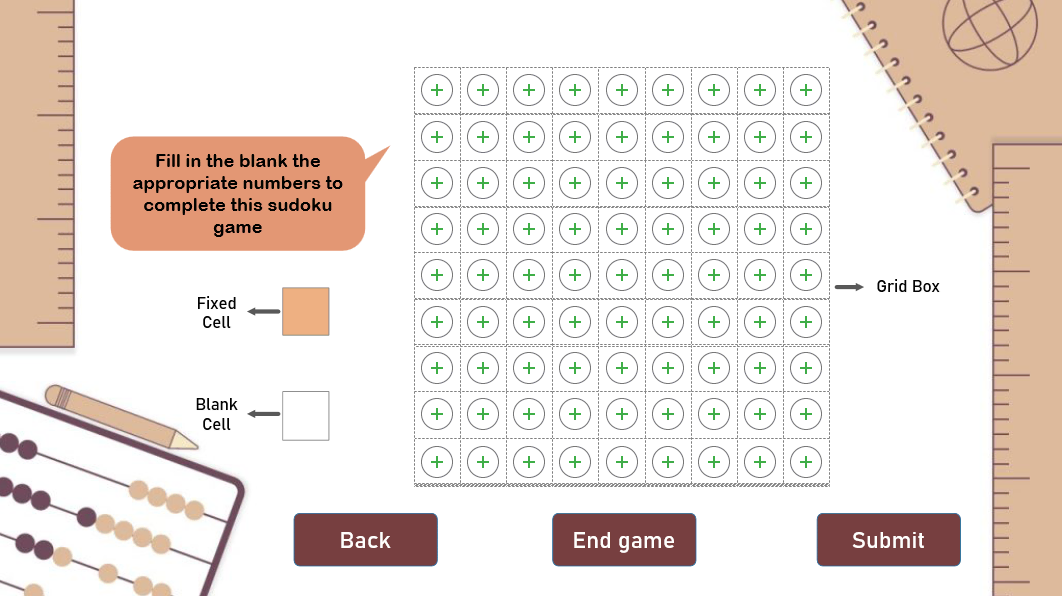
Create Sudoku Game Layout and Grid boxes
This is a preparation step. To be more precise, in this game, you need to:
- Create the instruction (Insert tab > Shape). Then, feel free to add text and customize its font and size.
- Create 9×9 containers by using Grid Box. (Insert tab > Container > Grid Box > choose proper preset slide layouts).
- Create Back and End Game buttons to make the game easier to control. (Insert tab > Button).
Set up Fixed Cells of Sudoku Game
Those steps above only help shape the form of the game. We need to set up fixed cells and blank cells to complete the game visually. Next, let’s set up fixed cells.
- Access the Insert tab > select Text Caption > draw or click anywhere on the Canvas.
- Change the size of the Text Caption object to be equal to the size of the grid box (eg. 56px wide and 56px high). Use the Align Text Center in the Home tab.
- Navigate to the Style & Effects tab > customize the Fill, Line and Shadow.
- Copy and paste the Text Caption to create other fixed cells. Then, place it on top of a grid box.
- Fill in the objects with fixed given numbers.
Set up Blank Cells of Sudoku Game
Now, let’s deal with the blank cells. Your first task is to customize one blank cell. Then, copy and paste it on the Canvas until the copies’ quantity is equal to that of the blank cells left. Let’s look closer into the procedures.
To customize a blank cell, let’s start by inserting text entries:
- To insert Text Entry, first, insert a grid box. Navigate to the Insert tab, select Container, then Grid Box.
- In the Size & Properties tab, change the size of this grid box to be equal to the size of the small grid box in the table (eg. 56px wide and 56px high). Also, use the Align Text Center.
- Click the plus and move the cursor to Questions, choose Fill in Text Entry.
Next, set score and other properties for text entries:
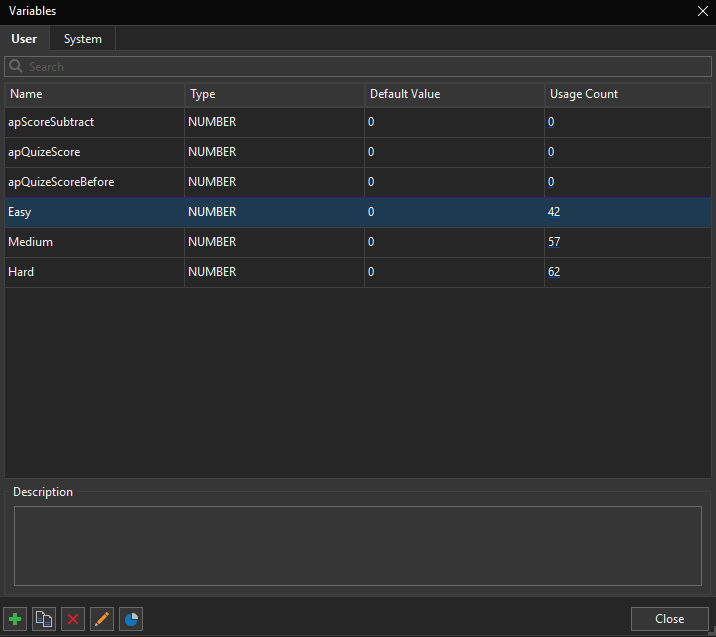
- Create a number variable to count scores by choosing Variables in the Home tab. Finally, we have 3 new variables corresponding to each level: Easy, Medium and Hard as you can see now.
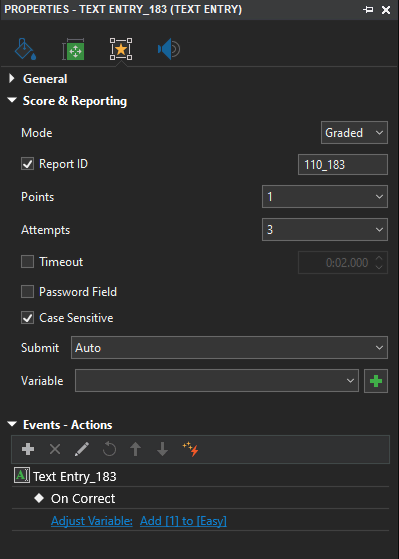
- Then, set the number of attempts to 3, so that players can only fill in the blank for maximumly 3 times.
- Set the submitting method to Auto. Thus, players can submit their answers automatically. That means the system will validate the entered text whenever players press any key.
- Lastly, add events – actions to make the game work. Delete unnecessary events. Then, select the On Correct event, add the Adjust Variable action. After that, set add [1] to [Easy]. Do the same with slides of other levels later (Medium, Hard).
After completing setting up one, let’s duplicate it into many other blank cells
- Count the number of blank cells needed, then duplicate the customized cell.
- Continue by moving each blank cell to the empty grid box. Then set correct answers for text entries. Navigate to the Properties pane, choose the Interactivity tab, General section and click the Add Value button.
Submit and Get Results
The final step in designing a question slide is to set actions for right and wrong answers in your Sudoku game. In both cases, players will receive a feedback message after submitting their answers.
- Create a Submit button first. Access the Insert tab > Button. In slide Easy level, when players submit the correct answer to each text entry object, the system will add 1 point to the Easy variable as we set before. Otherwise, it doesn’t. This level has 34 correct answers, so the max point of this level should be 34.
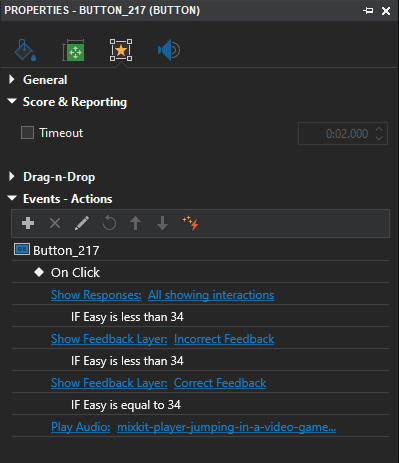
- Add events and actions to the Submit button. To be more precise, add the On Click event and 2 actions corresponding to 2 cases like this:
- If there is any incorrect answer, players can review and check their results. To get it done, add the Show Responses action and set it up like the image below. Then, click the plus button to add a condition for that action. By doing so, players can see which blank cells are incorrect. Then, answer again until they have all the correct ones.
- If players have all the correct answers meaning the Easy total score is equal to 34, a correct feedback layer will be shown.
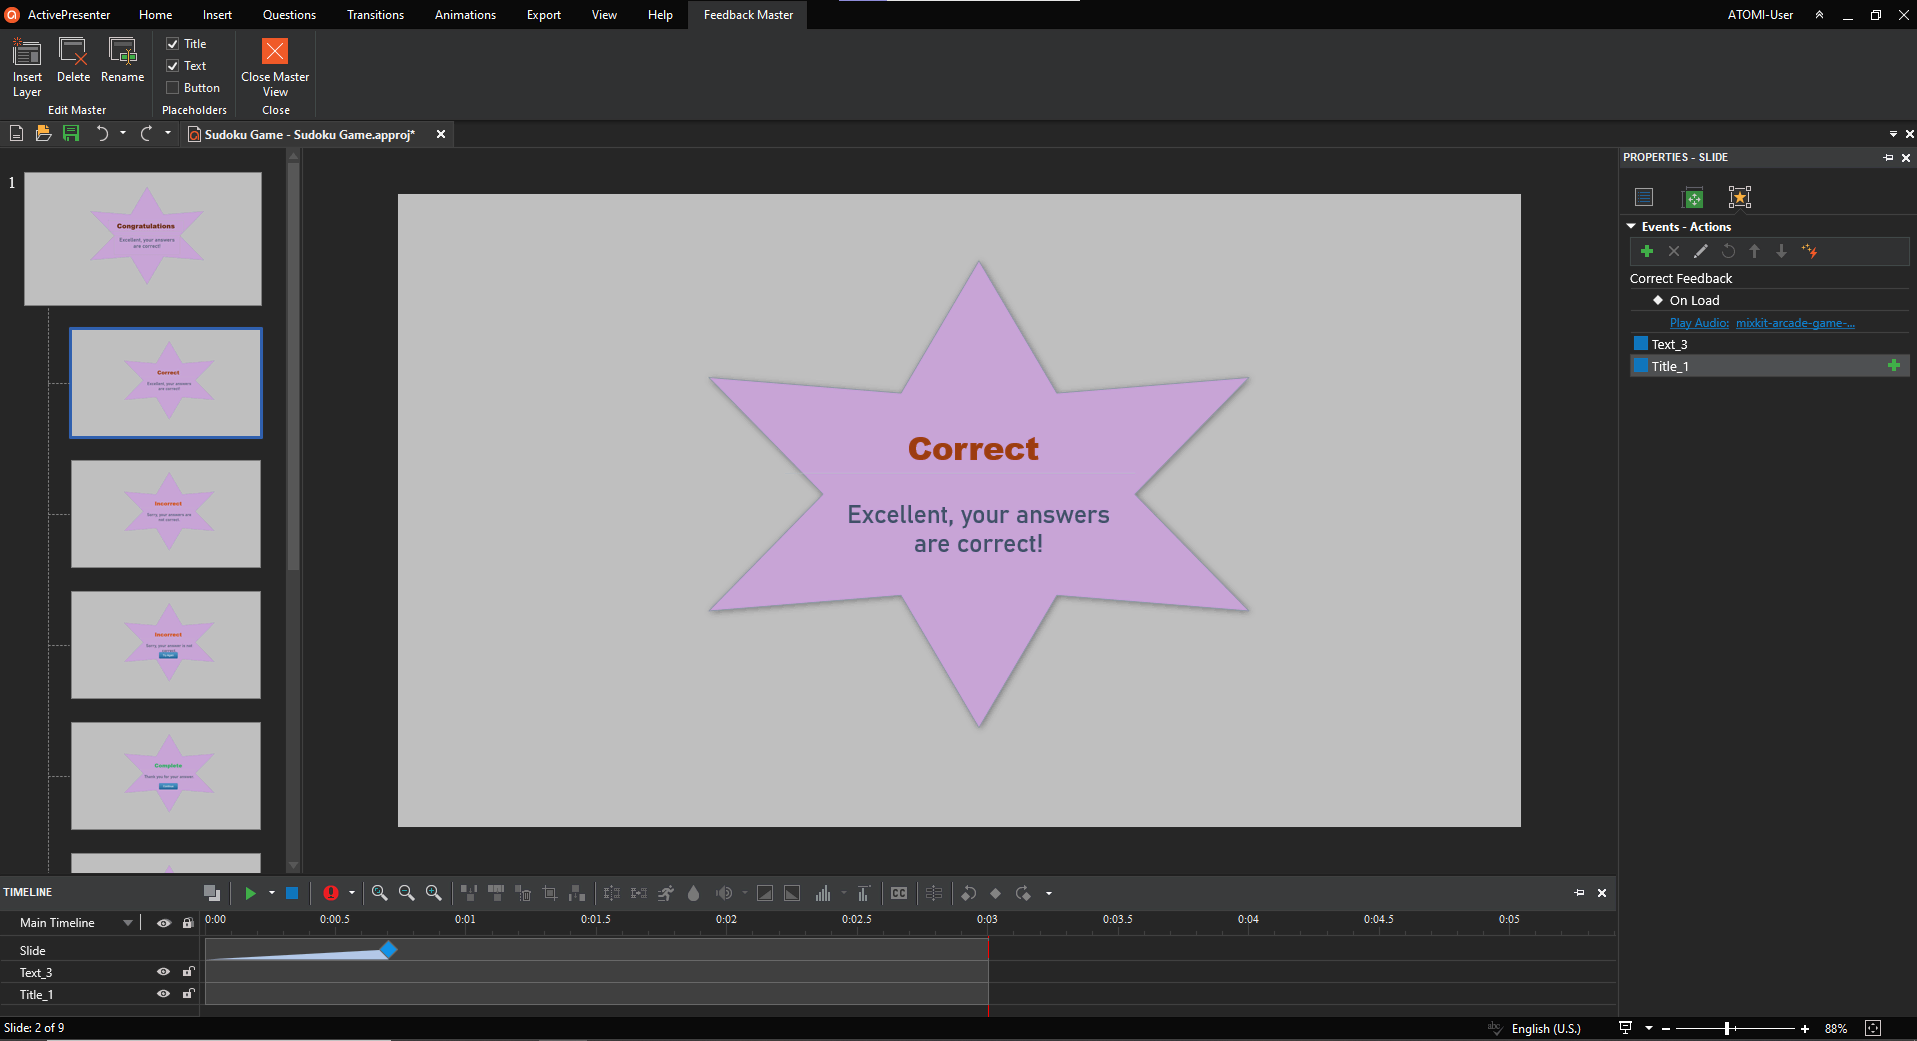
- Customize that feedback layer the way you want in the View tab > Feedback Master > Correct Feedback Layer.
Repeat the same steps with Medium and Hard levels. Use the copy function to make the process faster.
Design Ending Slide of Sudoku Game
The last step in creating your own Sudoku game is to design the Ending side. Just add a shape and fill in the text caption to say thanks to the players.

Preview and Export the Game
Previewing the game is necessary since it lets you see any mistakes caused and make changes before actually exporting. If the result pleases you, just export it to HTML5, SCORM, or xAPI packages depending on your needs.

For your reference, you can download the sample project from this link. That is how to create the Sudoku game in ActivePresenter 8. Let’s follow our Blog and subscribe to our YouTube channel for more helpful blog posts and videos.
See more