Shapes Matching Game is a fun, educational activity for early learners. Finding and matching shapes help kids reinforce their shape recognition skills.
In the previous post, you learned how to create a Shape Patterns Game in ActivePresenter 8, our winning star elearning authoring software for teachers and trainers. The game asks kindergarten players to recognize a repeating pattern of various objects. Today, let’s try creating a Shapes Matching Game.
Matching shapes is a familiar activity for children of all ages. Players simply observe and match similar shapes together. It teaches kids geometric concepts of shape, size, space, and position visually. You can download online shape worksheets and cards to start creating a game. But, have you ever thought of turning these paper materials into interactive shapes? Let’s get to know how to create a Shapes Matching Game in ActivePresenter 8 in this blog:
Click here to download the sample.
How to Play Shapes Matching Game?
Shapes Matching Game is easy to play. Players’ mission is to observe and recognize similar shapes. Next, they need to drag the colored shapes to the corresponding dotted ones. If players drag incorrectly, the objects revert to their original positions and they get no point. In contrast, if the dragged objects are correct, they will get 10 points. Finally, they can build a house, a boat, or complete a missing picture. After players complete building one shape, they will be redirected to the next one.
Now, it’s time to design the game.
How about the Preparation for the Game?
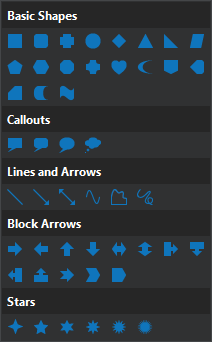
The very first step to creating any game is preparing resources. They are necessary materials to build the game. Shapes Matching Game requires some vivid background images. For example, a grassland background behind a house, or an ocean below a boat. Collect background images as much as you want. For shapes, they are available in the app. Navigate to the Insert tab > Shapes to choose what you need.
What is the Shapes Matching Game’s Layout?
The Shapes Matching Game has 6 slides divided into 3 parts as shown below:
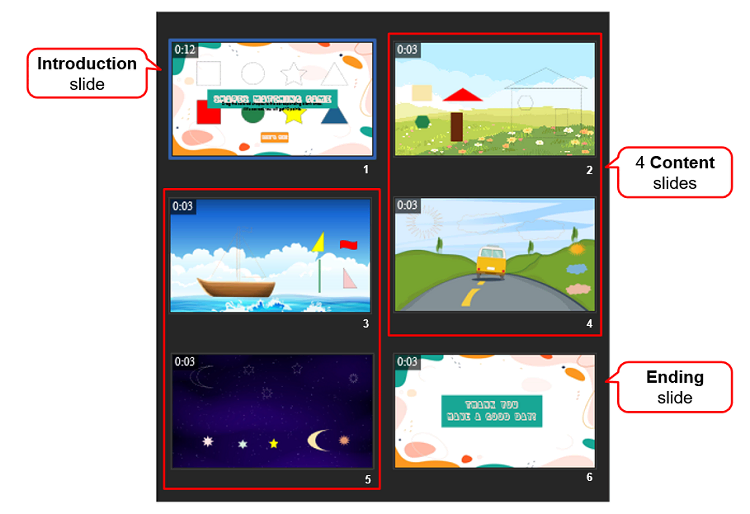
- Introduction Slide (Slide 1)
- Content Slides (Slide 2, 3, 4, 5)
- Ending Slide (Slide 6)
You can add more content slides if needed.
How to Create the Game?
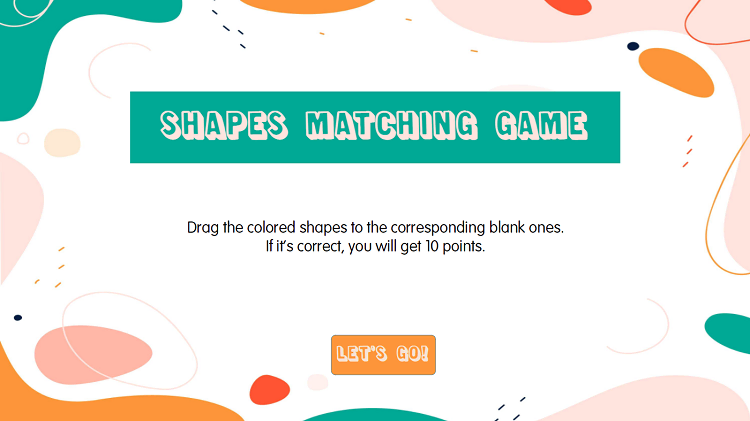
1. Create Game Introduction Slide
The Introduction slide in the Shapes Matching Game consists of 3 main parts: Title, Instruction, and the Play button. Except for that, you can decorate it in your style. To begin with, let’s see how the Introduction slide will look like:
1.1 The Decoration Part
Let’s start with the decoration part. Follow the steps below:
- Add and adjust slide background (Properties pane > Slide Properties tab > Background Image section > select a background image from the project or import them from your computer).
- Create shape (Insert tab > Shapes > click to choose one).
- Copy and Paste the shape (CTRL+C and CTRL+V) and drag it to the position you want.
- Change their style to identify drag sources and drop areas (select an object > Properties pane > Style & Effects tab > Fill / Line / Shadow section).
- Add entrance and exit effects to objects (Animations tab > Entrance/Exit section > Entrance/Exit Effects).
- Add motion path to those shapes (select moving objects > Animations tab > Emphasis & Motion Path section > click
 button > select a path).
 - Change the path direction by dragging the orange arrow of the line.
- Create new couples of objects (press CTRL+G > CTRL+C and CTRL+V).
- Change the shapes of the new objects (Format tab > Change Shape).
- Align all the objects to make the slide look better (Format tab > Align).
1.2. The Title and Instruction
- Insert text for the game title and instruction (Insert tab > Text Caption).
- Style the font, size, and color of the text (Home tab > Font section).
- Add entrance effects (Animations tab > Entrance section > Entrance Effects).
- Add a motion path to the title as you did with the objects above. It makes your slide livelier.
1.3. The Play Button
When players click this button, they will be redirected to the next slide to start playing the game. So, you need to create an event – action for it.
- Insert a button (Insert tab > Button).
- Click to name the button.
- Style the font, size, and color of the text (Home tab > Font section).
- Add an entrance effect (Animations tab > Entrance section > Entrance Effects).
- Add an action to the button (Select the button > Properties pane > Interactivity tab > Events – Actions section > add the On Click event > Go Forward 1 slide).
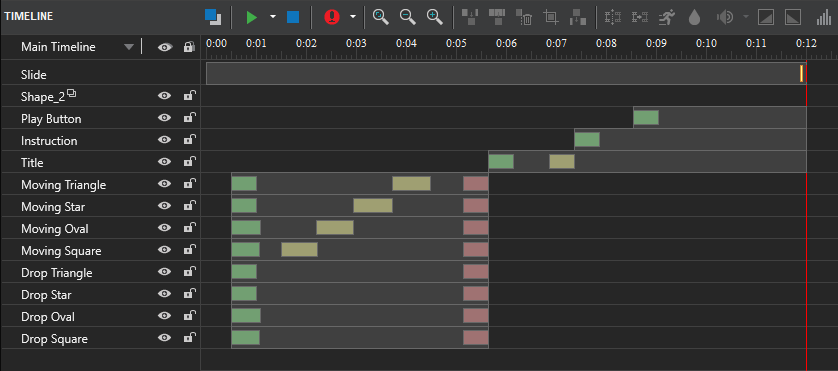
After all, you can adjust the timing and duration for all objects so that they will appear orderly as you wish:
2. Create the Content Slides
The Play button leads you to the content slides. Thus, you need to add new slides. Follow the steps below:
- Add 4 new slides (Home or Insert tab > click the drop-down arrow under the New Slide button > select Blank).
- Set the background for the slides (Properties pane > Slide Properties tab > Background Image section > select a background image from the project or import it from your computer).
You need to create drag sources, drop areas, and a score box for each content slide. After that, take advantage of events – actions to add interactivities to the game. Thus, each step will be described in turn:
- Convert Normal Objects into Drag Sources
- Add Drop Areas from the Insert tab
- Create Score Box Using Variables
- Add Interactivity to the Game
2.1 Convert Normal Objects into Drag Sources
The first content slide asks players to match drag sources and drop targets to build a house. In that way, you need to use shapes to create some parts of the house. For instance, the house is built from 4 shapes: triangle, rectangle, rounded rectangle, and hexagon. They represent the roof, body, door, and window, respectively. Do as follows:
- Draw 4 shapes (Insert tab > Shapes).
- Adjust their appearance (Properties pane > Style & Effects tab > Fill / Line / Shadow section).
- Name them to identify each part of the house (select each one > Properties pane > Interactivity tab > General section > Name).
- Convert all of them to drag sources (select them > Properties pane > Interactivity tab > Drag-n-Drop section> select Drag Source).
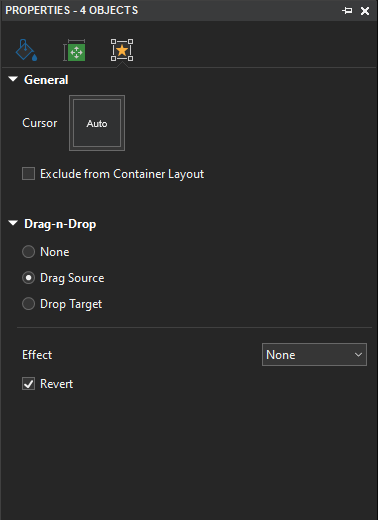
After that, you will realize that the drag sources are bordered by the green dashed lines.
2.2. Add Drop Areas from the Insert tab
There are 3 steps to create Drop Areas in the Shapes Matching Game. Let’s check one by one as shown below:
2.2.1. Insert Drop Areas
Now, let’s create 4 drop areas corresponding to the drag sources above.
- Insert a drop area (Insert tab > Drop Area).
- Delete unnecessary parts such as the default drag source and feedback messages.
- Make 3 more copies of the drop area (CTRL+C and CTRL+V).
- Change the shapes of the drop areas so that they have the similar look with their corresponding drag sources above (select a drop area > Format tab > Change Shapes).
- Name the drop areas as corresponding parts of the house.
- Style them the way you want (select all drop areas > Properties pane > Styles & Effects tab > Fill/ Line/ Shadow section).
2.2.2. Set up the Acceptable and Correct Drag Sources for the Drop Areas
In the next step, you will specify the acceptable values and the correct values for those drop area objects. Accept values mean the drag sources that the drop area can accept. They are not necessarily correct values. Meanwhile, correct values are the accurate answers, which help build a house correctly.
To do that, select a drop area > Properties pane > Interactivity tab > Drag-n-Drop section > Accept List.
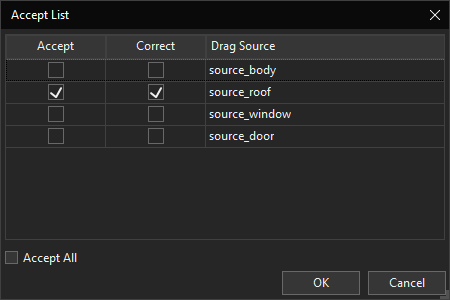
In the dialog that appears, tick the corresponding checkboxes in the Accept and Correct columns. It is to set up a drop area to only accept one drag source as its correct value.
After clicking the OK button, orange arrows (drag-n-drop connectors) appear in the Canvas. They denote that dropping a drag source into a drop area is a correct action.

2.2.3. Match the Drag Sources and Drop Areas
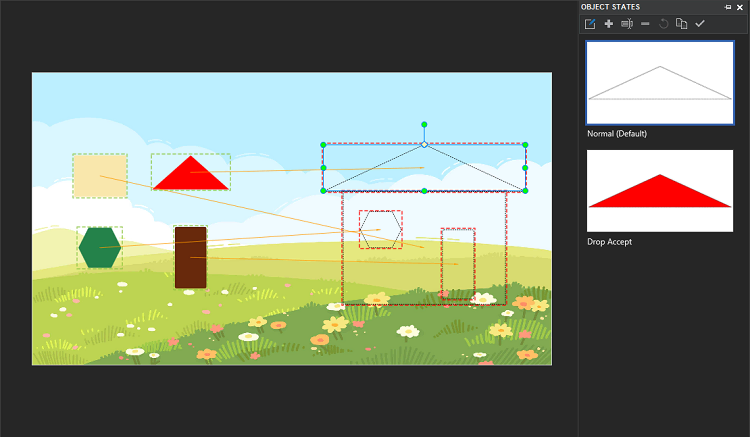
When players drag a drag source to a drop area correctly, the dotted lines will disappear. They display as no line. This state-changing is easily made in ActivePresenter with the Object States feature. To do that:
- Select a drop area.
- Open the Object States pane (View tab > Object States).
- Enter the edit mode by clicking the Edit States button.
- Click the plus button to add a new state.
- Select Drop Accept from the Built-in States list. It shows how a drop area looks when any accepted drag source is dropped onto it.
- Customize its style to match with the drag source one (Properties pane > Style & Effect tab > Fill section > Solid Color > Color > select a color from the list). For example, if a drag source has red color, pick up a red color here.
- In the Line section, select No Line.
2.3. Create Score Box Using Variables
The Shapes Matching Game will be more exciting if players can get points for each correct answer. Therefore, you should create a score box. However, before creating a score box, you need a number variable. In the Home tab > Variables. The Variables dialog pops up. Click the plus button to add a new variable:
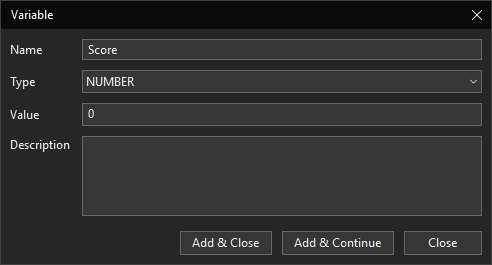
Name the variable, for example, “Score”. Then, choose NUMBER from the Type list.
Take the following steps to create a score box for the game:
- Draw a shape (Insert tab > Shapes).
- Click to input text if you want,for example, type “Score”.
- Style it the way you want.
- Assign the number variable to the score box (click to edit the inline text > Home tab > Reference > select the score variable that we have made).
- Make the score box shown in multiple slides (right-click the box > Show over Multiple Slides > Top Layer).
2.4. Add Interactivity to Shapes Matching Game
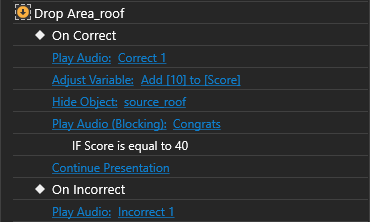
To create interactivity for the Shapes Matching game, you need to add events-actions to objects. According to the game guide above, if players drag correctly, the correct sound will be played. The drop areas are filled with solid colors, and you get 10 points. So, in the On Correct event of the drop areas, add the following actions:
- Play Audio > select Correct 1 from the built-in list.
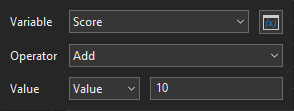
- Adjust Variables:
- Hide Object, then, select the drag source you want to hide.
- Play Audio (Blocking) action and suitable conditions to prevent a slide from going forward too fast. In other words, the sound will be played when players complete a slide and get the maximum points.
When players drag incorrectly, there will be incorrect sound played. To do that, in the On Incorrect event of the drop areas, you can add the Play Audio action > select Incorrect 1 from the built-in list.
After all, the events – actions of the drop areas will be like this:
Keep in mind that you can copy actions from one object to another one. It saves your time and effort.
Last but not least, you can create more content slides to make the game more attractive.
3. Create the Ending Slide
This slide is to announce that the game ends. You can:
- Add a background image (Properties pane > Slide Properties tab > Background Image section > select a background image from the project or import it from your computer).
- Type and style an ending message.

4. How to Preview and Export the Shapes Matching Game?
The last step to complete the creating game process is checking what you have built then publishing it.
To check how the game works, click HTML5 Preview or press F5 on the keyboard.
To export the game, open the Export tab > select HTML5, SCORM package, or xAPI.

Final Words
That’s how to create a Shapes Matching Game in ActivePresenter 8. The app offers you both materials and interactive actions for the game. Visit our Blog and YouTube channel for further information. Thanks for reading!
More Articles:
Create Way Back Home Game in ActivePresenter 8