The winds of Industry 4.0 have swept across industries, and the global shift brought on by the COVID-19 pandemic has undeniably amplified the power of online learning.
From classrooms to cutting-edge tech companies and beyond, the landscape of instruction, training, and skill development has been forever transformed.
Interactive eLearning courses have emerged not just as a viable solution, but as the leading approach for today and the future. While the market offers a variety of tools to help you build online learning content, if your ambition is to create truly comprehensive and engaging experiences, complete with interactive quizzes, gamification elements, and a robust suite of features, then one option stands out as a must-consider: ActivePresenter.
ActivePresenter is an all-in-one screen recorder, video editor, and eLearning authoring software that mainly focuses on creating eLearning courses. With it in hand, you can easily create your own courses in several ways.
This powerful yet intuitive platform equips you with everything you need to design and deliver dynamic eLearning courses that captivate learners and drive effective learning outcomes.

This blog will guide you through the process, instructing you on how to create compelling eLearning courses with ActivePresenter in six practicable, step-by-step stages.
Before we dive into the step-by-step guide, make sure you have the essential tool at your fingertips: don’t forget to download ActivePresenter (free & no sign in required). With the software installed and ready, you’ll be perfectly positioned to follow along and showcase your eLearning course in no time. Let’s get started!

Create eLearning Courses
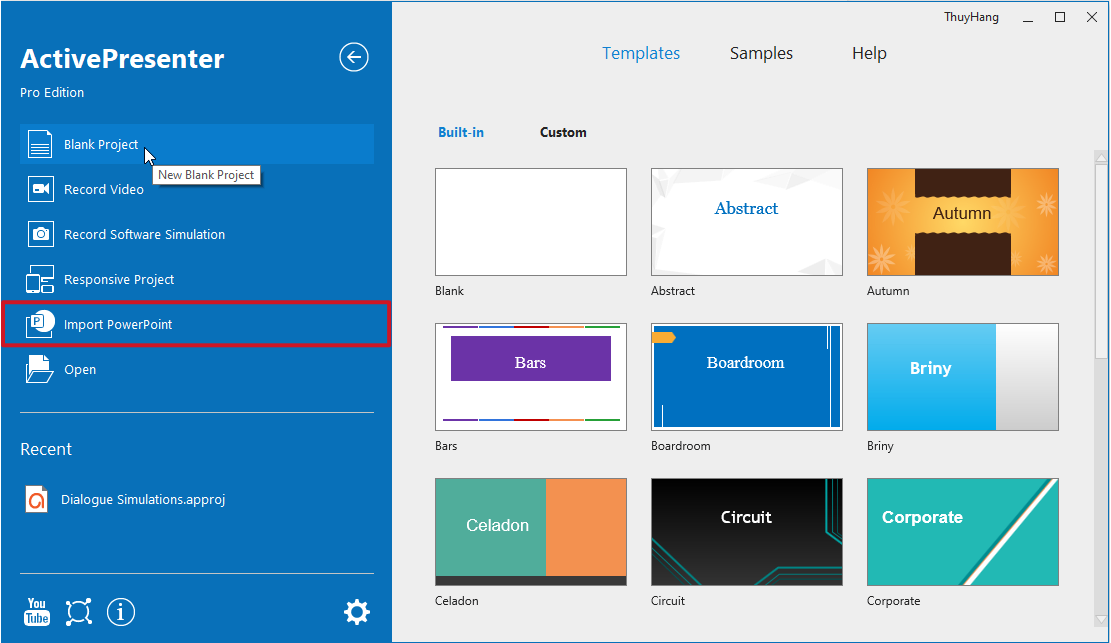
In ActivePresenter, you can create your course from scratch or import a presentation from PowerPoint, customize the content, and add animations and effects if necessary.
When creating a course from scratch, you will need to follow the steps below:
Step 1: Prepare
Everything needs preparation work, and so does making a course. By taking the time to do some preparation work, you are able to control every single detail of your course. First, determine the target audience of your project. By narrowing down your audience, and putting yourself in their shoes, you will know their positions (for example, HRs or salespeople), and characteristics and understand what they are eager to learn. Based on this, you then can define the purpose and type of eLearning course you are going to create.
Step 2: Design a Course
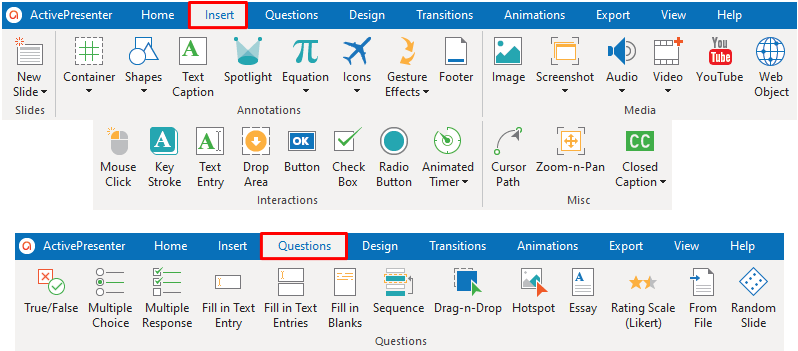
Slide-based projects are what you can see from the first time opening a new project in ActivePresenter. After doing some preparation work above, you now need to put all the content together to build a course. For example, adding text, images, and videos to the slides. With the intuitive User Interface, you can easily navigate between tabs and panes inside the app. For instance, the Insert tab is where you can find everything you need to add to the course while the Questions tab includes 11 built-in types of questions.
Step 3: Record Screen
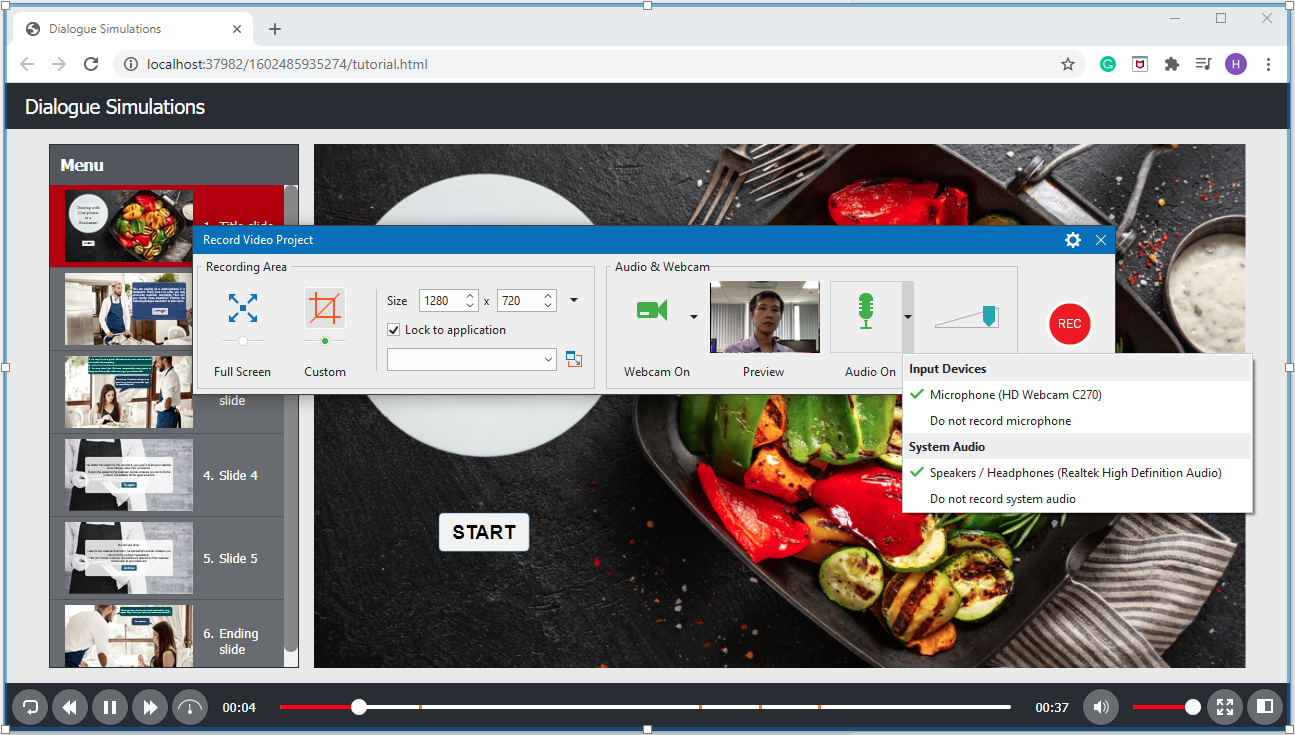
Screen recording is by no means new in creating eLearning courses. As screen recording can capture every motion on your screen, it’s a perfect way to create video tutorials, instructional videos, and videos involving software or digital products. ActivePresenter offers 2 screen recording modes, which are Record Video Demonstration and Record Software Simulation.
If you select Record Video, you will get a video after recording. Meanwhile, the Record Software Simulation feature allows you to capture all actions on the screen and then convert them into a slide-based project including Image slides (Mouse Click, Key Stroke), and Video slides (mouse scroll, drag-n-drop). You can choose the one that suits your needs.
With each recording mode, you can also record audio from your microphone, system audio, and video webcam simultaneously or separately. If you don’t want to record narration while recording the screen, just turn the microphone off. With ActivePresenter, you are able to record narration in the editing phase, which will be mentioned in the next section.
Step 4: Record Narration or Convert Text to Speech
Giving your course a voice makes it more personal and engaging. Basically, to add a voice to an eLearning course, the instructor who creates the course will record the narration himself. In ActivePresenter, you can choose to record narration import a recorded audio file into the app for further editing. Don’t worry about the noise while recording narration since the software offers Audio Noise Reduction to deal with it.
Another option is converting text to speech. ActivePresenter generates text from Closed Caption or any objects containing text to speech within seconds. This feature is really helpful for those having trouble with their voices, such as heavy local accents or speech impairment. They can simply convert text to speech by using this feature and use more voices supported by third parties including Amazon Polly, Google Cloud, and Microsoft Azure to ease the problem.
Step 5: Make an eLearning Course Interactive
ActivePresenter is a powerful software that gives you the ability to style the course in your own way. Even if you have no experience with technology, you still can make your course interactive by adding ready-made animations, interactive objects, and events – actions. Of course, for those who are familiar with coding, running javascript actions makes your course become more personalized and beautiful.
Step 6: Preview the eLearning Course
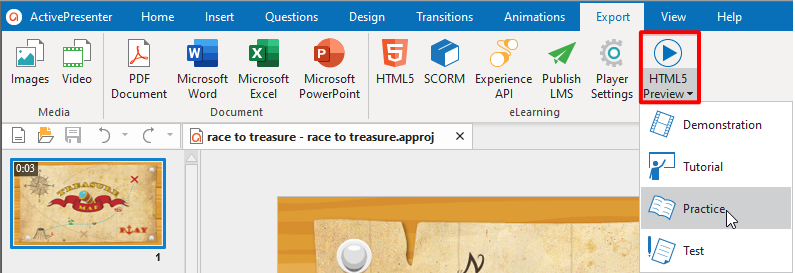
During the process of course building, rather than previewing your content on Canvas, ActivePresenter allows you to preview it as an HTML5 output. You can view and test all the interactive actions of the course. Just by clicking the drop-down arrow on the Preview button then choose one of the 4 previewing modes. By doing this, you can view your course and check if any part of it is correct or not.
Step 7: Publish/Export eLearning Courses
After finishing creating your eLearning course, you now may need to publish it to a Learning Management System (LMS) or export it to HTML5 and share it with others. ActivePresenter allows you to publish or export your course in 4 ways. They are Export to HTML5, Export to SCORM, Export to xAPI, and Publish to LMS.

Below is detailed information about each of them.
Export to HTML5
Exporting your content to HTML5 is an easy way to share your content with others. You can embed the HTML5 output into a webpage. Alternatively, you can compress the folder to a zip file and then share it with others so that they can unzip it and open the .html file to view the content. Note that if you want to track the learner’s results, consider exporting your course to SCORM/xAPI package and uploading it to an LMS. In case you don’t use an LMS, you can send report data (course results) to an HTTP address.
Export to SCORM/xAPI Package
If you are creating an eLearning course to host in your SCORM or xAPI-compliant LMS, use the SCORM or Experience API options. Thanks to these options, your course will be exported to a SCORM or xAPI package. After that, you just need to upload these packages to your LMS. The steps for this are different for each LMS. So, please contact your LMS administrator if you need help uploading, launching, or tracking content.
Publish to LMS
This way, your course will be uploaded directly to ActivePresenter Online, a free LMS developed by Atomi Systems Inc. This LMS provides 200MB of personal storage space and a maximum of 100MB for each course uploaded. Generally, there are 3 main steps for uploading your course to this site: registering an account, logging in to your account, and publishing the course. Detailed steps are discussed in this tutorial: upload courses, enroll learners, and track results in ActivePresenter.
Summary
Now that you have learned the basic steps on how to create eLearning courses with ActivePresenter. Hopefully, these instructions will help you build your courses better and more effectively. Give ActivePresenter a try and see how it inspires you to create.