Drag and drop (also drag-n-drop, drag & drop) is a very useful feature in ActivePresenter – a powerful authoring tool for eLearning design. This facility helps you create impressive drag and drop interactions without breaking a sweat. Today, I’ll give you a clear understanding of this feature, plus its three practical examples.
So first, download ActivePresenter for your Windows or macOS. Then, follow the instructions in this post to better understand how to use the drag-n-drop interactions in ActivePresenter!

Understanding Drag-n-Drop Interactions in ActivePresenter
What is a Drag and Drop?
Basically, drag and drop refers to the action of selecting a thing in a specific area, moving (dragging) and then placing (dropping) it in another area. “A thing” can be an object, a window, and a dialog. Most of us have already used drag and drop when working with our computers, laptops, and even smartphones. A very common example is drag an unnecessary file or folder into the recycle bin to delete it. Another is select a file from the File Explorer, and then drag it to the desktop to copy it.
Generally, a drag and drop involves the following actions:
- Move the pointer to “the thing”.
- Press and hold down the button to select “the thing”.
- Drag “the thing” to the desired location by moving the pointer to that area.
- Drop “the thing” by releasing the button.
With this in mind, using drag and drop helps save a considerable amount of time. This leads to a simple and streamlined workflow as well.
What is a Drag-n-Drop Interaction in ActivePresenter?
A drag and drop interaction in ActivePresenter works the same way. Simply put, the feature allows you to drag an object and drop it into another. This means that you need a draggable object and a place or an object to drop it. ActivePresenter calls them a drag source and a drop target, respectively.
Drag Source and Drop Target
So, what does a drag source and a drop target mean?

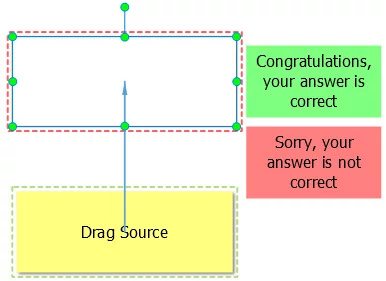
Let’s take a look at the above image. The green shape has a light green marker which indicates that an object is a drag source. Meanwhile, a light orange marker points out that the purple rectangle is the drop target.
Two markers appear by default only in the editor, not in any output format. If you prefer, you can hide them by going to the View tab > Drag-n-Drop.
Creating drag and drop interactions, one of the most common tasks is convert objects into a drag source or drop target. ActivePresenter allows you to convert any image, shape, highlight, or text caption object into a drop target or drag source. But in that case, there are some exceptions, including:
- Objects which show across multiple slides.
- Objects which are shown by Show Objects actions. This type of action shows shape, image, audio or video objects according to your settings.
- Objects which are elements of eLearning questions. This excludes the Drag-n-Drop question which I’ll mention later in this article.
Drag Drop Connector
A drag drop connector is a blue line linking a drag source with a corresponding drop target. You can:
- Create a drag drop connector: drag the marker at the center of the drag source to the correct drop target.
- Remove a drag drop connector: select the blue line and press the DELETE key on the keyboard.
- Map an already mapped drag source to another drop target: drag the head of the connector arrow to the new drop target.
When it comes to drag-n-drop interactions, there are two other concepts you need to know: Drag-n-Drop question and Drop Area.

Drag-n-Drop Questions
Drag-n-drop question is a type of eLearning question which has multiple drag sources and drop targets. It requires learners to map them correctly to get scores.
Here is the default drag-n-drop question:
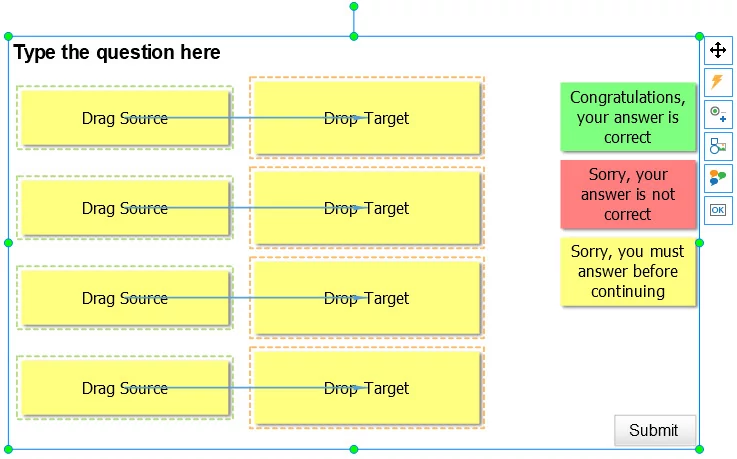
This question type comes in handy when you need to make drag-n-drop quizzes like this “Finding favorite foods for animals” game. See Creating Drag-n-Drop Questions to learn how to do that.
Each time learners drop a drag source, drag-n-drop question doesn’t evaluate correctness of user, but shows the Accept/Reject feedback message. The Correct/Incorrect appears only when learners click the Submit button.
Drop Area
Drop areas are special drop targets that assess, score and keep track of user response. That is, a drop area accepts only one dropped source. When learners drop a new accepted drag source, it will take the place of the old one (if any). In that case, the old drag source will be sent back to its original position. Meanwhile, a drag-n-drop question can have multiple dropped sources as correct answers.
In addition, drop areas show a Correct/Incorrect message instantly each time learners drop a drag source. Thanks to that, this feature is helpful not only in designing eLearning quizzes but also in creating software simulations. In terms of the latter, for example, use this interactivity to ask learners to drag a Docx file to the MS Word application for opening it. Bear in mind that buttons like Clear, Back, Skip, and Submit aren’t available for drop areas.
Compared with drop targets, drop areas have some significant differences as shown below:
- Drop areas have the light red marker rather than the light orange marker in normal drop targets.
- When you insert a drop area, a correct drag source and feedback messages are also added automatically. You can change their styles or remove them if not necessary.
- When you drop a drag source onto a drop area, On Correct and On Incorrect events are triggered instead of On Accept and On Reject. In other words, for drop areas, “accepted” means “correct”, and “rejected” means “incorrect”.
How to Create Drag-n-Drop Interactions in ActivePresenter
Now is the time to learn the techniques. Based on the above basic knowledge, there are three ways to create a drag-n-drop interaction in ActivePresenter.
Converting Objects into Drag Sources/Drop Targets
Let’s say you’ve just added two shapes to a slide. ActivePresenter offers you a facility to convert them into a pair of drag source – drag target. This can be done in the Drag-n-Drop section of the Properties pane. Follow these steps below:
Step 1: Insert objects. As mentioned earlier, only image, shape, highlight and text caption objects are converted into drag sources and/or drop targets. You can edit their properties like fill, shadow, and text. See Using Style for Objects.
Step 2: Select the object you want to set it as a drag source or drop target. Then, go to the Properties pane > Drag-n-Drop section > select the Drag Source or Drop Target option button, respectively.
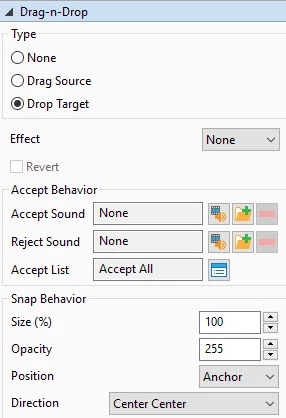
In this step, mind the following:
- You can turn only image, shape, highlight, or text caption into drag sources/drop targets.
- Drag sources and drop targets have their own properties. See Creating Drag-n-Drop Questions to learn how to customize them.
- ActivePresenter automatically converts any drop target which doesn’t belong to a Drag-n-Drop question into a drop area. It’s because the drop target doesn’t validate the drop action as correct or incorrect.
- You’re able to define correct drag source – drop target pairs in the Event Editor of Drop Area or Drag-n-Drop Question. See Setting up Event for Interaction Objects.
- One drag source can be mapped to multiple drop targets. It means that when taking the output simulation, learners can drag the source to one of the correct targets.
A practical use of this way:
If you want to bring joy into learning lessons, using this technique is a good strategy. It can transform boring contents into attractive ones, which encourages learners to actively participate in the learning environment.
For example, instead presenting information merely, I make learners think about the SEO optimization process. Then, ask them to identify the correct order of the steps by themselves. Each time learners give a correct answer, a text box appears. Thus, they can have a clear explanation for each step.

Using Drag-n-Drop Button
Another way to create drag and drop is use the Drag-n-Drop button in the Interaction tab. This feature is suitable to make drag-n-drop eLearning questions. At the same time, it gives you the ability to test scores and assess learners’ performance. See Creating a Drag-n-Drop Question to learn more about the procedure.
A practical use of this way:
You can use the Drag-n-Drop button to create drag-n-drop interactions in many purposes. Out of them, building recall tests is one of the most realistic applications of the Drag-n-Drop button. Looking at the example below, it’s a great way to challenge learners’ memory. Simply ask them to use drag and drop to match fruits with their names.

As you can see in the screenshot above, I used images as drop targets. To do that, you can work with the Fill section in the Properties pane to convert shapes into images.
Using Drop Area Button
Besides the Drag-n-Drop button, the Drop Area button is another option to create interactive questions or other drag and drop interactions for your eLearning courses. You can access this button in the Interaction tab. By default, a drop area comes with only one drag source, but you can add as many drag sources as you want.
After that, you’re free to edit drag source like changing styles or adding images. To set which drag sources are accepted, go to the Drag-n-Drop section in the Properties pane.
A practical use of this way:
To illustrate, I used the Drop Area button to create a puzzle below. Learners have to select a correct part in the right box, and then drag it onto the missing piece in the left image. Using the Drop Area button instead of Drag-n-Drop question, I can let learners find out the correct answer through the trial-and-error technique.
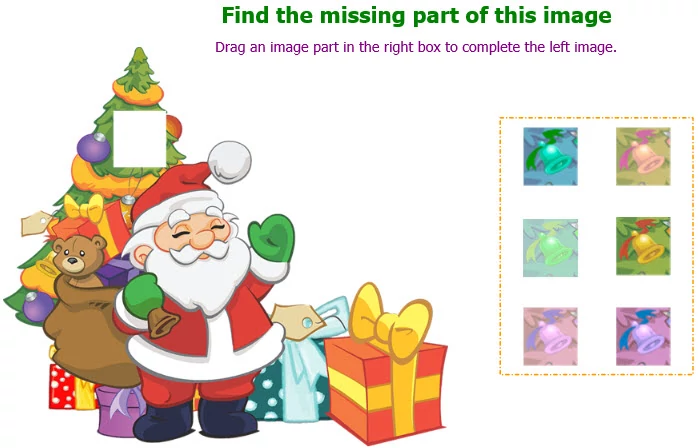
As you can see in the screenshot above, I use images as drag sources. To do that, you can work with the Fill section in the Properties pnae to convert shapes into images.
Tips for Using Drag and Drop Interactions
Using drag-n-drop interactions is helpful to engage learners and boost learning performance. Here are some tips and tricks you can use to take advantage of this feature in ActivePresenter.
- You should insert all desired objects before converting them into drag sources/drop targets and mapping them. This helps reduce the editing time since ActivePresenter lets you edit multiple objects at once.
- It’s better to rename drag sources/drop targets with recognizable names before mapping them. This makes it easier for you to identify them in the Event Editor window.
- Use the Change Shape button in the Format tab to change shape forms, even shapes are already converted into drag sources/drop targets. You have no need of deleting them and inserting new shapes.
- If there’re two overlapped drop targets, when a drag source is dropped onto the overlapped area, the drop target which has higher z-order will process the dropped source. So, I recommend you to set the z-order properly to get your desired results. See Ordering & Aligning Objects for more details.
Knowing how to use drag and drop interactions brings you a huge opportunity to be creative. So get started right now, and let your creativity flow with ActivePresenter – the best eLearning authoring tool.
Don’t forget to share your masterpieces with us via Facebook, YouTube channel or online community.