In the tutorial 3D Transformation Guide, I used a cube to explain some 3D properties. And that cube may spark your interest in the way I created it. So in today’s tutorial, we will learn how to create a 3D object like that cube in Saola Animate without using a single line of code.
Inserting Recognizable Elements
First of all, let’s insert 6 elements that we will use as the faces of the cube. The elements should be different with various colors or texts for easier distinguishing them during the editing. So I used different colors for each element and numbered them like the picture below:
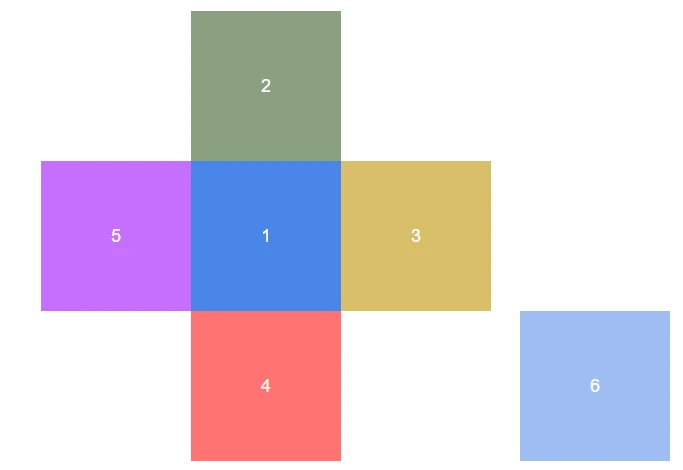
However, the picture above illustrates all the inserted elements with their main fronts that face forward us. We need to make certain that after transforming into cube’s faces, these elements’ main fronts will be turned outwards, hence the numbers can be read normally. So, change the elements’ positions like this:

Transforming The Elements
In the next step, we will work with each face of the cube. To be more precise, we will use the element (1) as the bottom face of the cube. And the element from (2) to (5) are going to be set as the side faces of the cube. Lastly, the element (6) will be the top face.
Creating Side Faces of The Cube
Beginning with the side faces, we will transform them by using 3D transformation properties. Firstly, we need to change their origin points. Therefore, we can rotate them around the right axes and make them perpendicular to the element (1).
So, select each element, in the Properties pane > Position & Size tab > in the Transform section, change all the elements’ Origin Y values to 100%.
After that, we can start rotating them by changing their Rotate values to the following:
- Element (2) Rotate Y: 180°
- Element (3) Rotate Y: 180° and Rotate Z: 270°
- Element (4) Rotate X: 180°
- Element (5) Rotate X: 180° and Rotate Z: 270°
Note that if you want the transformation to be animated, turn on the Auto-Keyframe mode before changing the values. As a result, we will get this:
Note: In the video above, the view of the scene was changed by using the Rotate View tool.
Creating Top Face of The Cube
In terms of the top face, firstly, we will drag the element (6) to be coincided with the element (1).
Then, in the Properties pane > Position & Size tab > in the Transform section, change the element’s Translate Z equal to the value of the element width and height. Therefore, it can fit the other cube faces and become the top face of the cube.
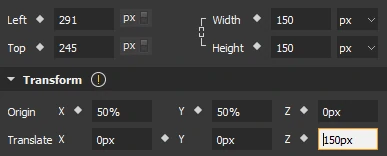
In order to make this top face animated, create the animation to make it translate from other values to where it fits the cube. For example, in our cube animation, the top face translates from 300px to 150px.
Grouping The Elements for Transforming
While editing a 3D object like this cube, the Rotate View tool can help you to get a better view of the object. Or, you can change the scene Perspective property in the Properties pane to other values, for example:

However, they are just useful for editing elements in 3D space more intuitive and will not affect the output. If you want your 3D object to appear with a different perspective in the output, just group the elements together and transform the whole group in the way you want.
You can refer to this link to know more about grouping the elements.
After grouping them, you can use 3D transformation properties or 3D transformation tools to transform it like a single element.
More examples
By this way, you can also create other solid geometry, such as a rectangular box or a pyramid, and so forth.