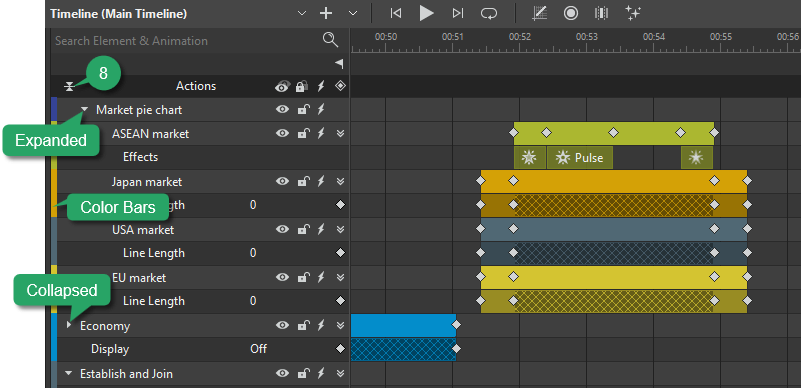
The Timeline pane plays an integral role in the animation-creating process. It gives you the capability to view and control all timing aspects of a project. When you create a brand new project or open an existing one, normally, you will see this pane located at the bottom of the application. However, in case you randomly close it, open the View tab, click Timeline to make it appear again.
In this tutorial, let’s learn the basic commands to work with the Timeline pane, including:
- Navigate the Timeline
- Snap in Timeline
- Zoom Timeline In and Out
- Manage Timeline View
- Search, Show, Hide, and Lock Elements in the Timeline Pane
Navigate the Timeline
Saola Animate offers many ways to navigate the timeline. Do one or more of the following options:
- Drag the Playhead to the desired location.
- Click anywhere in the timeline ruler, the Playhead will jump to that location immediately.
- Change the time value in the time control (also the current time indicator). Just click on the time control to make it editable, then scroll the mouse wheel or enter a new value.

- Press HOME or click the Go to Start button (1) to return to the starting point of the timeline.
- Use SPACE BAR on your keyboard or click the Play/Stop button (2) to start or stop animation in real time.
- Press END or click the Go to End button (3) to jump to the end of the animation.
- Click the Loop Playback button (4) to play the animation in a loop. Note that this feature only works in the editor, it will not work when previewing in a browser.
Additionally, to aid you in navigating, the Timeline pane comes equipped with two useful controls: snapping and zooming. The following sections will discuss each of them in turn.
Snap in Timeline
Dragging the Playhead along the timeline, you may notice some snapping actions. For example, the Playhead jumps to timeline items (such as keyframes, labels, triggers) or particular tick marks on the timeline ruler.
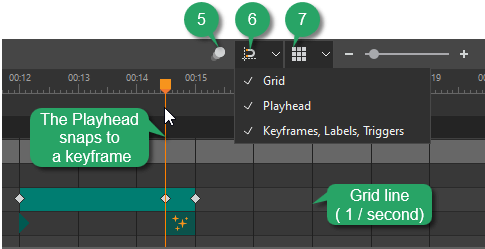
By default, the timeline snapping is turned on with three selected modes:
- Grid: The Playhead and timeline items snap to the grid lines. Grid lines give precise measurements of the timeline by displaying subtle vertical lines at regular intervals. They only appear when you click the Show Grid button (6).
- Playhead: Timeline items snap to the Playhead.
- Keyframes, Labels, Triggers: The Playhead and timeline items snap to the position of timeline items.
Note: When none of these three modes is selected, the Playhead and timeline items will only snap to special tick marks on the timeline ruler. These tick marks appear depending on the zoom level of the timeline.
Zoom Timeline In and Out
As your animation can be fairly long, you may not be able to see all animation segments in the Timeline pane. In that case, you can consider using zoom controls to zoom the timeline in and out.
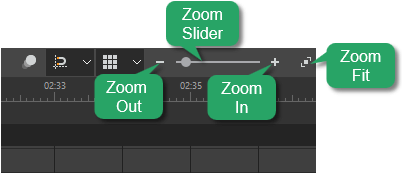
The timeline zoom controls appear as follows:
- Zoom slider: Drag the slider to the right, toward the + button to zoom in the timeline. Or, click this button multiple times to zoom in to the level you want. Conversely, drag the slider to the left or click the – button to zoom out.
- Zoom to Fit: Click the button to fit all existing animations to the timeline view.
Additionally, you can use the mouse wheel to zoom the timeline. Place the cursor on the timeline, then hold down CTRL while scrolling the mouse wheel to zoom in or out.
Manage Timeline View
The Timeline pane lists out a scene together with its elements and all animated properties. To the left of each element name, there’s a small color bar which labels each element and its animation segments with a specific color. That way, Saola Animate helps you quickly identify which animations belong to an element.
If you’re creating complex animations, the list of elements and properties can go on forever. Fortunately, you have some controls to manage the timeline view.
Expand and Collapse Element Properties
Click a triangle button to expand or collapse all animated properties of an element. If you want to achieve the same results for all elements at once, the Expand/Collapse Lanes button (8) on the Actions bar will come in handy.
Filter Elements
A scene may have static elements (for example, a background image) that stay unchanged over time. Obviously, you don’t need to clutter up the timeline with those elements. Saola Animate allows you to filter out all elements that contain no animation using the Show Animated Elements Only button (5).
This filter only affects what you see on the timeline, it doesn’t influence what appears on the Canvas.
Search, Show, Hide, and Lock Elements
It’s often hard to work with a lot of elements and complex animations. Chances are you cannot select an element on the Canvas because it’s behind others. To find a way out, you need to search for that element by scrolling the mouse wheel. You may also likely select the wrong element by accident because elements are placed so closely.
To solve these problems, Saola Animate provides some useful controls mentioned below. Note that these controls are available in both the Timeline and Elements panes.
Search Elements
From Saola Animate version 3.0, you can search any element, animation, or group name in the search box , which is located above the Actions bar:

Show and Hide Elements
In the Timeline pane or the Elements pane, notice the eye icons, which are known as the Show/Hide Element buttons. Click on this button to show or hide an element. An open eye means that an element is visible. Whereas an eye with a slash indicates that it is invisible.
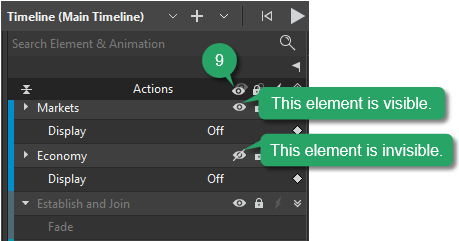
To show/hide all elements in a scene at once, click the Show/Hide All button (9) on the Actions bar.
Take note of the following:
- The Show/ Hide Element buttons come in handy when you want to hide some elements on the Canvas so that you can focus on the target elements. It does not affect the output you get after exporting the project.
- To control the element’s visibility in the output, animate the Display property. Choose Off to make an element invisible and On to make it suddenly appear in a scene. Besides, you can use the Opacity property to fade in or out an element. To do that, animate the Opacity from 0% to 100% to fade an element in, and from 100% to 0% to fade it out.
- When you hide a group, its child elements are also invisible.
- When an element is hidden on the Canvas, it can still be selected and edited from other panes.
Lock and Unlock Elements
Moving an element by mistake is a bad experience. For example, you want to move a text element but accidentally seize and drag a background photo. To avoid that, you can lock elements in their location. That way, elements cannot be selected, moved, or edited, but they still remain visible.
To lock an element, click the Lock/Unlock Element button. By default, elements are in the “unlock” state which is indicated by an open lock. At that time, you’re free to select and edit them. When you lock elements in place, the button turns into a closed clock and the element names get dim.
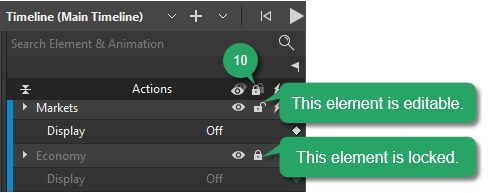
To lock/unlock all elements in a scene at once, click the Lock/Unlock All button (10) on the Actions bar.
So we’ve walked through some basics and controls of the Timeline pane. Stay tuned for the coming tutorials.
Related Articles:
