Changing slide names is just a very small detail in the whole process of creating a project. Nonetheless, it plays an important role in helping you manage and identify slides better. If each slide in your project has its own name instead of automatic title like Silde 1, Slide 2,… you can easily find specific information for reviewing and editing. You no longer waste much time than necesssary to find it in a long list of anonymous slides.
For your further information, slide names are useful in both the editing phase and the final outputs. That is, you can see slide names in:
- The Slide pane when you hover your mouse over each slide
- The Go to Slide list when you create the “Go to Slide” action for any object.
- The outline when you export projects to HTML Slideshow, PDF, Word, Excel, and PowerPoint.
- The table of content (TOC) when you export projects to HTML5 simulation.
With these in mind, it’s better to spend some time on adding descriptive names to your slides. In ActivePresenter 7, you’re free to change slide names with very simple techniques. Let’s learn how to use them in this today’s tutorial.
To change slide names, you’re given two ways. First, change slide names from the Properties pane. Second, generate slide names from the first shape.
Change Slide Names from Properties Pane
To name a slide, follow these steps:
Step 1: Select a slide.
Step 2: In the Properties pane > Slide Properties tab ![]() > General section > enter a slide name in the Name box. If you want to add more descriptive information or other notes or comments for that slide, just type your text in the Description box.
> General section > enter a slide name in the Name box. If you want to add more descriptive information or other notes or comments for that slide, just type your text in the Description box.
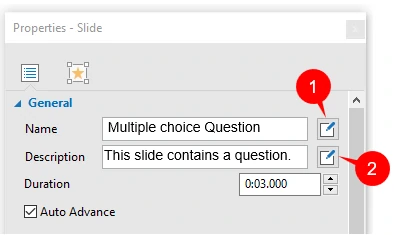
To format the slide name or its description in a visual way, click buttons (1) or (2) on the right of each text box. Then, a rich text editor will appear:
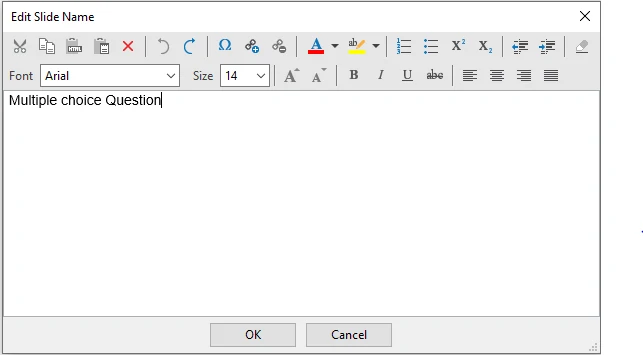
As you can see, this editor contains a lot of commands to style slide name or its description. So, keep in mind this feature in case you want to change the formats.
Note:
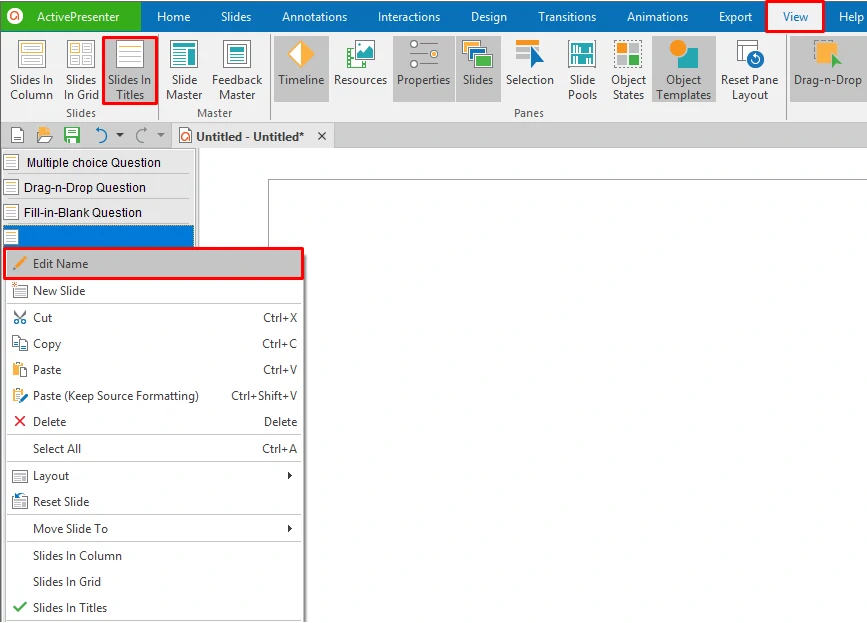
- There’s another way to edit slide names. Just right-click any slide and click Slides in Titles. Alternatively, you can access the View tab and click Slides in Titles
 button. Then, you can see titles of all slides in the Slides pane. Right-click a slide, then click Edit Name to launch the text editor.
- Keep in mind that ActivePresenters allows you to name many slides the same name. All you need to do is just to select multiple slides that you want to give them the same name and perform the above steps.
Generate Slide Names from First Shape
This way is useful when you want to name a slide after the text inside its first shape. This feature especially comes in handy for your software simulation project. Do the following:
Step 1: In the Slide tab > Batch Operations > Generate Slide Name From First Shape. Then, the Generate Slide Name From First Shape dialog will be opened:
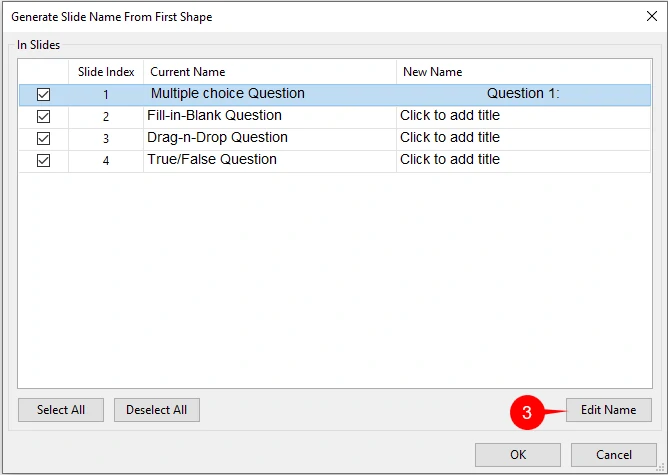
This dialog includes:
- The Slide Index represents the slide numbers.
- The Current Name displays the current name of each slide.
- The New Name shows the text inside the first shape of each slide
To rename slide, double-click a name in the New Name column. Or, select any row, then click Edit Name (3). Make sure that the corresponding check box is ticked if you want to apply the change.
That’s all information you may need to know when changing slide names in ActivePresenter 7. Keep following our Tutorial page and blog to get more useful tips and tricks about using the app.