Inserting objects is an easy but important task in creating any project ranging from simple to complex. So, knowing how to do that is a must when creating contents with any application.
As you know, ActivePresenter 7 now supports creating responsive projects. Inserting objects in that kind of projects is the same as doing in non-responsive projects. However, managing objects has some differences.
This article will explain in details how to insert and manage objects in responsive projects.
Inserting Objects in Responsive Projects
There are two types of objects in ActivePresenter 7: Non-interactive and Interactive Objects. You can access them easily from the Annotations and Interactions tab. Refer to Introduction to interactive objects and Introduction to annotation objects for more details.
In general, inserting objects in responsive projects is like doing that in a non-responsive one. Just click any type of objects listed above to insert it.
Objects’ properties in the two types of project are almost the same except some differences. Objects in responsive projects have exact position (position mode), responsive unit (px and %), and object alignment (align horizontal and vertical center). Besides, you cannot lock the aspect ratio of objects in the responsive project.
Managing Objects in Responsive Projects
An inserted object has a default position in the slide. You can change that position as well as the position unit if you want.
There are two ways to do that:
- Drag the object on the Canvas.
- Change position values of the object in the Properties pane. This way provides a more exact position on the Canvas.
To do the latter, take the following steps:
Step 1: Select the object.
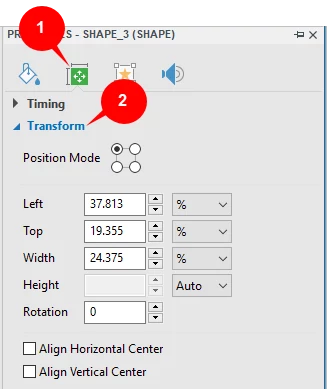
Step 2: Open the Size & Properties tab (1) in the Properties pane.
Step 3: Access the Transform section (2).
After that, you can change object position, position mode, object position value, and align object as you wish. Keep reading to know each of them for details.
Changing Object Position Mode
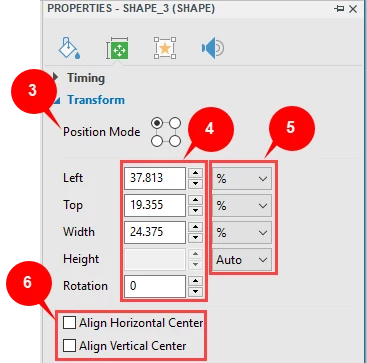
Position Mode is the exact specification of the object position in a slide of a responsive project. To change this value of an object, select one from four modes (3) (top-left, top-right, bottom-right, or bottom-left).
Changing Object Position and Size
You can change the object position in a slide by changing values in the Left, Top, Width, and Height spin box (4).
- Left: Left edge of the frame.
- Top: Top edge of the frame.
- Width: Width of the frame.
- Height: Height of the frame.
- Rotation: Rotate the object by a specified degree in slide coordinates. You can drag the rotation handle of the object on the Canvas to have the same result.
If you want to keep the height-to-width ratio when changing the object width, just select Auto for the position unit of the height. This option automatically changes the height according to the width.
Note: The values (Top, Left, Right, and Bottom) displayed in this section depend on the Position Mode type you select. For example, if you select the Bottom-Right mode, this section will show Bottom and Right value instead of showing Top and Left value when you select the Top-Left mode.
Changing Object Position Value Unit
An object in a responsive project has a default responsive unit including Top, Left, Width (in percentages or pixels), and Height (in percentages, pixels, or auto). ActivePresenter allows you to change it easily.
To change types of unit, access the Unit boxes (5) and select one from the unit list.
Note: When you choose the % unit, once you change the device layout, the object size will be adjusted correspondingly.
Aligning Objects
You can align objects at the center of the slide in all layouts of responsive projects. Just check the align check box (6).
- Align Horizontal Center: The object will be aligned horizontal center and you can move the object only in the vertical direction of the slide. You cannot move it horizontally.
- Align Vertical Center: The object will be aligned vertically center and you can move the object only in the horizontal direction of the slide. You cannot move it vertically.
If you select both check boxes, objects will be aligned both horizontal and vertical center of the slide. This means that you cannot move the object either in the horizontal or vertical direction.
Note: The boundary of objects in a responsive project in the smaller layout will be inherited from the larger layout.
For example, the Tablet Landscape is smaller than the Desktop layout. So, if you change an object boundary in the Desktop layout, its boundary will be inherited by the Tablet Landscape layout. However, the Desktop is larger than the Tablet Landscape layout. Hence, if you change the boundary of an object in the Tablet Landscape layout, its boundary will not be inherited by the Desktop layout.
Inserting Objects into Multiple Slides
What if you need to insert one type of object into multiple slides? You can definitely do that with the Batch Operations feature in ActivePresenter 7. This feature is useful especially when some slides of your project need the same type of objects.
To do that, do as follows:
Step 1: Open the Slide tab, click Batch Operations.

Step 2: Select Insert Objects…, the Insert Multiple Slide Objects dialog will appear, take further steps below:
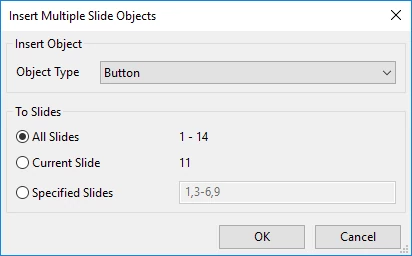
Step 3: Select a type of objects from the Object Type list.
Step 4: Select slides that you want to insert objects. You can choose to insert object in all of the project slides, in the current slide or some specified slides.
Step 5: Click OK.
That’s how to insert and manage objects into responsive projects in ActivePresenter 7. Hope that the article is helpful. Feel free to contact us if you need help.