Last Updated On: March 20, 2020
ActivePresenter 7 supports more audio effects such as Audio Fade and Audio Noise Reduction. They let you improve your audio quality in general and recording quality in particular. In the scope of this tutorial, we will learn how to use the Audio Fade feature. Audio Noise Reduction will be saved for another article.
 After that, the audio Time Bar will look like this:

 .
Step 2: Click the arrow button on the Adjust Volume button (4) and select Restore Original Volume:
.
Step 2: Click the arrow button on the Adjust Volume button (4) and select Restore Original Volume:
 After that, the faded range will go back to its original signal level.
That’s all I want to share about the Audio Fade effect in ActivePresenter 7. Hope that you’ll find it useful. Don’t forget that we have the tutorial page with many useful articles, feel free to take a look.
After that, the faded range will go back to its original signal level.
That’s all I want to share about the Audio Fade effect in ActivePresenter 7. Hope that you’ll find it useful. Don’t forget that we have the tutorial page with many useful articles, feel free to take a look.
What Is Audio Fade
When you add an audio to a slide, you may end up with a sudden start or end that can be rough on the ears. Don’t worry because you can fix this issue easily with Audio Fade feature. Audio Fade is an effect used in audio editing to make the audio gradually increase or decrease the signal level. It’s useful especially in smoothing the beginning and end of an audio track. Audio Fade includes Audio Fade In and Audio Fade Out. When you want the beginning of the audio to gradually increase from silence, you can use the Fade In effect. In contrast, you can use the Fade Out effect to decrease the sound to silence. This feature is also useful in fading the background music in your projects.Using Audio Fade in ActivePresenter 7
Now, take the following steps to use Audio Fade: Step 1: Select the audio object (on the Canvas, Timeline or Selection pane). This selected audio track can be a normal audio file or the recorded file. Step 2: In the Timeline, specify the audio range that you want to apply the effect. It’s the start range of the audio Time Bar if you need to apply the Fade In effect. On the other hand, it’s the end range of it if you need to apply the Fade Out effect. Just in case you are a beginner, drag the Start and End marker of the Playhead along the Timeline ruler to select a range. Note: If you don’t select any range, ActivePresenter will apply the effect to the whole audio file. Step 3: Click the Audio Fade In or Audio Fade Out button (1) depending on your need.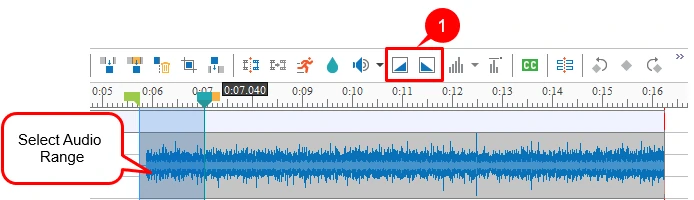 After that, the audio Time Bar will look like this:
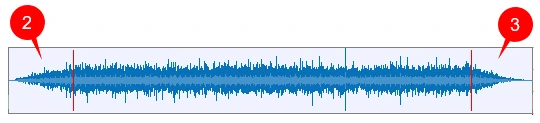
- Fade In (2) begins with silence and gradually becomes louder until full volume.
- Fade Out (3) makes an audio progressively softer until it can no longer be heard.
- The red lines mark where the Fade In effect ends and where the Fade Out effect starts.
Deleting Audio Fade
To delete the audio effect that you’ve applied, do the following: Step 1: Select the faded range. Tip: Before selecting the range, turn the Timeline Snapping mode on so that you can select it more exactly. To do that, open the View tab and click Timeline Snapping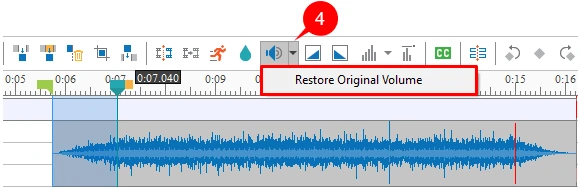 After that, the faded range will go back to its original signal level.
That’s all I want to share about the Audio Fade effect in ActivePresenter 7. Hope that you’ll find it useful. Don’t forget that we have the tutorial page with many useful articles, feel free to take a look.
After that, the faded range will go back to its original signal level.
That’s all I want to share about the Audio Fade effect in ActivePresenter 7. Hope that you’ll find it useful. Don’t forget that we have the tutorial page with many useful articles, feel free to take a look.