ActivePresenter allows you to run interactive presentations in four modes: Demonstration, Tutorial, Practice, and Test. They are also called operation modes. Each of these modes is suitable for a specific purpose. Let’s find out how to work with them in this tutorial.
Overview of Operation Modes
As said earlier, you’re given 4 operation modes. They come in handy when you create HTML5 contents like interactive software simulations and quizzes. Free to use them for particular purposes, depending on your needs.
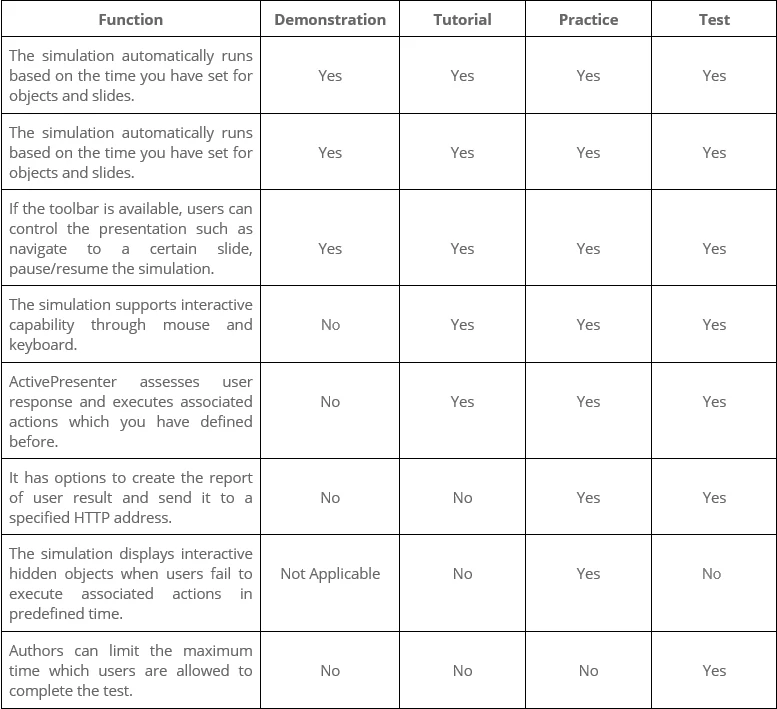
- Demonstration: In this mode, the task will be shown as a demonstration for learners. It won’t be interactive but only viewable.
- Tutorial: This mode lets learners do the task. But they are moved to the next action only after they have performed the previous action correctly.
- Practice: This mode gives learners a chance to try the task themselves. So they can practice what they’ve learned without formally joining the test. There’s also no time and attempt limit.
- Test: This mode brings learners to the real test. They have to complete the task in a limited time and number of attempts.
Below are details about operation modes in ActivePresenter 7. You should keep an eye on the differences among them.
Working with Operation Modes
Choose Operation Modes for Showing Objects
When creating HTML5 contents, you have to choose operation modes for objects. If not, you can’t see them when you preview projects in browsers or view the output.
By default, ActivePresenter chooses operation modes for some object types like shape and mouse click. But you’re free to choose the mode for any object you want it to be visible. To do that, follow these steps:
Step 1: Select one or more object.
Step 2: In the Properties pane > Size & Properties > Show in Mode. You see the Show in Mode section like this.
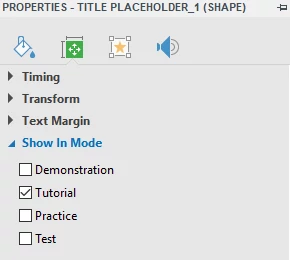
Then, select any check box to choose the corresponding mode for the selected object. Remember you can select multiple modes for a single object.
Note:
- You can choose operation modes for all objects on the same slide only. You can’t do this for all objects on multiple slides at a time.
- When creating software simulations, the app automatically chooses the Demonstration mode for cursor path objects, the Demonstration and Tutorial mode for callout objects.
Choose Operation Modes to Export Projects
To choose operation modes to export a project, do the following:
Step 1: In the Export tab > HTML5. This opens the Export To HTML5 window.
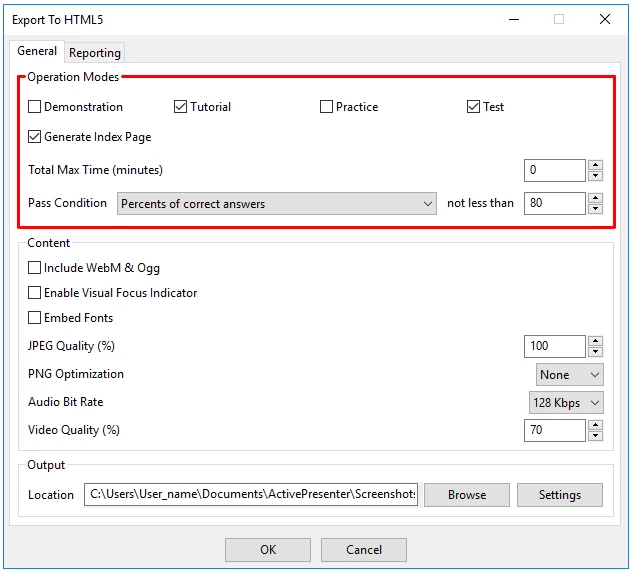
Step 2: Look at the Operation Modes section in the General tab, and select any mode you wish. Then, customize options like Total Max Time and Pass Condition. Note that the Total Max Time option is available only for the Test mode. For more information, see Exporting Projects to HTML5.
Note:
- When exporting a project to video, the video output is automatically in the Demonstration mode.
- By default, all of four operation modes are selected. But you can select only the modes you want.
That’s how to work with operation modes in ActivePresenter 7. To apply this technique, you can show learners the task in Demonstration mode. Then, let them try it by themselves in Tutorial or Practice mode before bringing them to Test mode. Remember that ActivePresenter allows you to create any and all these modes with a single video without record several times. Hope that it helps.