When creating an eLearning project, sometimes you want to insert an audio file to make it more interesting and engaging. For instance, when you voice your project over and insert the background music, you may want to decrease the background music while increase the volume of your voice sometimes, and vice versa. You may also want to change your voice volume where it’s too either loud or small. In this article, I will explain in detail steps of how to change audio volume with ActivePresenter.
Change Audio Volume
Change volume for a specified part of the video/audio file.
To apply changes for a specified part of the video/audio, take the following steps:
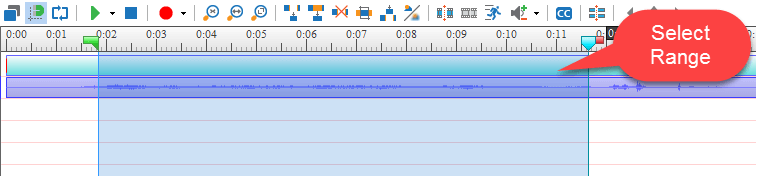
Step 1: Select the range on the Timeline.
Just in case you are an ActivePresenter-newbie, you can click, hold and drag the Red and Green Markers along the Ruler to select the range.
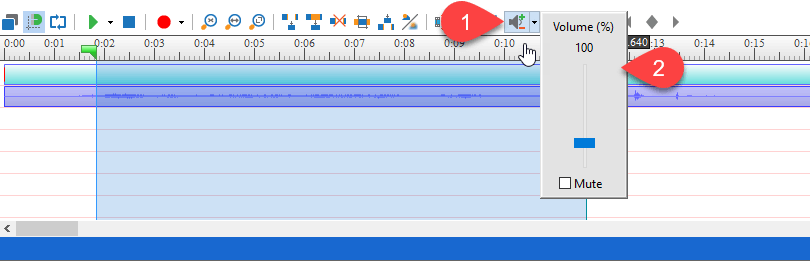
Step 2: Click the Adjust Volume button. (1)
Step 3: Scale the volume from 0 (silent) to 500 (max) in the Volume Scale dialog. (2)
Change Volume for the whole video/audio file
- Click the video/audio object to select it.
- Click the Adjust Volume button. (1)
- Adjust the scale. (2)
Restore Original Audio Volume
Restore Original Volume for a specified part of video/audio file.
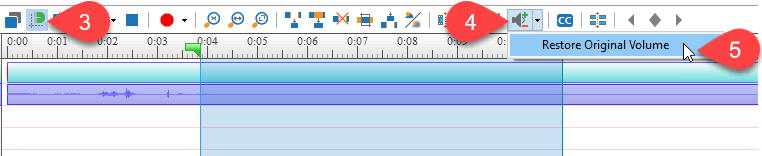
To restore the original volume of just a video/audio range, it is recommended that you should turn the Snap mode on for easily selecting the range that you have changed the volume.
To do that, take following steps:
- Click the Snapping button. (3)
- Select the range.
- Click the Adjust Volume button. (4)
- Choose Restore Original Volume. (5)
Restore Original Volume for the whole video/audio file
- Click the video/audio object to select it.
- Click the Adjust Volume button. (4)
- Choose Restore Original Volume. (5)
So, we have introduced Change Volume in ActivePresenter. Try it now and please let us know if you have any obstacle.