Looping animation repeats itself as soon as it completes. In Saola Animate, you can easily loop animation using timeline triggers.
This tutorial covers:
Looping Animation in a Scene
By default, animation, as well as the timeline containing it, plays forward once. To loop animation, you can set a timeline trigger at the end of the animation. The trigger will play the timeline again once it reaches its end.
Suppose you’re animating a car. Apart from moving the car, you have to make the car wheels rotate while the car is moving. The best practice is create a wheel symbol having its own rotating looping animation. Then, use the wheel symbol to create the car and animate the car as a whole. The following process shows you how to create a seamless rotating animation for the wheel image before converting it into a symbol.
Step 1: In the Timeline pane, move the Playhead to the end of the animation. You can also press the END key or click the Go to End button (1).
Step 2: Press ALT+T or click the Insert Trigger button (2) on the Actions bar. This opens the Timeline Triggers dialog where you can define a trigger.
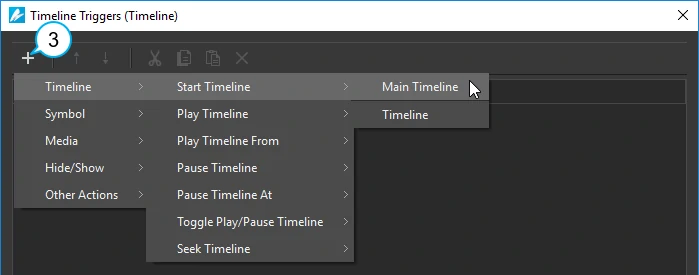
Step 3: Click Add Action (3) > Timeline > Start Timeline. In this case, the target object is the main timeline.
This attaches the Start Timeline action to the trigger (4) which makes the timeline play and loop as soon as it ends.
To see your loop in action, you can preview it in browser or use the Loop Playback button (5) in the Timeline pane. Be aware that the Loop Playback option loops only in the editor, not when the document is exported.
Note: You can use the Complete timeline event to loop the current timeline. Just click the Timeline Event Handlers button (6) and add the following event actions: Complete – Start Timeline.
Looping a Document
You can loop not only a single timeline of a scene but also all scenes in a document, including the main document and the symbol one. Do the following:
Step 1: In the Timeline pane, go to the last scene in a document. After that, move the Playhead to the end of the animation on the main timeline.
Step 2: Press ALT+T or click the Insert Trigger button on the Actions bar. This opens the Timeline Triggers dialog where you can define a trigger.
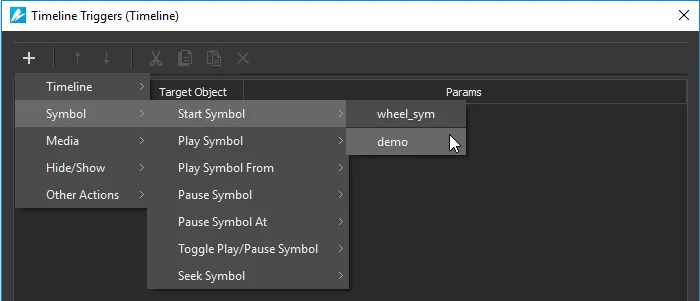
Step 3: Click Add Action > Symbol > Start Symbol. The target object can be the main document or any symbol you want.
Note:
- Similar to looping a timeline, you can use the Complete timeline event to loop the whole document. Just add event actions (Complete – Start Symbol) to the main timeline of the last scene in the document.
- You may want to alternate forward and backward playback direction during a loop. In other words, animation will play forward and then in reverse. To do that, set the playback direction to Backward. You can also change the speed of the reversed animation by selecting a speed other than 100%.
- In addition, it’s possible to loop animation back to a certain point on the timeline instead of returning to the beginning. Just use the Continue Timeline/Symbol From action. Specify the point where you want the animation to loop back using time in milliseconds or labels.
That’s it! You now have a loop within your animation. Feel free to ask us if you need any help.


