Creating hover effect is a simple way to add a subtle level of interaction to your website. The hover effect can provide a variety of benefits by providing instant information or serving as navigation aids.
Thus, it helps reduce the number of clicks required by user, as well as limit extra space on a page. For users to simply achieve these benefits, Saola Animate supports to create hover effect at ease without coding. In this tutorial, we will learn how to create hover effect in Saola Animate, a powerful tool to create HTML5 animations in detail with some examples.
Types of Hover Effect
Before creating the hover effect, we need to be aware of its applications. Generally speaking, the hover effect makes the change when users move their mouse over an object. While there are many innovative ways the hover effect can be used, I would like to summarize some of its more common usages.
- A hover effect can present the element’s new appearances. For example, hovering over a button changes its color, shape, font,…
- Hovering is also an effective way to show a different perspective of an element like changing the view angle of the element, or zooming in or out the element.
- This special effect can also be used to initiate movement or animation.
Tools to Create Hover Effect
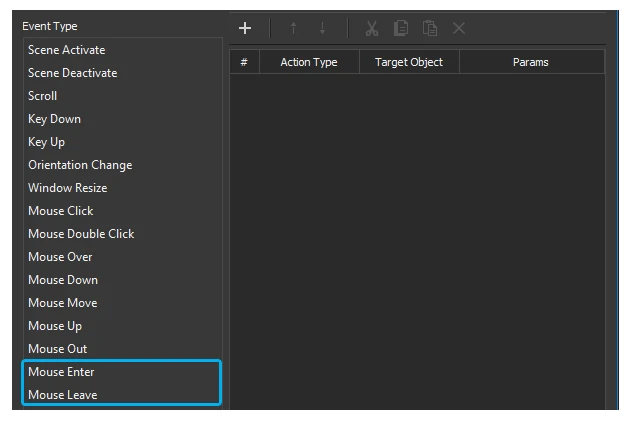
Saola Animate provides two event functions namely Mouse Enter and Mouse Leave to create the hover effect. They can be found in the Document, Scene and Element Event Handlers. If they are new to you, learn more about event-actions in this tutorial.
The Mouse Enter event occurs when the mouse pointer moves onto an element.
The Mouse Leave event occurs when the mouse pointer moves out of an element.
With each of these events, we need to choose the actions to complete the hover effect. Depending on which purposes of using hover effect, we can use different actions.
Note: The Mouse Over and Mouse Out events in Saola Animate differ from Mouse Enter and Mouse Leave events in the way they handle event bubbling. The Mouse Over and Mouse Out may not be suitable to use for single element due to possibility of causing undesirable behavior. The Mouse Enter and Mouse Leave are used in this tutorial because they are better to deal with single element.
Steps to Create Hover Effect
To begin with, I want you to take a quick look at this example:
The play button is changed when the mouse hovers over it. In this example, I used 2 images to represent different states of the button.
The image (1) is the normal state of the button and the image (2) is the hovering state of it, which is initially hidden by the normal state.
To create hover effect with them, we need to group them or convert them to symbol. Thus, we can add events for them later and edit them independently of the main project. Symbol can also be reused in other documents.
Note that in the case of creating button, to ensure the button can work with a single tap in iOS, the Display property and Show/Hide action should not be used.
To continue creating the hover effect, follow the steps:
Step 1: Create the display animation for the image (1) using Auto-Keyframe mode:
Firstly, put the Playhead at where you want the animation to end on the timeline.
Next, select the element, in the Properties pane, set the Opacity to 0. You can remove transition of its segment if you need to.
Note: The normal state image should be at the top of the z-order.
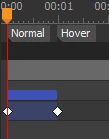
Step 2: Create two labels on the timeline and name them. The Normal label is at the time that image (1) display is on. The Hover label is at the time that image (1) display is off.
Note: We should use label because using it is easier to remember, using timestamp is more complex.
Step 3: Open the Scene Event Handlers of the symbol or the Element Event Handlers of the group, for each type of the hovering applications, we need to add different actions.
Hovering To Change Appearances
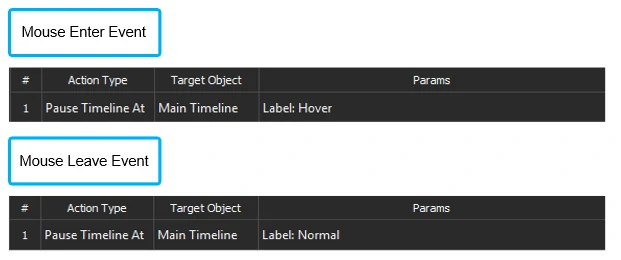
With the Mouse Enter event, click Add Action > Timeline > Pause Timeline At > Main Timeline > double-click the Params cell > Label > Hover label.
With the Mouse Leave event, click Add Action > Timeline > Pause Timeline At > Main Timeline > double-click the Params cell > Label > Normal label.
The result will be like this:
Note: You can use the Hide/Show action to create the hover effect to switch between the element’s appearances. However, it will lead to tapping twice in iOS to enable the click function.
Hovering To Zoom or To Trigger Animation
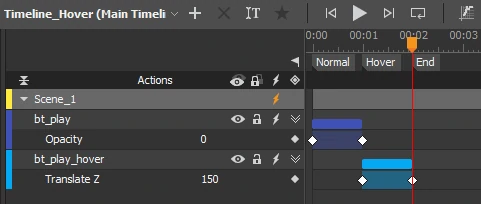
In order to zoom or to trigger animation by the hover effect, create new animation for the hidden element. As regards zooming, you can use Scale X and Scale Y or Translate Z properties to create the zooming animation. And don’t forget to place the animation segments at different times. After that, put the third label at the end of the new animation and name it.
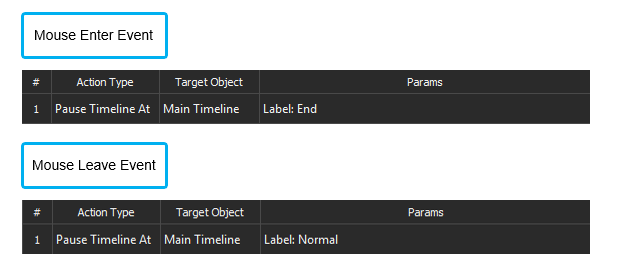
Next, with the Mouse Enter event, click Add Action > Timeline > Pause Timeline At > Main Timeline > double-click the Params cell > Label > End label.
With the Mouse Leave event, click Add Action > Timeline > Pause Timeline At > Main Timeline > double-click the Params cell > Label > Normal label.
After all, we will get the result like this:
In terms of triggering animation, we will do another variant:
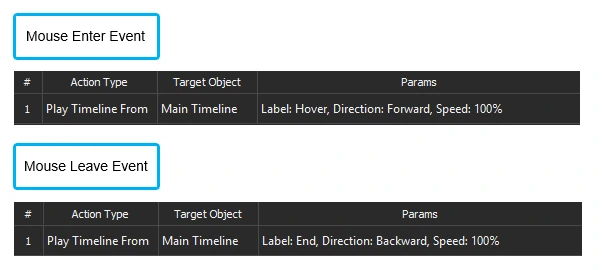
With the Mouse Enter event, click Add Action > Timeline > Play Timeline From > Main Timeline > double-click the Params cell > Label > Hover label.
And with the Mouse Leave event, you can do the same as the previous one, or you can let your animation go backward: click Add Action > Timeline > Play Timeline From > Main Timeline > double-click the Params cell > Label > End label, and choose Backward direction.
Note that to perform the animation livelier, you can add Easing to your animation.
In the result, the hovering triggers the zooming animation like this:
Finally, make 2 images coincide and don’t forget to resize the Canvas size and scene size to fit the symbol. Then return to the project and preview how the button works in browser.
That’s how we create the hover effect in Saola Animate. Try Saola Animate now and share with us your experience!
