Are you looking to add natural-sounding voiceovers to your eLearning courses without recording yourself? ActivePresenter 10, one of the best eLearning authoring tools, makes it simple with the Cloud Voices feature. This AI-powered tool converts any text into lifelike speech, perfect for narrations, interactive objects, or annotations. Whether you’re creating tutorials, quizzes, or videos, it saves time and enhances accessibility. In this article, we’ll guide you through the steps to use cloud voices in ActivePresenter 10.
Note: AI features are only available in the paid edition of ActivePresenter. An active Internet connection is also required to use AI features that rely on connected providers.
AI Services and Cloud Voices
ActivePresenter uses AI services to provide features like Cloud Voices. These services may consume AI credits each time you generate content. You can track your credit usage at any time by opening the AI tab to view your statistics and remaining balance.

How to Use Cloud Voices in ActivePresenter 10
Ensure you have an ActivePresenter 10 license to unlock access to Cloud Voices. Now, follow the steps below:
Step 1: Access the Cloud Text-to-Speech Voices by performing either of the following:
- Open the AI tab > Cloud Voices.
- Select a text object > Properties pane > Audio tab > Audio section > More Voices … button.
Step 2: Configure the settings in the pop-up Cloud Voices dialog.
The dialog includes two main sections: Voices Option and Preview.
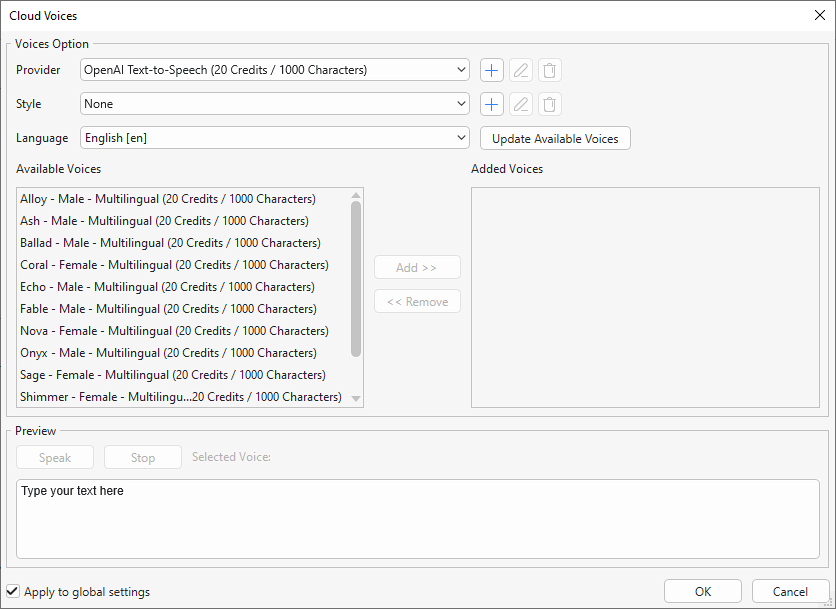
1. In the Voices Option section
- Provider: Choose your desired Cloud Voices provider from the drop-down list. By default, ActivePresenter provides you with Cloud Voice from OpenAI and Amazon Polly. Besides, you can add, edit, or remove custom cloud voice providers here.
- Style: Select a desired style for the generated voice from the drop-down list. The style list depends on the voice provider. You can also add, edit, or remove a custom voice style.
- Language: Select a language you want from the drop-down list. The language list
- depends on the voice providers.
- Update Available Voices: Click this button to update the available voices of the selected voice provider.
- Available Voices: Show the available voices of the selected voice provider. The number of AI credits consumed depends on the length of the text and the provider. Click on a voice to select it.
- Add: After selecting a voice in the Available Voices list, click Add to move that voice to the Added Voices list.
- Remove: Click Remove to delete that voice from the Added Voice list.
- Added Voice: Show the added voice, which moves in from the Available Voices list. These added voices will be shown in the Text to Speech section in the Properties pane and ready to convert your text object to speech.
2. In the Preview section
- Preview: Enter the text in the Preview textbox.
- Speak: Click Speak to preview the voice with the entered text.
- Stop: Click Stop to stop previewing the voice.
- Apply to global settings: Select this option to apply the current settings to a future project.
- OK: Save the settings.
Use Cloud Voices to Convert Text To Speech in ActivePresenter 10
Once you select your desired cloud voices, you can use these voices to convert text to speech. These cloud voices will be shown in the Text to Speech section in the Properties pane. Do the following to convert text to speech using cloud voices.
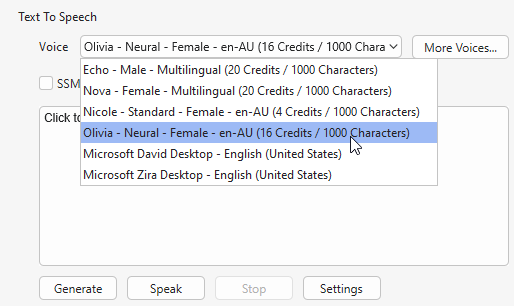
Step 1: Select a text object on the Canvas (shape, text caption, etc.) > Properties pane > Audio tab > Audio section > Text To Speech > Click on the Voice drop-down list > Select a cloud voice from the list.
Step 2: Perform either of the following:
- Click the Generate button to convert text to speech.
- Select a closed caption segment on the Timeline pane or the Canvas > Right-click it > Convert Closed Caption to Audio.
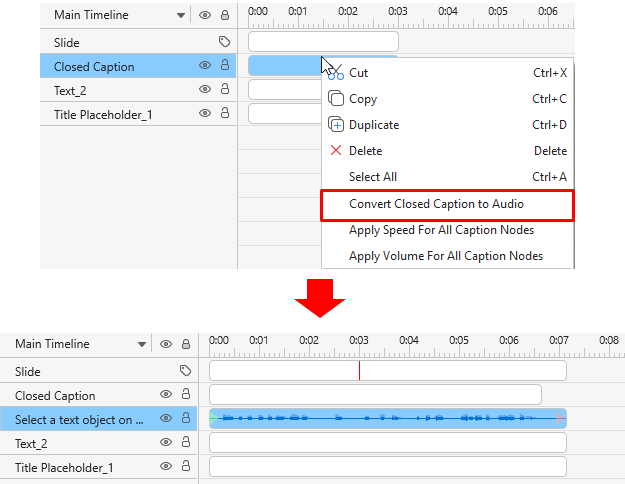
Then, you’ll see an audio object appear on the Timeline pane indicating your text has been converted to speech.
Note: Besides cloud voices, ActivePresenter also detects and uses SAPI5-compatible voices installed on your computer for text-to-speech.
That’s how to use Cloud Voices in ActivePresenter 10 to convert text to speech.
👉 Download ActivePresenter 10 today and start creating smarter, faster, and better content!

FAQs about Using Cloud Voice in ActivePresenter 10
1. What are Cloud Voices in ActivePresenter 10?
Cloud Voices refer to the AI-powered Text-to-Speech (TTS) feature in ActivePresenter 10.
2. Do I need a license to use Cloud Voices?
Yes. Cloud Voices are only available in licensed editions of ActivePresenter 10 (Standard or Pro). The Free Edition does not support them.
3. Do Cloud Voices require an Internet connection?
Yes. Since the voices are generated by providers (such as Amazon Polly or OpenAI), you must remain connected to the Internet.
4. Will using Cloud Voices consume AI credits?
Yes. Each time you generate audio with Cloud Voices, credits are deducted based on the text length and the provider used.
5. Which providers can I use for Cloud Voices?
ActivePresenter supports both built-in providers and custom ones, such as Google Cloud and Microsoft Azure. You can add more custom cloud voices as you want.
See Also: