If you’ve created interactive eLearning courses in ActivePresenter 10, the next step is to deliver them to your learners. One of the most seamless ways to do this is to publish eLearning project to uPresenter LMS, a lightweight LMS platform that lets you host, share, and track your courses instantly.
In this tutorial, you’ll learn how to upload your eLearning project directly from ActivePresenter 10 to uPresenter.
Why Publish eLearning Projects to uPresenter LMS?
uPresenter is an eLearning creation platform designed to work hand-in-hand with ActivePresenter. By publishing eLearning projects directly to the uPresenter LMS, you can:
- Direct publish flexible courses without expensive LMS setup.
- Share your course online with just one click.
- Avoid manual packaging (e.g., SCORM or xAPI) and uploading processes.
- Keep your content organized and easily update existing courses.
- Track learner progress, quiz results, and completion rates in real time.
How to Publish eLearning Project to uPresenter LMS
Step 1: Prepare Your Project
Before publishing, make sure you’ve completed desinged your project in ActivePresenter 10. This includes adding interactions, quizzes, and setting up player options.
Step 2: Access the Publish
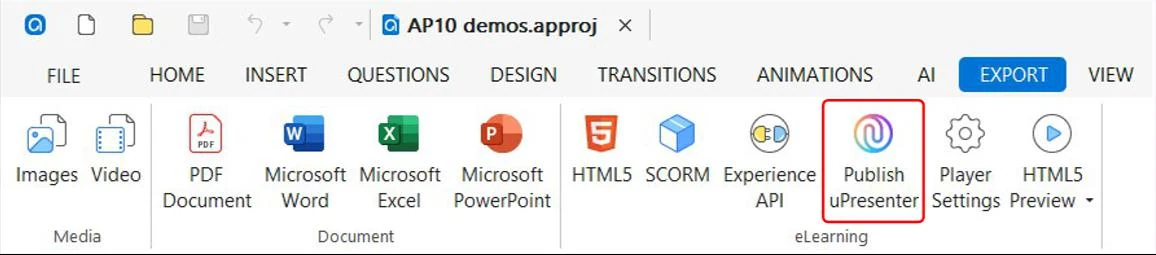
- Go to the Export tab.
- Click Publish uPresenter.
Step 3: Sign In/Sign up to uPresenter
A dialog box will appear asking you to log in with your uPresenter account. If you don’t have one yet, sign up at upresenter.ai.
Step 4: Fill in Course Information
Once signed in, you’ll see fields for course details in ActivePresenter
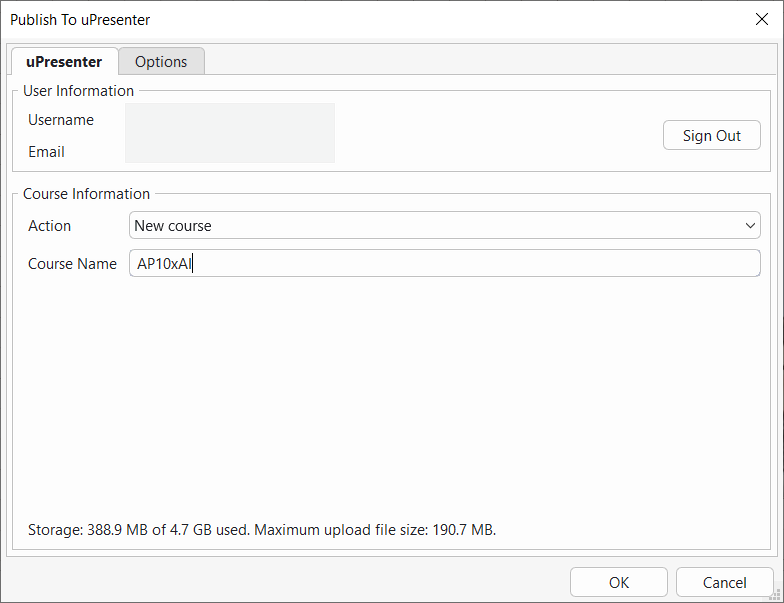
- User Information: Displays your username and email.
- Action: Choose one of two options:
- New Course: Create and upload a brand-new course.
- Update Existing Course: Replace or revise an older course already on uPresenter.
- New Course: Create and upload a brand-new course.
- Course Name: Enter or edit the title of your course.
Step 5: Adjust Options (Optional)
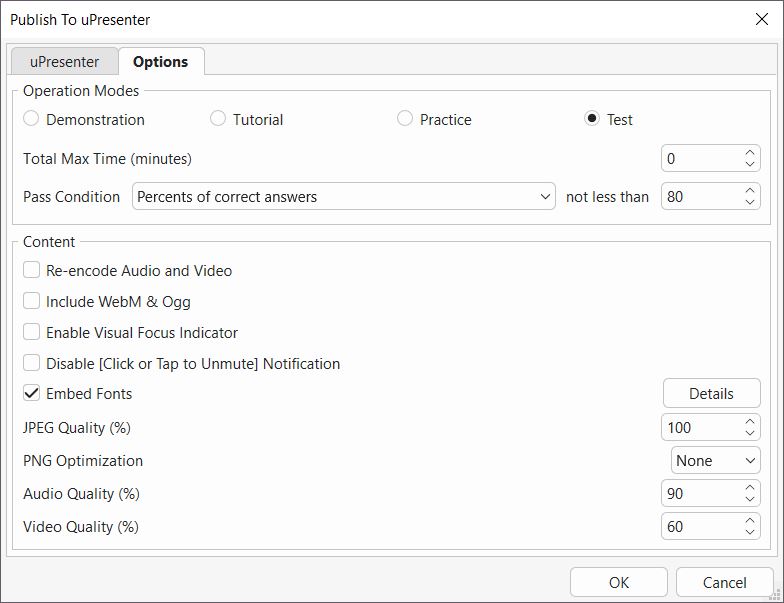
Switch to the Options tab to configure export settings.
Here are the explanation for each option:
Four Operation Modes: Select modes to export. ActivePresenter 10 offers you 4 modes to export: Demonstration, Tutorial, Practice, and Test.
Demonstration: In this mode, learners simply watch the task being performed. They don’t interact with the content—just observe how it’s done.
Tutorial: Learners follow along and try each step with the help of on-screen hints and annotations guiding them through the process.
Practice and Test: These modes let learners perform the task on their own to check their understanding. No hints or annotations are shown. The difference is that in Practice mode, interactions like mouse clicks, keystrokes, or drop areas will appear only if a learner makes a mistake, while in Test mode, they won’t appear at all.
Total Max Time (in minutes): Set the total max time of the test. This value is the objects’ life cycles plus the time for students to answer. It also includes the pausing time of the presentation to wait for user answers. Set the value to 0 to disable this feature.
Pass Condition: Determine the overall pass/fail result of students when they take a test.
Re-encode audio and video: If this option is selected, ActivePresenter will re-encode all audio and video to ensure compatibility with HTML5 across different devices and browsers.
However, if you are confident that your audio and video files are already fine and want to reduce export time, you can disable this option. In that case, ActivePresenter will not re-encode audio/video files that haven’t been edited in the editor.
Include WebM & Ogg: Allow viewing HTML5 content on browsers that don’t support MP4 and MP3 but support WebM and Ogg.
Enable Visual Focus Indicator: Display an outline around the object having focus.
Disable [Click or Tap to Unmute] Notification: Some browsers don’t allow content containing audio that plays automatically without user interaction. In that case, the HTML5 player will mute audio to enable autoplay. The player will display a message to notify users to click to unmute audio. Select this checkbox to hide the message.
Embed Fonts: Embed fonts that are used in content into output using CSS3 Web Fonts Specification. This makes the content look consistent across platforms and devices. Click the Details button to select the fonts to embed.
Fonts selected to embed will be included in the output package, ensuring that learners see the exact same typography even if those fonts are not installed on their devices.
JPEG Quality (%): Set the quality level for images saved in JPEG format.
PNG Optimization: Choose the compression level for PNG images. The higher the level, the longer the export.
Audio Quality: Define the output audio quality. The higher the audio quality, the larger the output file size.
Video Quality (%): Set the output video quality. Higher values deliver better quality but result in larger files.
Step 6: Publish Your Course
Click OK to start publishing. ActivePresenter will upload your project directly to uPresenter.
Step 7: View Course Online
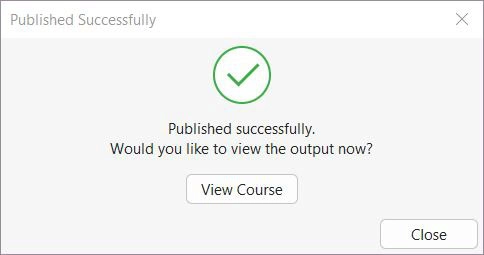
When the upload finishes, a confirmation dialog appears with a View Course button. Click it to open your course instantly on uPresenter.
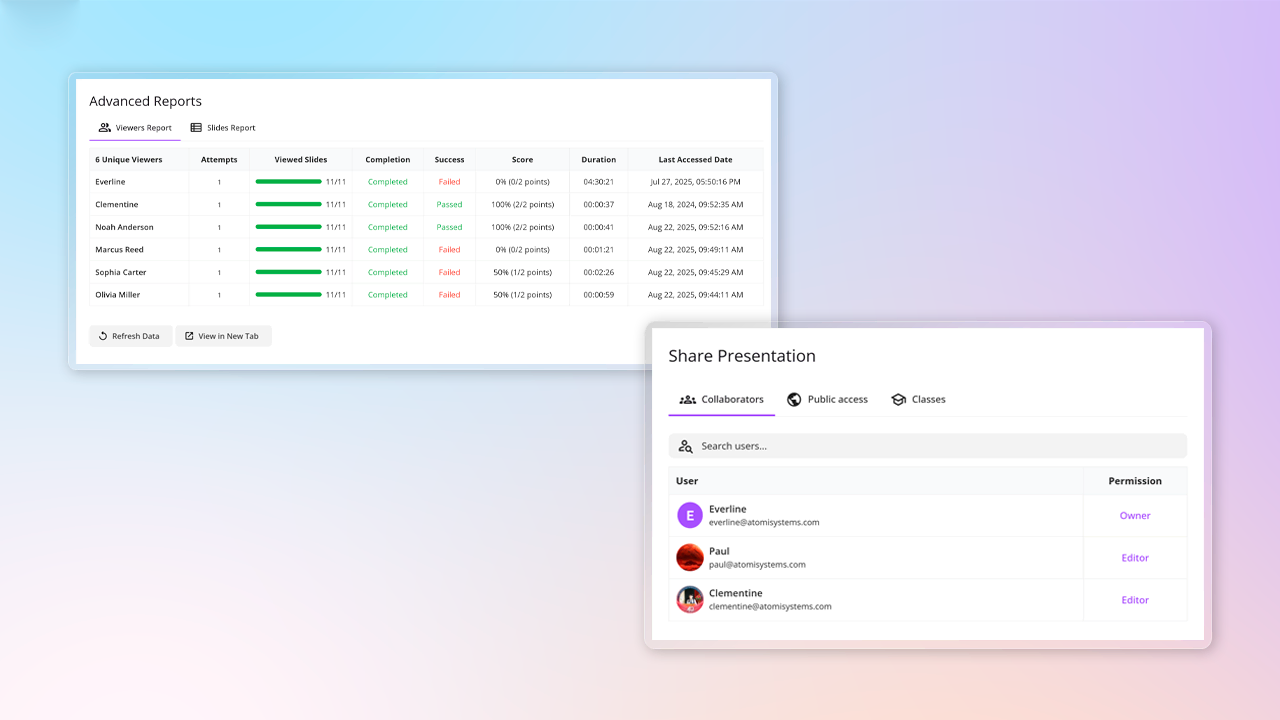
Step 8: Share & Track Results
You can continue to share, invite learners and see how they interact and engage with your courses right in the uPresenter. Please refer to Enroll Learners & Track Result in uPresenter tutorial.
Tips for a Smooth Publishing Process
- Use meaningful course names so learners can identify them easily.
- If you need to revise a course, choose Update Existing Course instead of uploading a new copy.
- Test your project in HTML5 preview before publishing to ensure everything works correctly.
Final Thoughts
With just a few clicks, ActivePresenter 10 makes it simple to publish eLearning projects to uPresenter LMS. This direct integration helps educators, trainers, and instructional designers deliver interactive learning experiences without worrying about technical hassles.
Whether you’re creating tutorials, simulations, or quizzes, publishing eLearning courses to uPresenter ensures your learners can access and engage with your content seamlessly.
Download ActivePresenter to publish eLearning projects directly to a lightweight LMS, making it easy to share courses and track learner results.

FAQ: Publish eLearning Project to uPresenter LMS
1. Can I publish my eLeanring project to uPresenter LMS in the free version?
Yes, but the output will have ActivePresenter watermark. Upgrading to Pro edition will remove the watermark.
2. Do I need a uPresenter account to publish?
Yes. You must sign in/sign up with your uPresenter account before uploading a course.
3. Can I update an existing course on uPresenter?
Yes. Choose Update Existing Course to replace or revise a published course.
4. Does publishing eLearning projects to uPresenter LMS support tracking learner results?
Yes. uPresenter lets you track progress, quiz scores, and completion status automatically by navigating to Report section in the upper right corner after publishing to uPresenter.
5. Can I preview my course after publishing?
Yes. Once upload is done, click View Course in the confirmation dialog to open it online instantly.