In this tutorial, you’ll learn how to use ActivePresenter’s self-recording feature to capture all activities within the ActivePresenter 10 interface. Designed as an all-in-one eLearning solution, ActivePresenter 10 lets you record your screen, edit videos, create responsive courses, and publish them directly to LMS platforms like uPresenter.
Overview of Self-Recording
ActivePresenter allows you to record your own ActivePresenter interface in two modes: Record Screen As Video and Record Interactive Simulation. The settings are similar to the standard recording modes, but instead of capturing other apps, you record the ActivePresenter user interface itself. In the Record Screen As Video mode, you can also enable your webcam to include a face-cam overlay.
When to Use Each Mode
- Record Screen As Video: Use this mode when creating tutorial or demo videos with sound and webcam.
- Record Interactive Simulation: Use this mode to create interactive lessons where each mouse and keyboard action becomes a separate slide for learner interaction.
Step-by-Step Guide
Step 1: Open ActivePresenter 10, in the Start page, choose either Record Screen As Video or Record Interactive Simulation, depending on your purpose.
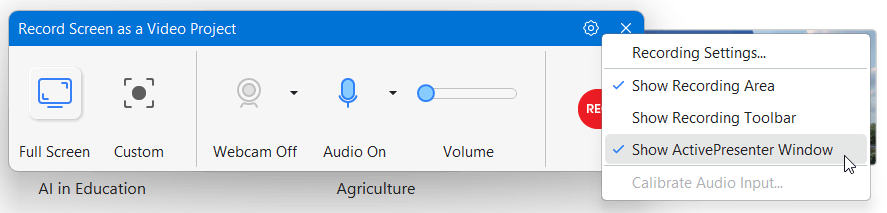
Step 2: In the Recording dialog, click the Settings icon, then select Show ActivePresenter Window. This option limits the recording area to the ActivePresenter interface only.
Step 3: Adjust the other settings: choose your screen resolution and audio input. If needed, turn on the webcam to record your face along with the screen (this option is available only in video mode). You can also enable or disable cursor effects, click highlights, or system audio.
Step 4: Review your settings and click Record. ActivePresenter will start capturing all activities inside its interface.
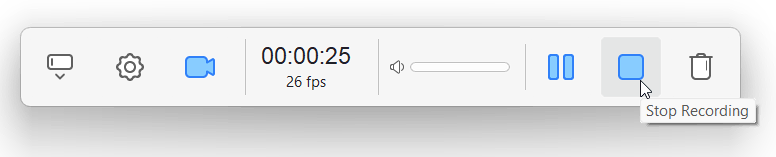
Step 5: When finished, press CTRL+END (for Windows) or ⌥⌘2 (for macOS). Alternatively, you can click the Stop button in the Recording Toolbar dialog.
If recording as a video, your project will open in the Timeline for trimming, adding annotations, or voice-over. If recording as a simulation, ActivePresenter will generate separate interactive slides for each user action.
Tips and Notes
- To record other applications, disable Show ActivePresenter Window and select your desired region instead.
- Use hotkeys for faster start/stop operations, check them in the Settings dialog.
- If using a webcam, position it in a visible corner and ensure proper lighting.
- For consistent audio quality, avoid unplugging or plugging in your microphone while recording, as it may cause sound interruptions or device errors.
Try ActivePresenter 10 for free today and start creating professional tutorials, demos, or eLearning courses right away!

Frequently Asked Questions
Q1: Can I record the webcam in self-recording mode?
A: Yes. In Record Screen As Video mode, you can enable the webcam to record your face along with the ActivePresenter screen.
Q2: What’s the difference between Record Screen as Video and Record Interactive Simulation?
A: The video mode creates a single video file (ideal for demos or screencasts), while the Interactive Simulation mode generates interactive slides for eLearning lessons.
Q3: Can I edit the recorded file afterward?
A: Absolutely. Once recording stops, your project opens in the editor where you can trim, annotate, add voiceovers, quizzes, or export it in multiple formats.
Q4: Why is my audio missing after recording?
A: Check your recording settings to ensure the correct microphone is selected and enabled. Also, verify your OS microphone permissions and test before recording.
Q5: What can I do if ActivePresenter crashes during recording?
A: You can try recovering your video from the hidden folder: C:\Users\Username\Documents\ActivePresenter\.ActivePresenterCachedProjects
Enable “Show Hidden Files” in File Explorer to access it. If you find video files there, copy them to another location and open them in ActivePresenter. If not, the recording may be lost. To prevent this in the future, keep sessions under 30 minutes, ensure enough disk space, and use the H.264 codec for long recordings.