Creating effective training for new software, applications, or internal systems used to be a technical headache involving endless screenshots and complex coding. Thankfully, modern software simulation tools for training have revolutionized this process, allowing instructional designers and L&D professionals to build realistic, interactive learning experiences without writing a single line of code.
These software simulation tools automatically capture application actions and turn them into guided practice, demonstration videos, and graded assessments. But among the several options out there, which is worth the title: Best software simulation tools for training without coding? Let’s deep dive into this blog post to explore some outstanding names as well as know how to create an interactive software simulation step by step.
ActivePresenter: The Best Software Simulation Tool for Training
When searching for the best software simulation tool that offers a perfect blend of power, ease of use, and value, ActivePresenter stands out as the top choice. It’s an all-in-one eLearning authoring tool, a video editor, and a screen recorder, making it a comprehensive solution for creating professional software simulation training.
An interactive software simulation created by ActivePresenter. See and interact with the full sample here.
Why ActivePresenter Is The Best Software Simulation Tool for Training
Smart Capture Technology
This is the cornerstone of its efficiency. When recording a software process (using the Record Interactive Simulation option), ActivePresenter does not merely capture video frames. Instead, it captures the data of the interaction (mouse click coordinates, keystrokes, object information) and generates:
- Automatic Slide Creation: Each significant action (a click, a text input) becomes its own slide in the project.
- Interactive Objects: Mouse clicks (hotspots), key presses, and text input boxes.
- Feedback Messages: Correct, incorrect, and hint messages to guide the learner.
- Smart Annotations: Text captions that automatically describe the action taken (e.g., “Click the ‘File’ button”).
Built-in Training Modes
The entire process is handled by the software. After finishing your editing, you can export the project to the Demonstration, Tutorial, Practice, or Test modes typical of high-quality software training. You can customize all interactions, feedback, and branching logic using a simple, visual, drag-and-drop interface, eliminating the need for complex JavaScript or ActionScript. ActivePresenter effortlessly supports the 4 standard modes of software training:
- Demonstration: The simulation plays back as a narrated video.
- Tutorial/ Practice: The learner clicks on the correct spot to advance, receiving automated hints.
- Test: The learner performs the task without hints, and the simulation tracks success/failure for scoring.
Comprehensive Video Editing
A key differentiator is the built-in & professional video editor. If a step requires a full-motion video (e.g., a drag-and-drop action or continuous scrolling), ActivePresenter captures it as video. You can then use the editor for:
- Trimming, cutting, and speeding up video segments.
- Adding Zoom-n-Pan effects to highlight specific screen areas.
- Applying blur to hide sensitive data – all within the same program, unlike tools that require exporting to third-party editors.
- And more…
Value and Accessibility
ActivePresenter provides a unique financial model in the market: an extensive, non-expiring Free edition and a highly competitive, one-time perpetual license. This makes high-quality software simulation accessible to freelancers, educators, and organizations seeking an alternative to expensive annual subscription fees.
Immediate Publishing & Hosting
The ultimate goal of creating great training is getting it in front of your learners, and you can achieve that easily in ActivePresenter. Beyond simply exporting to industry-standard formats like SCORM, xAPI, and HTML5, the software features a direct Publish to uPresenter LMS option. This feature allows creators to bypass the typical clunky, multi-step process of manually exporting a course package, logging into an LMS, and then uploading the ZIP file. Instead, the entire training simulation, along with its necessary tracking data, is uploaded and hosted directly to the uPresenter LMS environment straight from the ActivePresenter interface. A potential five-minute chore now turns into an instantaneous click.
All-in-One Platform
Unlike many competitors, ActivePresenter combines professional screen recording and video editing features (like blur, green screen, advanced audio editing) with full eLearning authoring capabilities (quizzes, responsive design, SCORM/xAPI support) in one program. This means no jumping between separate tools.
Download ActivePresenter and try almost all features for free with no limitation in time!

The Other Top Software Simulation Tools: Why They Fall Short
The market for software simulation is also shared by other famous tools like Adobe Captivate and Articulate Storyline 360. While they are competent, they are often not the best choice for straightforward, no-coding software simulation training due to significant hidden drawbacks.
Cost Barrier: High Fees and Hidden Expenses
The most immediate minus point is the pricing structure of these competitors. Especially for freelancers, smaller teams, and budget-conscious organizations.
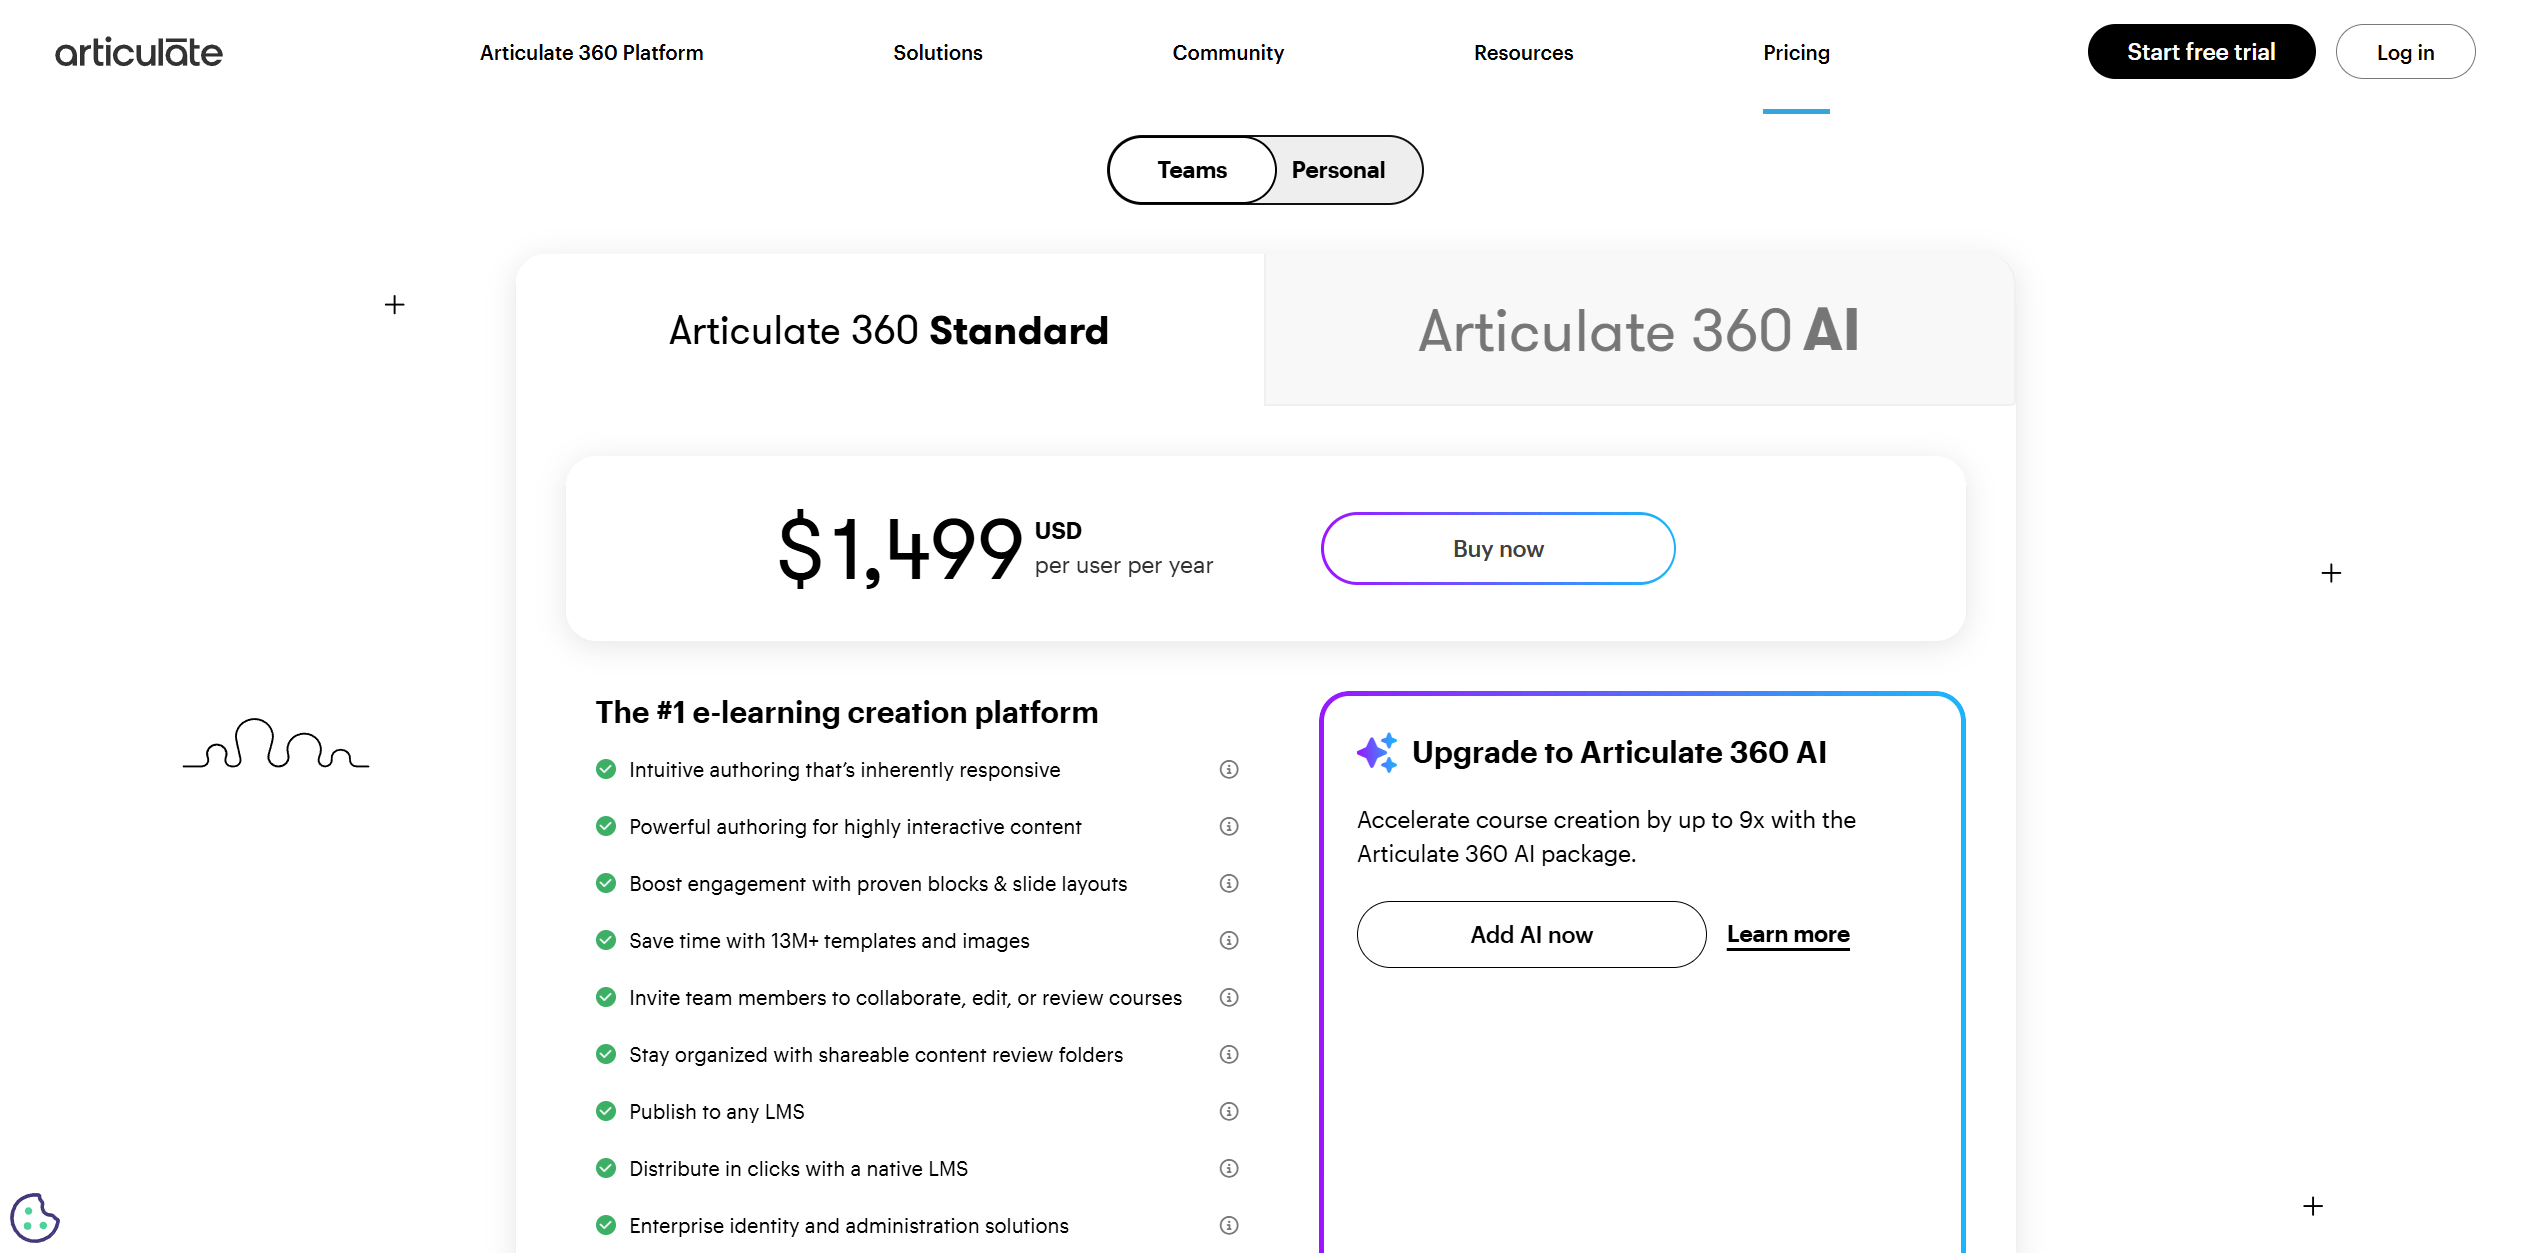
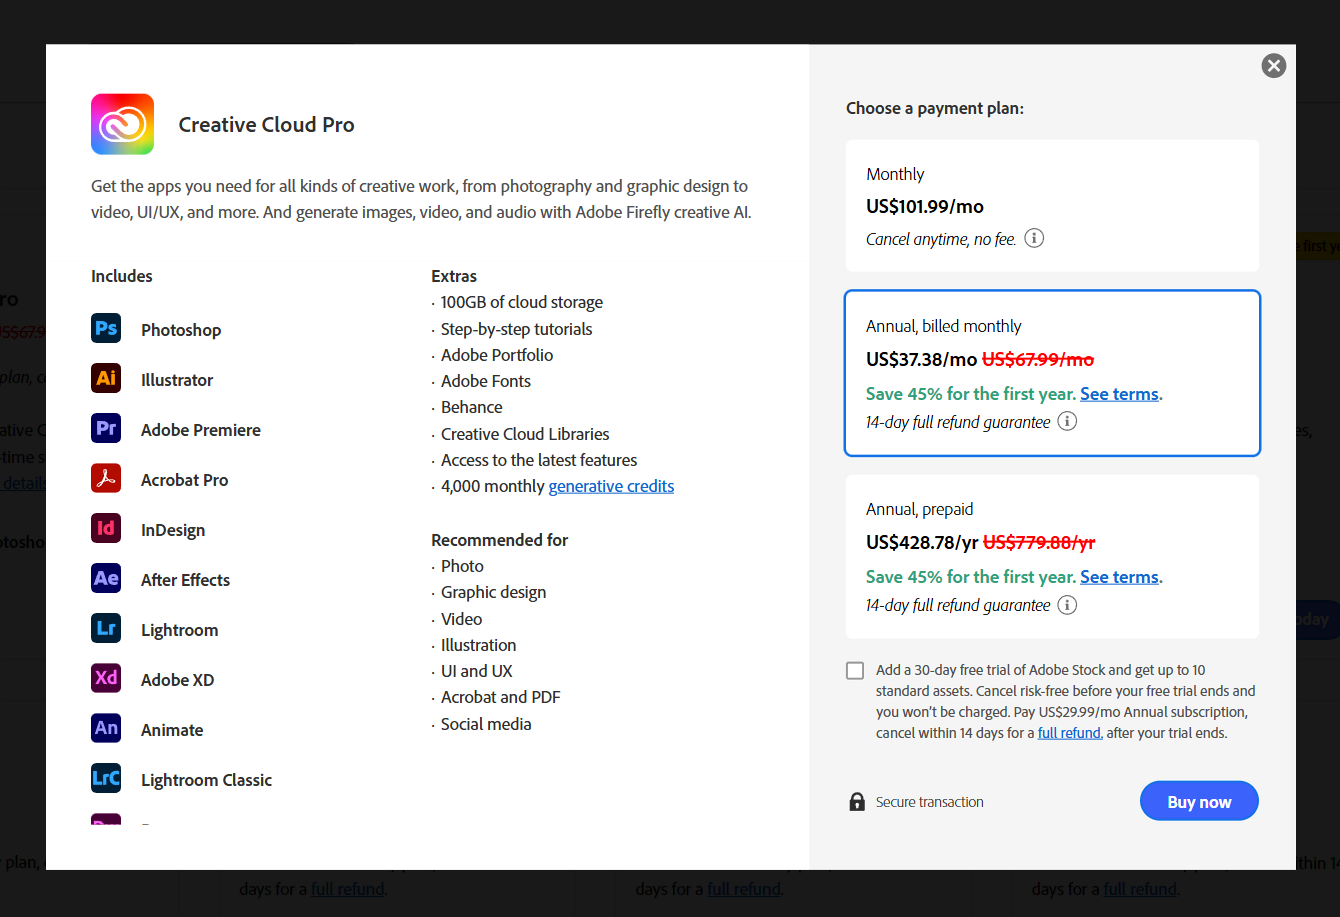
- Mandatory Subscription Fees: Articulate Storyline 360 operates exclusively on a costly annual subscription model, with the standard Teams plan hovering around $1,499 per user, per year. Adobe Captivate also pushes a subscription model (approx. $39.99/month or $479.88/year), with its Perpetual License being an expensive one-time purchase ($1,299 or more).
- The Hidden Cost of Ecosystems: While these subscriptions do include extensive asset libraries (like Content Library 360 or Adobe’s built-in assets), users often feel pressured to expand their toolkit. For instance, creating the entire course in Articulate requires using the larger Articulate 360 suite (including Rise, Review, etc.). Similarly, complex editing in Captivate can subtly push users toward the full Adobe Creative Cloud suite, incurring higher overall costs.
Steep Learning Curve and Complex Workflows
Both tools suffer from interfaces and design philosophies that prioritize power and breadth over rapid simulation creation.
- Adobe Captivate’s Complexity: Captivate has a long-standing reputation for a steep, intimidating learning curve. Its interface is packed with advanced features and dense menus, making the process overwhelming for L&D professionals whose core need is simply to capture a process and publish it. Mastery requires a significant time investment far beyond what’s needed for basic simulation.
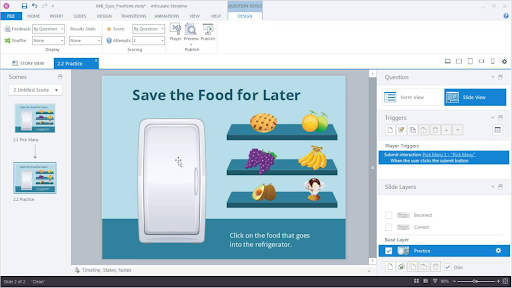
- Articulate Storyline’s Simulation Deficit: While Storyline’s interface is familiar (like PowerPoint), its capture utility is less “smart” than ActivePresenter’s. Creating the essential multi-mode simulation often devolves into a manual, repetitive process. Designers must spend time individually setting up Triggers, Layers, and interactions for each click box and text entry field, slowing down the development of linear, step-by-step simulations.
Performance and System Drag
The complexity and feature bloat of these powerhouses often come at a cost to performance. Both Captivate and Storyline 360 are resource-intensive applications. Working with large projects, high-resolution screens, or full-motion video clips can often lead to:
- Slow Load Times and Lag: Frequent freezing or hesitation, especially when switching views or previewing large, interactive slides.
- System Dependence: They demand powerful CPUs and ample RAM, making development difficult for users working on standard corporate laptops or older machines.
Why ActivePresenter Beats the Competitors
- Cost Barrier: The biggest drawback of both Captivate and Articulate is the cost and licensing model. Both require a significant, recurring annual subscription (or an expensive perpetual license for Captivate). For freelancers, smaller teams, or educators, ActivePresenter’s one-time purchase is an undeniable advantage.
- Learning Curve: Adobe Captivate is widely recognized to be complex and has a steep learning curve. While it offers advanced features like virtual reality (VR) simulations, achieving basic, high-quality software simulation training in ActivePresenter is faster and less intimidating for new users.
- All-in-One vs. Toolkit: While Articulate 360 is a suite of tools (Storyline, Rise, etc.), ActivePresenter is one single application that handles video, screencasting, and interactive eLearning. This unified approach optimizes the workflow for creating, editing, and publishing software simulation tools without coding skills or laggy experience.
How to Create a Software Simulation for Training in ActivePresenter
Creating a realistic and interactive software simulation in ActivePresenter is incredibly straightforward. The “Record Interactive Simulation” feature handles the heavy lifting, generating all the necessary interactive elements for you.
Here is a simple, step-by-step guide:
Step 1: Initiate the Simulation Capture
- Launch ActivePresenter: Open the application.
- Select the Recording Mode: On the Start Page, click Record Interactive Simulation. This will bring up the Recording Interactive Simulation Project dialog.
- Define the Capture Area: A blue frame will appear on your screen. Drag the blue rectangle to anywhere on the screen to specify the recording area manually. This action can also be done by using tools and commands in the Recording Area section of the dialog. ActivePresenter automatically detects and records within this area.
- Adjust Settings (Optional): In the dialog, you can adjust the recording options, such as selecting a capture profile, disabling audio recording (often preferred for simulation), and ensuring Automatic Annotation is checked for the best results. Check out this tutorial to know more details about how to record interactive software simulations.
Step 2: Record the Steps
- Start Recording: Click the Record red button. The software will hide the recording toolbar, and you’ll see a small blue border around your target application.
- Perform the Actions: Simply perform the process you want to teach – click menus, type text into fields, drag objects, etc.
- Crucial Insight: ActivePresenter is designed to capture interactions. Every time you click or type, it captures a new frame or slide, complete with the automatically generated annotations and interactive elements.
- Stop Recording: Press the assigned hotkey (usually Ctrl + End for Windows) to stop the capture.
Step 3: Edit and Refine the Simulation Slides
The recorded actions are now converted into a series of slides in the ActivePresenter editor. Each slide represents a step in the process. Follow the steps below or read at the tutorial here to know how to edit recorded interactive simulations.
- Review the Slides: Click through the slides to see the automatic output. Notice the Mouse Click interactive objects and Smart Annotations (text boxes explaining the action) are already in place. Delete unwanted slides
- Customize Annotations: Click on the automatically generated text captions (Smart Annotations) and reword them for clearer instructions. For example, change “Click on Text Box” to “Type your username into the field.”
- Customize Cursor Path, Mouse Clicks, and Keytrokes: Check out the following tutorials for more information.
- Adjust Feedback: Select a Mouse Click object. In the Properties pane on the right, you can customize the feedback messages (Correct, Incorrect, Hint) that the learner will see when they interact with the simulation.
- Add Transition & Animation: Add transitions to slides and animations to objects for better appearance.
Step 4: Publish to uPresenter LMS for Training
The most straightforward way to get your interactive software simulation training hosted and tracked is through ActivePresenter’s proprietary integration.
- Select Export: Go to the Export tab in the main toolbar.
- Choose Direct Publish: Click the Publish uPresenter button.
- Sign In & Go: A dialog will appear asking you to log into your uPresenter account. Once logged in, ActivePresenter handles the entire process: it packages the course, uploads it, and ensures all tracking (quizzes, progress, completion) is set up automatically.
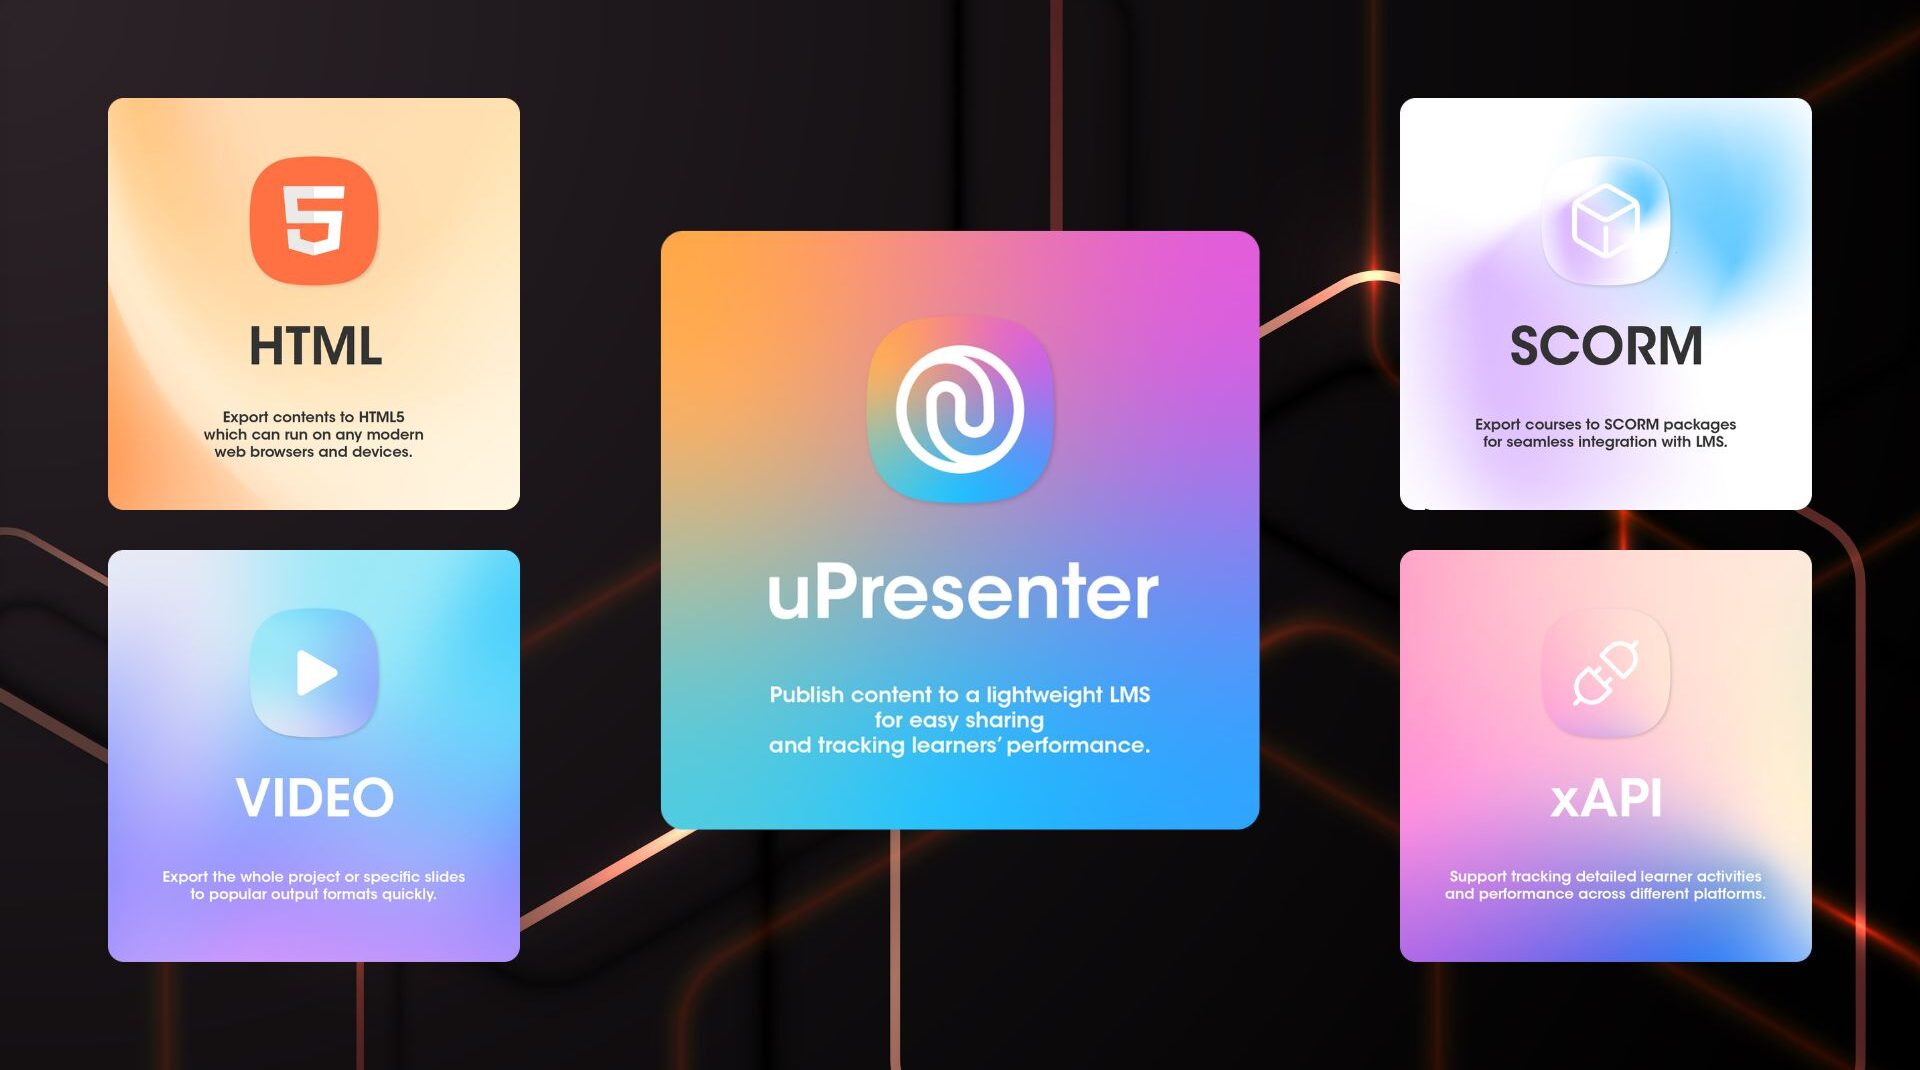
The other standard output formats like HTML5, SCORM, and xAPI are still available for compatibility with other third-party Learning Management Systems, but the Direct Publish option is the one-click path to hosting and tracking within the uPresenter environment.
In Brief
You now know more about the best tools to create software simulations for training. In which, ActivePresenter stands out the most. By using its unique Smart Capture feature, you can rapidly produce complex, interactive software simulation training content with maximum efficiency and minimal effort without the need for manual coding or stitching multiple tools together. Download ActivePresenter now to try creating a software simulation for free, and don’t forget to follow our Blog for more helpful tutorials and posts.