You’ve just been asked to build an online training course, and you have no idea where to start. Sound familiar?
Whether you’re a teacher transitioning to digital classrooms, a corporate trainer building compliance modules, or an entrepreneur packaging your expertise into a sellable course, the first question you’ll ask is: what is an eLearning authoring tool : and which one should you use?
In over nine years of working in instructional design and eLearning content production, I’ve tested more platforms than I care to count. This guide gives you the honest, practitioner-level breakdown you won’t find in a generic software review.
What Is an eLearning Authoring Tool?
So, what is an eLearning authoring tool, exactly? It is a software application designed to help educators, trainers, and instructional designers create digital learning content, without needing to write code or have a background in graphic design.
Think of it as the PowerPoint of online learning, but significantly more powerful. Where a slide deck can only display information passively, an eLearning authoring tool lets you:
- Build interactive quizzes and knowledge checks
- Record and edit screen capture videos
- Create branching scenarios that respond to learner choices
- Add animations, audio narration, and clickable simulations
- Export your finished content in standardized formats like SCORM, xAPI (Tin Can), or HTML5, ready to upload to any Learning Management System (LMS)
In short: these tools bridge the gap between raw knowledge and structured, trackable learning experiences.
How Does an eLearning Authoring Tool Actually Work?
Here’s a simplified breakdown of the typical workflow:
Step 1: Create Your Content
You start with a blank project (or a pre-built template) and add slides, scenes, or pages. You can import existing PowerPoint files, add video footage, or record your screen directly within the tool.
Step 2: Add Interactivity
This is where eLearning tools outshine regular presentation software. Using built-in logic systems : such as event-action triggers, variables, and conditional branching : you can make content respond dynamically to what learners do. Click the wrong answer? The learner gets a feedback message. Watch a video fully? The next module unlocks.
Step 3 : Assess and Track Learners
Most authoring tools include quiz builders that support various question types: multiple choice, drag-and-drop, fill-in-the-blank, hotspots, and more. These quizzes communicate results back to your LMS via SCORM or xAPI protocols.
Step 4 : Publish and Distribute
When your course is ready, you export it : typically as an HTML5 package : and upload it to your LMS (Moodle, TalentLMS, Cornerstone, etc.). Learners can then access it on desktop, tablet, or mobile.
Pro Tip: Always preview your course in the authoring tool’s built-in preview mode and test the SCORM package in a dedicated SCORM testing environment (like SCORM Cloud) before publishing to your LMS. This catches compatibility issues early and saves hours of troubleshooting later.
2 Types of eLearning Authoring Tools
Understanding this distinction will immediately clarify which category fits your situation best.
Desktop-Based Authoring Tools
These are installed software applications that run locally on your Windows or Mac machine. Because processing happens on your device, they typically offer more powerful features, greater control over file formats, and the ability to work fully offline.
Best for: Organizations with data privacy requirements, power users who need advanced interactivity, developers building software simulations.
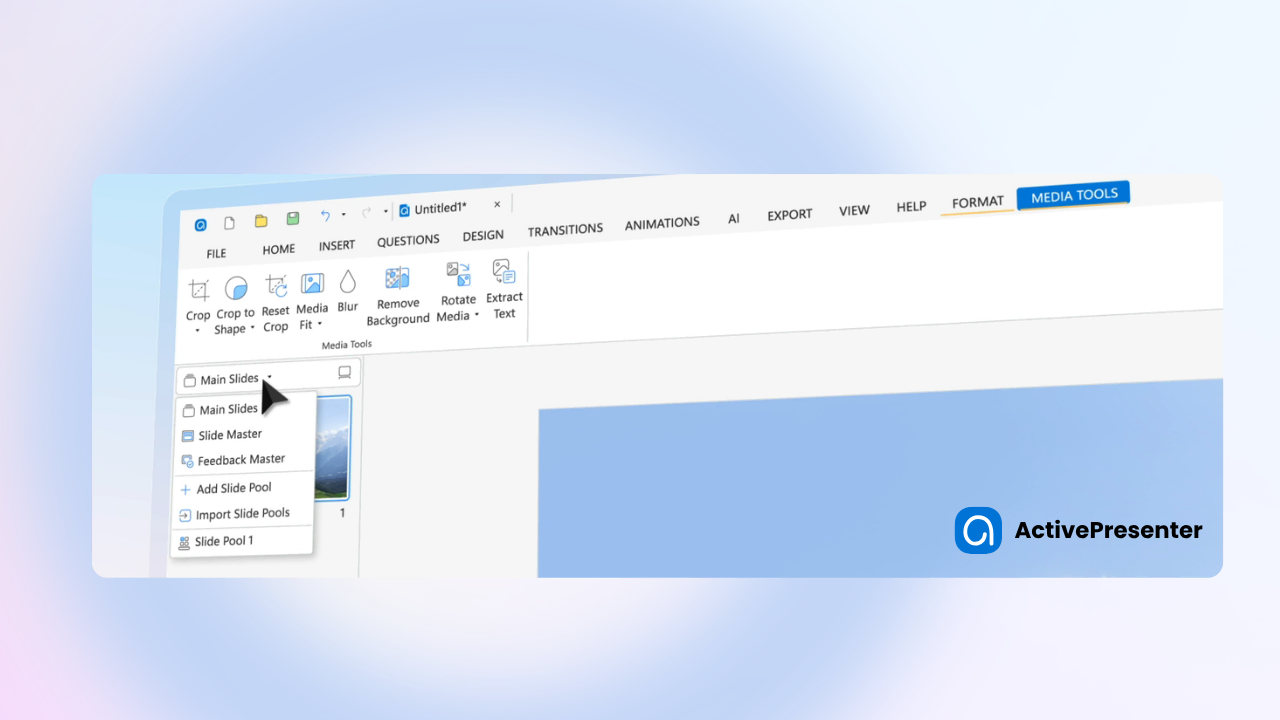
Example: ActivePresenter : which combines screen recording, non-destructive video editing, and a full-featured eLearning authoring environment in a single application.
Cloud-Based Authoring Tools
These run entirely in your web browser. No installation required : just sign up and start building. The trade-off is that internet connectivity is mandatory, and advanced features may be limited compared to desktop tools.
Best for: Teams working collaboratively across locations, educators who need quick, template-driven course creation.
Examples: Easygenerator, Elucidat, Gomo Learning, isEazy Author.
Key Features to Look for in an eLearning Authoring Tool
Not all authoring tools are created equal. Here are the features that separate a genuinely useful tool from one that’ll leave you hitting a wall at 11 PM before a launch deadline.
#1 Interactivity Engine
Look for tools that support event-action logic and variables. This is what allows courses to behave intelligently: tracking learner progress, unlocking content conditionally, or personalizing feedback based on quiz scores.
#2 Quiz and Assessment Builder
A robust quiz builder should support at least 8–10 question types and allow you to configure attempts, time limits, passing scores, and randomized question pools (also called Slide Pools). Random question pools are especially important for compliance training where question repetition undermines effectiveness.
#3 Screen Recording and Video Editing
For software training and IT tutorials, the ability to record your screen at high resolution : and edit the footage without re-recording : is non-negotiable. Look for tools that offer non-destructive video editing, meaning you can trim, add annotations, or insert callouts without permanently altering the original recording.
#4 SCORM / xAPI / HTML5 Export
These are the industry-standard formats your LMS will expect. SCORM 1.2 and SCORM 2004 handle completion and score tracking. xAPI (Tin Can API) goes further, capturing granular learner data like time spent on individual slides, simulation performance, and offline activity. HTML5 ensures your content renders perfectly on any modern device.
#5 Responsive Design
Your learners are on phones. Period. Ensure your authoring tool either automatically adapts course layouts for different screen sizes or gives you explicit control over the mobile view.
#6 Templates and Asset Library
Time is money. Pre-built slide templates, character packs, icon libraries, and interaction templates can dramatically cut production time : especially for beginners.
#7 Collaboration Features
If you’re working in a team, look for tools with shared project access, version history, and review/comment workflows.
How to Choose the Right eLearning Authoring Tool for You
Use these five criteria as your decision framework:
| Criteria | What to Ask |
| Ease of Use | Can a non-technical team member build a basic course in under a day? |
| Feature Depth | Does it support variables, branching, and quiz randomization? |
| eLearning Standards | Does it export SCORM 1.2, SCORM 2004, xAPI, and HTML5? |
| Free Trial | Can you test it fully before committing? (Avoid tools with feature-limited trials) |
| Support & Documentation | Is there video documentation, a knowledge base, and responsive support? |
| Pricing Model | One-time license vs. monthly subscription : which fits your budget long-term? |
A Closer Look: ActivePresenter as an All-in-One Solution
Among the tools I’ve evaluated over the years, ActivePresenter stands out particularly for users who need to combine screen recording, video editing, and eLearning authoring in a single workflow : without paying for three separate subscriptions.

Here’s what makes it worth highlighting for beginners and advanced users alike:
- Unlimited free trial : no time limit, no feature lock. You can build and export complete courses for free, making it the lowest-risk way to learn eLearning authoring
- Screen recording with lossless quality : captures at your native resolution with cursor customization, system audio, and microphone recording simultaneously
- Non-destructive video editing : trim clips, insert zoom effects, and add annotation layers on the timeline without permanently altering source footage
- Full interactivity suite : event-action system, variables, slide pools, branching paths, drag-and-drop interactions, and 20+ question types
- SCORM 1.2, SCORM 2004, xAPI, and HTML5 export : covers every major LMS requirement
- Responsive output : courses automatically adapt to mobile, tablet, and desktop viewports
- One-time license pricing : starting from $249 USD for a perpetual license, which is significantly more cost-effective than cloud tools at $80–$108/month
Now that you know what an eLearning authoring tool is and what to look for, the best next step is to try one yourself.
ActivePresenter offers a fully featured free version: no time limit, no feature restrictions, so you can explore screen recording, interactive quizzes, branching scenarios, and SCORM export without spending a cent.
👉 Download ActivePresenter for Free and start building your first professional course today.
