You have the knowledge. Your audience needs it. The only thing standing between you and a polished tutorial video is a process that actually works, and doesn’t eat your entire afternoon.
If you’ve ever stared at a blank screen wondering how to turn your expertise into a clear, engaging tutorial video, you’re not alone. I’ve watched countless creators, teachers, IT trainers, product managers, HR specialists abandon their tutorial projects halfway through. Not because they lacked ideas, but because the tools were either too complex, too expensive, or too slow.
That changes today. In this guide, I’ll walk you through exactly how to create a tutorial video in five concrete steps using ActivePresenter – a screen recording & editing tool that handles recording, editing, annotation, and high-quality export in a single, free application. No switching between three different apps. No surprise paywalls halfway through your project.
For your information, we’ve rounded up top 8 best screen recorder for Windows 10 in this article. And, ActivePresenter is one of the best options you can try.
Let’s get into it.
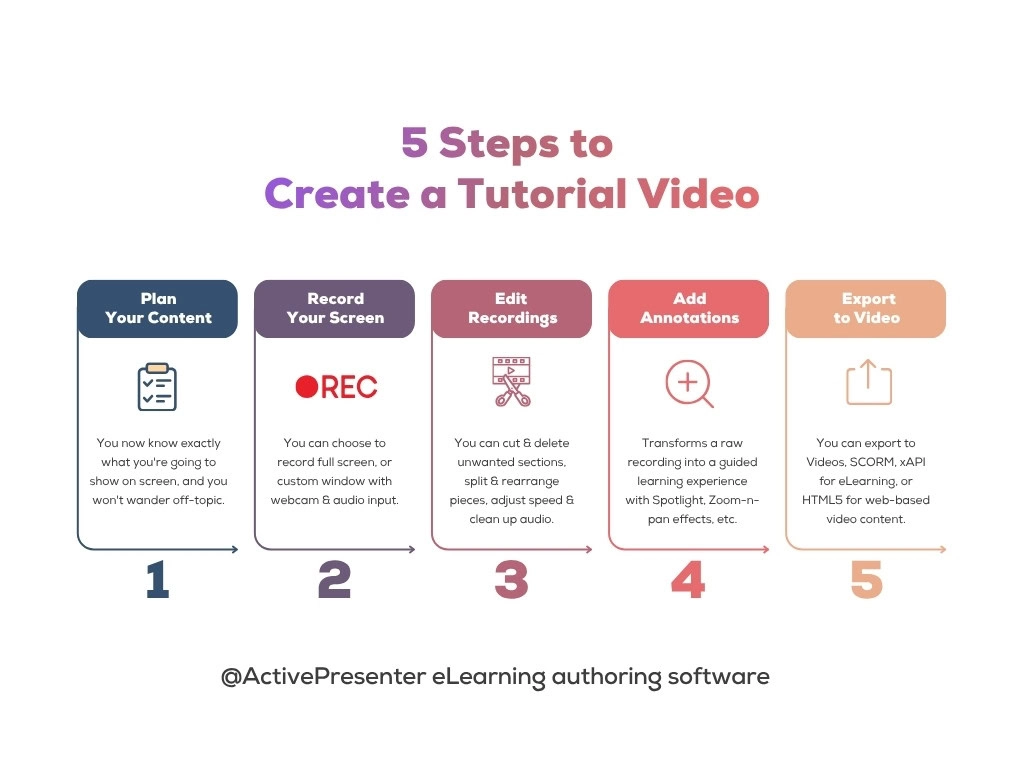
Step 1: Plan Your Content (Outline + Screen Prepare)
Estimated time: 60 seconds
The single biggest mistake I see creators make (and I made it myself for years) is recording without a plan. You end up with 20 minutes of rambling footage that needs to be cut down to 3 minutes. That’s not a 5-minute workflow; that’s a 5-hour editing nightmare.
Here’s what to do instead:
Write a Bullet Outline
You need 3 to 5 bullet points that represent the logical flow of your tutorial.
Example for a tutorial on “How to Create a Pivot Table in Excel”:
- Open your dataset
- Insert > Pivot Table
- Drag fields into Rows and Values
- Apply a filter
- Format and save
That’s it. Five bullets. You now know exactly what you’re going to show on screen, and you won’t wander off-topic.
Prepare Your Screen
Before recording:
- Close all unnecessary applications and browser tabs (nobody needs to see your 47 open Chrome tabs).
- Turn off notifications – system alerts, Slack, email pop-ups. One unexpected notification can ruin a clean take.
- Set your screen resolution to a standard size (1920×1080 is ideal for most tutorial videos).
Step 2: Record Your Screen with ActivePresenter
Estimated time: 90 seconds (for a 3-minute tutorial)
This is where ActivePresenter truly shines. It’s a professional-grade screen recording tool that’s completely free for video creation – no watermarks, no time limits.

How to Start Recording
- Open ActivePresenter and click the Record Screen as Video button on the Start Page.
- Choose your recording area: full screen, a custom region, or lock to a specific application window.
- Configure audio: Select whether to capture system audio (what your computer plays), microphone audio (your voice), or both. If you’re recording narration live, make sure your microphone is selected and test the input level.
- Enable webcam (optional): Want a face-cam overlay in the corner? Toggle the webcam option on. You can record it simultaneously or as a separate layer — giving you full control in editing.
- Hit Record. A countdown begins, and you’re live.
During Recording
- Follow your outline. Move through each bullet point deliberately.
- Pause if needed. ActivePresenter allows you to pause and resume recording. Made a mistake? Pause, collect yourself, and continue. You’ll trim the error in editing (which takes seconds, not minutes).
- Don’t aim for perfection. A clean take is great, but ActivePresenter’s non-destructive editing means you can fix almost anything after the fact.
When You’re Done
Press the Stop button (or use the hotkey Ctrl+End for Windows). ActivePresenter immediately opens your recording in the editing workspace – no importing, no file conversion, no waiting.
💡 Pro Tip: If you’re recording a multi-step process, consider recording in shorter segments and stitching them together in the timeline, it’s often faster than trying to nail a perfect long take.
Step 3: Edit Your Recording
Estimated time: 60 seconds
Here’s where most tools fall apart. They either offer no editing (forcing you into a separate app) or present an editing interface so complex it requires its own tutorial. ActivePresenter strikes a rare balance: powerful enough for professionals, intuitive enough for first-timers.

Essential Edits (The 80/20 of Tutorial Video Editing)
These four actions will handle 80% of your editing needs in about a minute:
1. Cut and Delete Unwanted Sections
Select the unwanted range on the timeline and hit Delete. That awkward pause where you forgot what to say next? Gone. The 10 seconds where you opened the wrong menu? Removed. ActivePresenter uses non-destructive editing, meaning your original recording is preserved – you can always undo changes.
2. Split and Rearrange
Need to reorder two sections? Use the Split tool to divide the recording at any point, then drag segments into the correct order on the timeline.
3. Adjust Playback Speed
Recorded a slow, repetitive process (like waiting for a file to download)? Speed up that section. Have a complex step that deserves more attention? Slow it down. ActivePresenter lets you change playback speed for any selected range — a feature that keeps your tutorial tight and watchable.
4. Audio Cleanup
Background hum from your air conditioner? Use the AI Noise Reduction tool. Need to boost your voice volume in a quiet section? Adjust the audio volume directly on the timeline. You can also record narration after the fact if you prefer to separate your recording and voiceover workflow.
💡 Pro Tip: You can even use the Text-to-Speech feature for a consistent, professional-sounding narration without ever touching a microphone.
Step 4: Add Annotations and Visual Cues
Estimated time: 60 seconds
A screen recording without annotations is like a textbook without headings, technically functional, but hard to follow. This step transforms a raw recording into a guided learning experience.
Shapes and Callouts
Use arrows, rectangles, and callout boxes to highlight specific areas of the screen. For example, when showing where to click in a software interface, place a bright arrow pointing to the exact button. ActivePresenter offers a rich library of pre-built shapes that you can customize in color, size, and animation.
Spotlights
This is one of my favorite features — and one that most beginners overlook. The Spotlight effect dims everything on screen except the area you want the viewer to focus on. It’s like shining a flashlight on the important part. Use it when your interface is busy and you need to cut through visual noise.
Zoom-n-Pan
Working with detailed interfaces where buttons and text are small? The Zoom-n-Pan tool lets you smoothly zoom into a specific area of the screen, show the detail, and then zoom back out. The transition is sleek and professional — it looks like something out of a high-budget product demo, but it takes about 5 seconds to set up.
Closed Captions
Even if your video has narration, always add closed captions. Here’s why:
- Many viewers watch videos on mute (especially in office environments).
- Non-native speakers rely heavily on captions to follow along.
ActivePresenter lets you add closed captions directly in the timeline. If you wrote a script in Step 1, you can paste it in and sync it to your video — a process that takes seconds.
💡 Pro Tip: When adding captions, follow the “7-second rule”: no single caption line should require more than 7 seconds of reading time. If a line is too long, split it. Your viewers should be able to read the caption and watch the screen action simultaneously. Also, keep each caption under 15 words — this is the sweet spot for readability.
Step 5: Export to High-Quality Video Format
Estimated time: 30 seconds (plus rendering time)
You’ve planned, recorded, edited, and annotated. Now it’s time to publish.
Choosing the Right Format
ActivePresenter supports multiple export formats: MP4, MKV, AVI, WMV, WebM. Here’s how to choose:
| Format | Best For | Notes |
| MP4 | YouTube, social media, LMS, general sharing | Most universally supported format. If in doubt, choose MP4. |
| MKV | Archival, highest quality retention | Excellent quality but limited device/platform support. |
| AVI | Legacy systems, Windows-centric workflows | Large file sizes; generally not recommended for the we. |
| WMV | Windows-specific playback | Compact but limited cross-platform compatibility. |
| WebM | Web embedding, HTML5 players | Great for browsers; smaller file sizes. |
My recommendation for 90% of use cases: MP4. It offers the best balance of quality, file size, and universal compatibility. Whether you’re uploading to YouTube, embedding in a course, or sharing via email, MP4 just works.
How to Export
- Go to Export > Video.
- Select your format (MP4 recommended).
- Configure resolution (match your recording resolution – typically 1920×1080).
- Click OK and let ActivePresenter render.
That’s it. Your tutorial video is ready to share with the world.
Pros & Cons: An Honest Assessment of ActivePresenter
After years of using this tool, here’s my objective breakdown:
Pros
- Free for video creation – no watermarks, no recording limits
- All-in-one workflow – record, edit, annotate, and export without leaving the app
- Advanced e-learning features – SCORM/xAPI export, interactive quizzes, software simulations
- Text-to-Speech integration – Amazon Polly, Google Cloud, Microsoft Azure voices built in
- Multi-format export – MP4, MKV, AVI, WMV, WebM, FLV
- Webcam recording – simultaneous or separate layer recording
- Zoom-n-Pan and Spotlight – professional-grade visual cues with minimal effort
Cons
- Desktop only – no mobile or web-based version (Windows and macOS)
Evaluation Criteria Summary
| Criteria | Rating (out of 5) |
| Ease of Use | ⭐⭐⭐⭐ |
| Recording Quality | ⭐⭐⭐⭐⭐ |
| Editing Capabilities | ⭐⭐⭐⭐ |
| Annotation Tools | ⭐⭐⭐⭐ |
| Export Options | ⭐⭐⭐⭐⭐ |
| eLearning Features | ⭐⭐⭐⭐⭐ |
| Value for Money | ⭐⭐⭐⭐⭐ |
| Cross-Platform Support | ⭐⭐⭐ |
The Complete 5-Minute Workflow at a Glance
| Step | Action | Time |
| 1 | Plan your content (outline + script) | ~60 sec |
| 2 | Record your screen with ActivePresenter | ~90 sec |
| 3 | Edit: cut, trim, adjust speed, clean audio | ~60 sec |
| 4 | Add annotations: shapes, spotlights, zoom, captions | ~60 sec |
| 5 | Export to MP4 (or your preferred format) | ~30 sec |
| Total active work time | ~5 min |
Final Thoughts: Stop Overthinking, Start Creating
The best tutorial video is the one that actually gets published. I’ve seen creators spend weeks perfecting a single video that could have been recorded, edited, and shipped in an afternoon. Perfectionism is the enemy of a useful tutorial library.
ActivePresenter removes the friction. One tool. Five steps. A professional result. Whether you’re a teacher building your first online course, an IT admin tired of answering the same questions, or a product team that needs onboarding videos yesterday.
The knowledge is already in your head. Now you have the process to get it on screen.
Ready to Create Your First Tutorial Video?
Download ActivePresenter for free, no watermarks, no time limits, and follow the 5-step workflow above.
