Imagine transforming your website from a static display into a vibrant, interactive playground. With the right tools, you can captivate your audience not just with visuals, but with engaging experiences they can actively participate in.
Saola Animate offers precisely this power, providing an intuitive platform to craft both compelling animations and interactive web content. Forget passive scrolling; today, we’re diving into a practical project that will unlock your creative potential.
We’ll guide you through the process of building a fun and engaging mini-game called “Catching Birds,” demonstrating step-by-step how to animate elements and weave in interactive features using Saola Animate.
To fully immerse yourself in this hands-on tutorial and start creating your own interactive magic, we encourage you to download the latest version of Saola Animate. Experiencing the “Catching Birds” game firsthand will also provide valuable insight into the exciting interactive possibilities you’ll soon be able to bring to your own web projects.
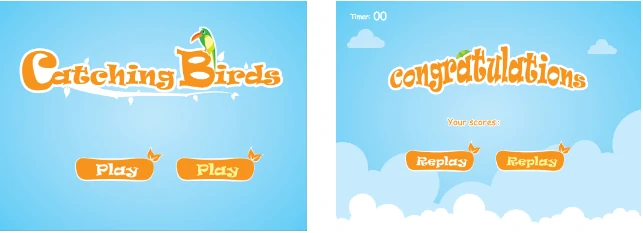
From Playing to Creating: Catching Birds
How to Play?
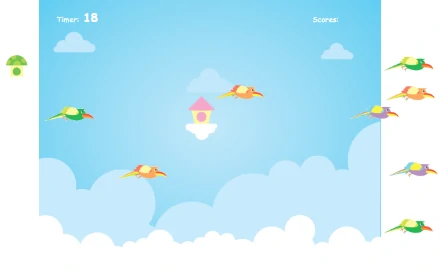
Click the Play button to start the game. Your job is to click the flying birds to catch them within the time limit of 30 seconds. Each exact click to a bird gives you 1 point. The more birds you catch, the higher score you will get.
How to Create?
This project includes 3 scenes (arranged in order in the Scenes pane): welcome, game playing, and congratulations. To start, you need to prepare designed graphic images and an audio track for sound effect when shooting birds. The welcome and congratulations scenes are almost the same. Therefore, we will create them together. In fact, you’ll spend much time on the game playing scene. Along with built-in animation properties, events-actions, custom JavaScript functions are invoked to control the birds, the timer, score, etc.
To be more clearly, you will follow this procedure:
- Make the welcome and congratulations scenes
- Design the game playing scene
- Use custom JavaScript functions to do advanced interactivity
- Preview and export the game project to HTML5
Make the welcome and congratulations scenes
To design these two scenes, you need a blank project where you can insert background and other external images. Then, you will add interactivity to the Play button in the welcome scene to start the game (move to the next scene), and to the Replay button in the congratulations scene to replay the game (move to the previous scene).
1. Create a blank project
On the Welcome Screen, click the New button. This will create a new project including one blank scene by default. Then, you can set the background image for the scene (In the Properties pane of the scene > Styles tab > Fill section > Image Fill > From File > Choose an image to be a background). After that, when you insert two more scenes, the background property will be inherited. This will help you save time for later design.
2. Insert images into two scenes
You can import images from your computer to each scene by clicking the Image ![]() button in the main menu toolbar. But I prefer importing resources into the Resources pane, then drag and drop them into each scene.
button in the main menu toolbar. But I prefer importing resources into the Resources pane, then drag and drop them into each scene.
If the Resources pane is not present, go to the View menu and check Resources to open it. Then, click Import Resources, and select From File. Also, don’t forget to rename inserted images, making it easier for you to recall them later.

Next, insert images into the welcome and congratulations scenes by using drag and drop.
The reason for using two images for a button is to create a hover effect. I will mention it in the next part.
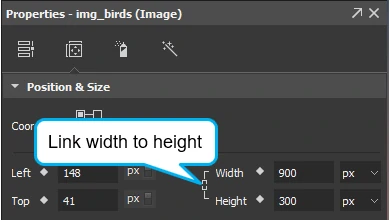
Note: After dropping an image into the Canvas, you may need to resize it. Image elements maintain their aspect ratio by default, which keeps them proportional while being resized. Therefore, if you want to freely change its size, just clear the Link width to height check box (the chain icon) in the Position & Size section of the Properties pane.
3. Make the Play and Replay images interactive
In the welcome scene, the Play button is highlighted and zoomed in when you hover the mouse over it. It is also clickable. For hover effect, let’s refer to this tutorial: Creating Hover Effect for clear understanding about how to do so.
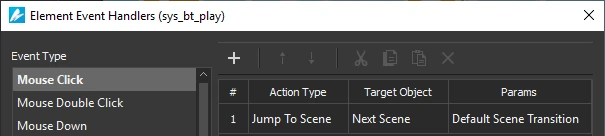
Besides, when the player clicks the Play button, it will trigger the next scene to start the game. For that to happen, use the Mouse Click event > Other Actions > Jump to Scene > Next Scene.
In the congratulations scene, creating hover effect for the Replay button is similar to that for the Play button. Also, use Mouse Click event to make the Replay button clickable. Don’t forget to set action that makes it jump to previous scene instead of next scene.
Design the game playing scene
After a Player clicks the Play button, the game starts. In this big step, firstly, you will design the scene by inserting images. Then, make the cages and the bottom cloud slowly move from right to left, and let the birds fly along predetermined paths. However, to better control these complex animations, you should add another timeline, letting you make different animations using the same set of elements.
1. Design the game playing scene
Firstly, to make the game playing scene, you need to insert designed graphic images into it. As mentioned earlier, if you’ve added images into the Resources pane, so now just drag images (clouds, cages, birds) and drop them into the scene. Take note of the following:
- For birds, you can use GIF images that are birds with flapping wings to make the game more attractive. Besides, in this game, you should prepare three birds with different colors and then converted them to symbols. So, you can reuse their animations, helping save your time and speed up your workflow. If you want to create more birds, simply copy and paste them on the Canvas.
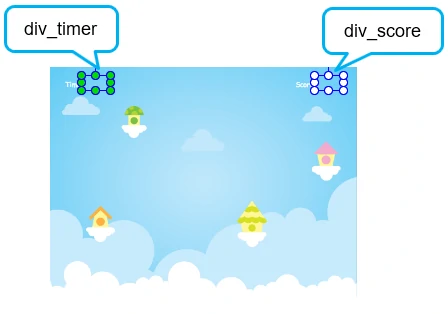
- In addition to creating Timer and Scores text by using the Text
 button in the main menu toolbar, you must create two Rectangle DIVs with No Fill (Properties pane > Styles tab > Fill section > No Fill) to show timer and score values. Then, rename them as below for later uses in JavaScript function which will be discussed in the next part. Stay tuned to know about it.
2. Add animation to the cages
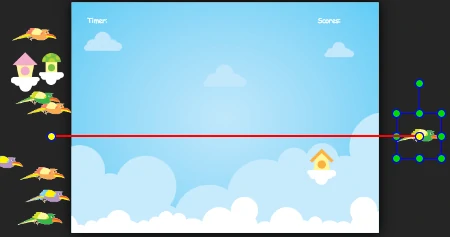
This scene contains four cages. When the scene loads, each cage will slowly move from right to left. For that to happen, you can create motion path to each cage. For instance, I will make animation to one cage, then you can do the same for the others.
Firstly, drag a cage to the right edge of the scene that is its starting position to move. Then, you can turn on the Auto-Keyframe mode which may help speed up your work. After choosing the Playhead point to define where to end the animation, on the Canvas, drag the cage to the left. This creates a red line indicating the path of the motion.
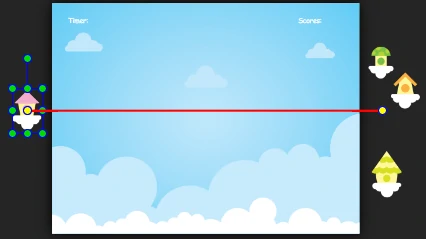
At the same time, in the Timeline, an animation segment is created with the starting keyframe is at 0:00:00 seconds, the ending keyframe is at the Playhead position.
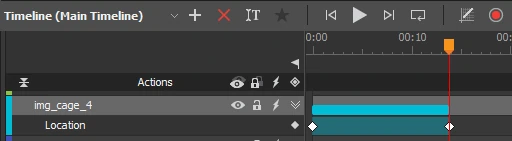
Then, if you want to change its start time, simply drag the animation segment to the right.
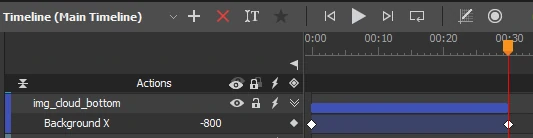
3. Add animation to the bottom cloud
To make the bottom cloud move from right to left within the scene view, using the Background Image X property is the way to do that.
Let’s refer to Changing Background Image Properties tutorial for clear understanding.
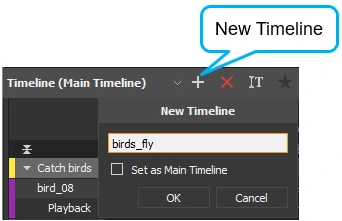
4. Add another timeline
You can create another timeline for birds’ animations. By that way, it is possible to control multiple birds’ animations through controlling their timeline playback such as start, pause, and continue it. Just click New Timeline at the top left of the Timeline pane.
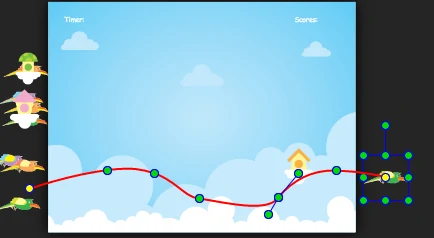
5. Create motion paths to the birds in the additional timeline
It can be said that motion paths and flight speeds of the birds will determine the difficulty level of the game. It means that the more zigzagging the motion paths are, or the faster flight speeds of the birds are, the harder the game is. Navigate to an additional timeline to create motion paths and set flight speeds to the birds.
Repeat the steps to create motion path above for birds. Don’t forget to set them fly from left to right.
Then, in the Timeline, you can drag the animation segment to the right to change its start time. And click and drag the ending keyframe to change its duration, meaning to set the flight speed of the bird.
Finally, edit the motion path the way you want. Editing a motion path is actually working with its anchor points. Anchor points are circle points on a motion path that define the path. Refer to this tutorial to learn more about editing motion paths.
6. Use timeline trigger to control multiple timelines
In this game project, the main timeline starts off automatically when a scene loads. Meanwhile, additional timeline (birds_fly), which also contain animations, doesn’t. To make two timelines start simultaneously, you must use a trigger. Timeline trigger starts automatically on the timeline, without user control.
To start the additional timeline (birds_fly) right from the beginning, you have to insert timeline triggers like the following steps:
Step 1: In the Main Timeline, move the Playhead to the beginning, at 0:00:00 seconds.
Step 2: Click the Insert Trigger button on the Actions bar. This opens the Timeline Triggers dialog where you can define a trigger.
Step 3: Click Add Action > Timeline > Start Timeline > birds_fly. This attaches the Start Timeline action to the trigger.
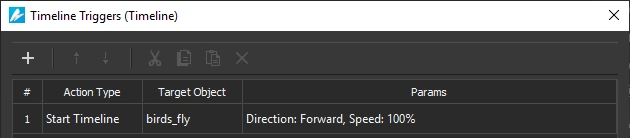
On the Actions bar, a red diamond appears at 0:00:00 seconds to represent the trigger.
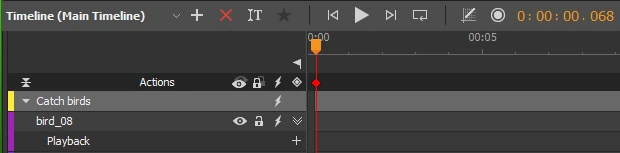
7. Use timeline trigger to loop the additional timeline
The additional timeline (birds_fly) contains birds’ animations. To loop the animations of birds as much as possible, you should loop its timeline playback by using timeline trigger.
For that to be done, in the additional timeline, you can press the END key on your keyboard or click the Go to End button. After that, the Playhead will jump to the end of its timeline. Then, also use the event- action: Timeline > Start Timeline > birds_fly.
Use custom JavaScript functions to do advanced interactivity
Apart from common built-in interactivity without coding, JavaScript functions can be invoked to do advanced interactivity. For example, in this game project, use JavaScript functions to add interactivity to the birds, update the score, run the timer, and show the final score.
1. Add interactivity to the birds
Change bird’s state and make it fall down
As said earlier, I’ve converted bird images into symbols that allow reusing their animations. To edit a symbol, just double-click it on the Canvas or double-click the symbol element in the Resources pane. After that, the editor displays the symbol content which resembles a normal Saola Animate document.
When you click a bird, the bird will change its state. So, I used these two images to represent different states of the bird.
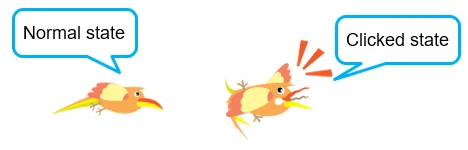
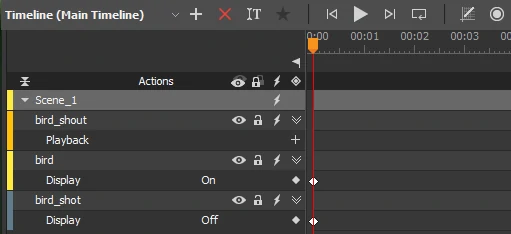
At the beginning of the game, you need to show the normal state and hide the clicked state. For that to be done, set the Display property (in the Properties pane > General tab > General section > Display) of these images as On and Off, respectively.
With regard to adding interactivity to the bird, you need to apply Mouse Click event to the bird’s normal state. This event that occurs should trigger multiple actions such as playing the audio track, hiding the bird’s normal state, showing the bird’s clicked state and then making it falling down. To make it easier, you might think about creating another timeline containing animations representing these actions, like this:
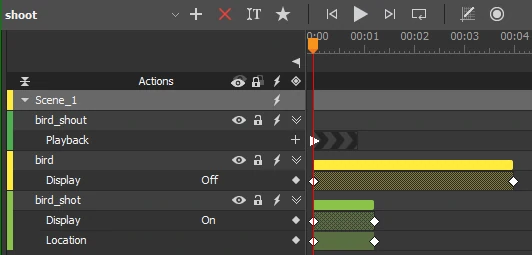
After all, click the Event Handlers button of the bird’s normal state to open the Element Event Handlers dialog. On Mouse Click event, click Add Action > Timeline > Start Timeline > shoot. This results in playing the additional timeline (shoot) once the bird is clicked.
Get scores when clicking birds
For advanced interactivity like getting scores when clicking birds, you need to invoke a custom JavaScript function. Still in the Element Event Handlers above, on Mouse Click event, click Add Action > Other Actions > Run JavaScript. Then, double-click the Params cell to add a new function.

Next, write this function in the JavaScript Function dialog that appears.
function onBirdClicked(doc, e) {
	// update score in parent document
	var parentDoc = doc.getParentDoc();
	if (!parentDoc.score)
		parentDoc.score = 0;
	++parentDoc.score;
	parentDoc.getElement('div_score').setText(parentDoc.score);
}
Hence, once you click birds, the score will be updated and displayed in the element named “div_score” already created in the game playing scene. So, that’s all to add interactivity to one bird symbol. Do the same for the remaining two symbols.
2. Show timer in the game playing scene
In the game playing scene, open the Scene Event Handlers. Next, add the following event action: Scene Active > Other Actions > Run JavaScript. Use the line of code as follows:
function initTimerAndScore(doc, e) {
	function countDownTimer(element, remainingSeconds, completeCallback) {
		var updateTimer = function() {
			element.setText(remainingSeconds);
			if (remainingSeconds <= 0) {
				clearInterval(timerId);
				if (completeCallback)
					completeCallback();
			} else {
				--remainingSeconds;
			}
		};
		var timerId = setInterval(updateTimer, 1000);
		updateTimer();
	}
	// show timer, allow playing for 30s
	countDownTimer(doc.getElement('div_timer'), 30, function() {
		doc.showNextScene();
	});
	// set initial score
	doc.score = 0;
}
Using this function allows the countdown timer to start running from 30 seconds. Besides, its time value will be shown in the element named “div_timer”.
3. Show the final score in the congratulations scene
When running out of time, the final score that the player has got will also be shown in the congratulations scene. For that to happen, create a DIV with No Fill and name it as “div_score”. Use Scene Activate event and Run JavaScript action for this scene. Then, add the following function:
function showFinalScore(doc, e) {
	doc.getElement('div_score').setText(doc.score);
}
At this point, you’ve almost completed the journey. The last tasks are previewing your game and exporting it.
Preview and export the game project to HTML5
It’s time to preview what you’ve created and check if everything pleases you. To do this, use the HTML5 Preview feature. Then, if you’re satisfied with the game project, just export it.
1. Preview the game project
Before actually exporting the project, previewing it on HTML5 is a good idea. It lets you know how the game looks like in a browser. When previewing, there are two issues that you may concern, which are autoplay and overflow.
#1. Autoplay
When it comes to previewing a project, by default, the document automatically plays when a browser opens. To use button to start the document, you need to deselect the Auto-Advance option of the first scene in the Properties pane.

#2. Overflow
The game playing scene contains the bird and cage elements which are overflowing the scene’s box.
To make your game more realistic, you are able to hide any content that extends beyond the box. Please refer to our tutorial Customizing Scene’s Overflow for more details.
2. Export the game project to HTML5
The last step when working on the game project is exporting it to HTML5. To export animation, press CTRL+ALT+E or click Export to HTML5 in the main menu toolbar.

Now you know how to create the interactive game Catching Birds with Saola Animate. You can also create many other interesting HTML5 animations and interactive web contents with the app. If you have any obstacle, feel free to ask us in the user community. Besides, don’t forget to visit our tutorial page for many useful know-how articles.