
You’ve finished recording a software tutorial, and everything looks sharp. But when it’s time to share the video, the file is larger than expected. You try lowering the export quality, only to find that menu labels and small interface text are becoming difficult to read.
Fortunately, reducing file size doesn’t have to mean sacrificing clarity. A well-chosen recording area, a few careful edits, and the right export settings can make a noticeable difference.
In this guide, you’ll learn seven practical ways to reduce screen recording file size without blurry text. You’ll also see how ActivePresenter Free Edition combines a free screen recorder with video editing and export tools, so you can apply these techniques in one workflow.
What Affects Screen Recording File Size?
Before changing your screen recording settings, it helps to understand what makes a video file large in the first place.
Five factors have the greatest impact:
- Resolution: Higher resolutions capture more pixels, which can preserve fine details but may require more data to encode.
- Frame rate: More frames per second (FPS) make movement smoother, although they can also increase file size.
- Bitrate: This determines how much video data is used per second. Higher average bitrates generally produce larger files.
- Codec: Video codecs compress visual information differently. Some achieve smaller files while maintaining similar perceived quality.
- Duration: Longer recordings contain more footage. Removing unnecessary sections is often the simplest way to reduce file size.
These factors work together. For example, a 1080p recording focused on one application may be easier to read than a 4K desktop recording that has been scaled down to fit a small video player.
The goal isn’t to make every setting as low as possible. It’s to preserve the details viewers need while avoiding unnecessary video data.
7 Ways to Reduce Screen Recording File Size Without Blurry Text
1. Record Only the Screen Area You Need
A full-screen recording may seem convenient, but it often captures more than your tutorial requires. Empty desktop space, unrelated windows, and a second monitor can make the important interface appear smaller in the final video.
A more focused capture area helps viewers see what matters without unnecessary distractions.
Before you start recording:
- Open the application you want to demonstrate.
- Arrange the window so the relevant controls are visible.
- Select a capture area that includes the task you’re explaining.
- Check that menus, pop-up windows, and dialog boxes will fit within that area.
For example, if you’re demonstrating how to change a software preference, recording the application window is usually more useful than capturing your entire desktop.
In ActivePresenter 10, you can select Record Screen as Video and use Custom mode to define the recording area. If you want the boundary to match a particular application window, choose Lock To Application and Fit To Application.
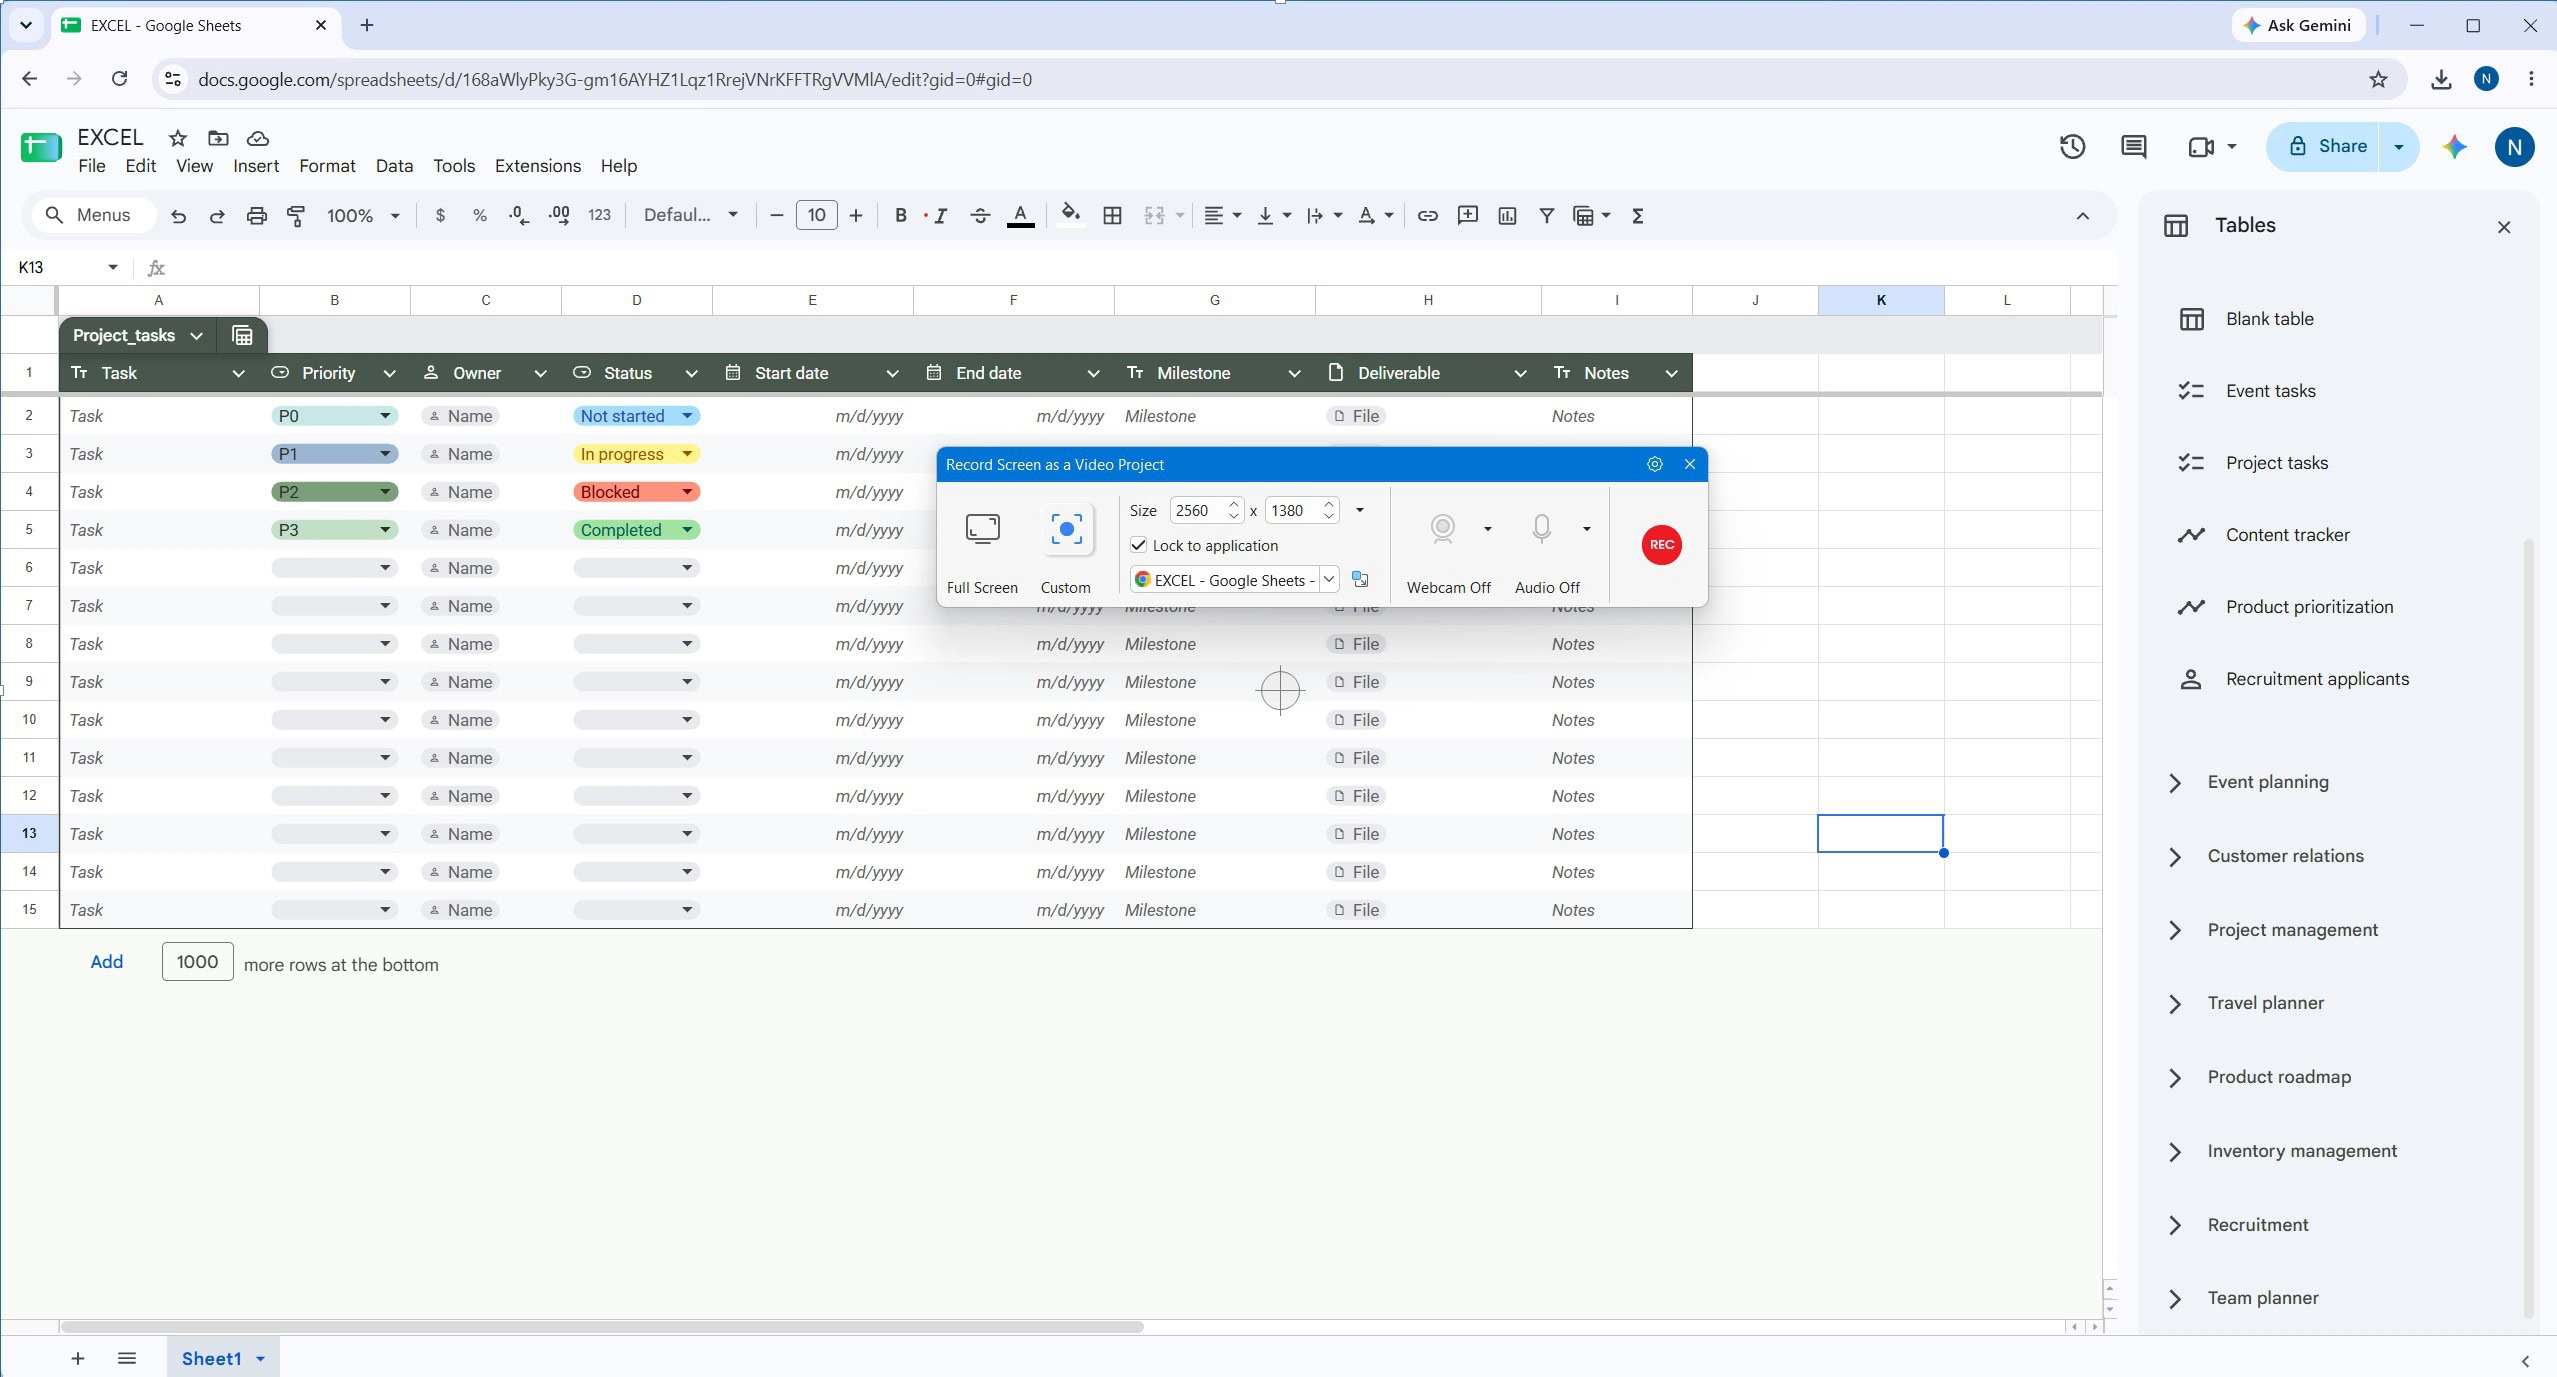
Tip: Leave a little room around the interface. Cropping too tightly may cut off drop-down menus or dialogs that appear during the demonstration.
2. Choose a Resolution That Keeps Text Readable
Lowering resolution is a common way to reduce video size, but it’s also one of the easiest ways to make small text blurry.
For most software tutorials, 1920 × 1080 (1080p) is a practical starting point. Simpler recordings with larger text may look fine at 1280 × 720 (720p). Detailed spreadsheets, code editors, and design applications may need a higher resolution or a more focused capture area.
Before reducing resolution, try improving the source recording:
- Increase the application’s zoom level or font size.
- Capture the relevant window instead of the entire desktop.
- Avoid recording a large workspace only to shrink it significantly during export.
- Preview small text at the size your audience will actually watch.
Consider a spreadsheet tutorial. Recording the relevant cells at 1080p with the worksheet zoomed to 125% may produce clearer text than recording the entire desktop at 4K with the worksheet displayed at 75%.
The best resolution isn’t necessarily the highest one. It’s the lowest resolution that still keeps essential information easy to read.
3. Match the Frame Rate to the Action on Screen
A higher frame rate makes movement look smoother, but it doesn’t necessarily make text sharper.
For software tutorials involving mouse clicks, typing, menu navigation, and occasional scrolling, 30 FPS is usually a good starting point.
Different content may benefit from different frame rates:
| Frame Rate | Suitable Content | What to Consider |
| 15–20 FPS | Mostly static presentations | Check that cursor movement and scrolling remain easy to follow |
| 30 FPS | General software tutorials | A practical balance between smoothness and encoding requirements |
| 60 FPS | Fast-moving demonstrations | Smoother motion, potentially larger files |
Reducing FPS won’t automatically produce a proportional reduction in file size. The result also depends on the codec, compression settings, and movement within the recording.
If your tutorial consists mainly of static screens and occasional clicks, there’s little reason to use 60 FPS unless testing shows a clear benefit.
4. Choose a Video Codec That Fits Your Needs
A video codec compresses the information in each frame so the recording can be stored and shared more efficiently.
For most instructional videos, H.264 is a reliable choice because it works with a wide range of devices, browsers, and learning platforms.
Other codecs, such as H.265/HEVC and VP9, may produce smaller files at comparable perceived quality. However, playback support and encoding requirements vary.
It’s also useful to distinguish between a codec and a container:
- H.264, H.265/HEVC, and VP9 are video codecs.
- MP4 and WebM are container formats.
Changing the container alone doesn’t necessarily make a recording smaller.
If you’re preparing a tutorial for an LMS, company website, or another publishing platform, check which formats it supports before exporting.
For broad compatibility, MP4 with H.264 is a sensible place to start.
5. Adjust Compression Without Sacrificing Clarity
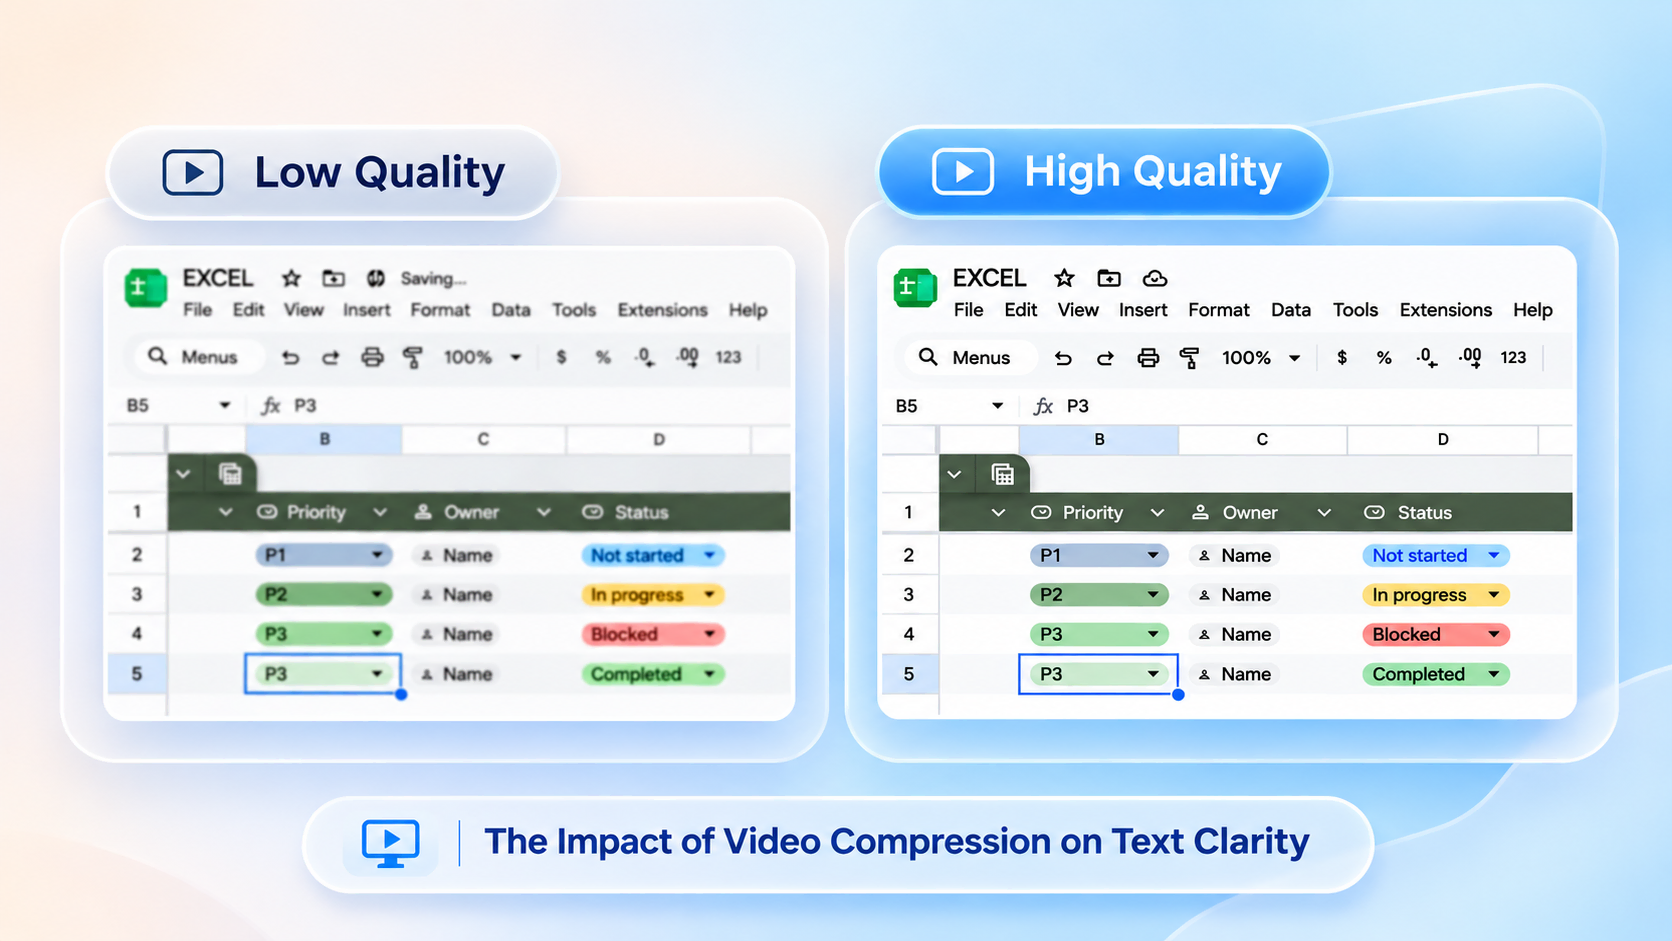
Compression can make a substantial difference to file size, but pushing it too far can introduce visible artifacts around letters, icons, and thin interface lines.
When you compress a screen recording, pay particular attention to text-heavy areas. These often reveal quality problems sooner than large, flat areas of the screen.
Some video editors allow you to set an average video bitrate directly. If yours does, the following H.264 ranges can serve as initial testing points:
| Resolution | Example Video Bitrate | Typical Use |
| 720p, 30 FPS | 1.5–3 Mbps | Presentations and simple interfaces |
| 1080p, 30 FPS | 3–6 Mbps | General software tutorials |
| 1080p, 60 FPS | 5–8 Mbps | Tutorials with more frequent motion |
Important: These are illustrative starting points for encoders with direct video bitrate controls. They are not universal recommendations, and they are not values to enter into ActivePresenter’s Quality field.
To see why bitrate matters, consider a five-minute recording:
- At an average video bitrate of 4 Mbps, the video data is approximately 150 MB.
- At 2 Mbps, the video data is approximately 75 MB.
These estimates exclude audio and container overhead. Actual file sizes depend on the encoding method and content.
Other encoders use quality-based compression rather than a fixed bitrate. In ActivePresenter 10’s standard video export workflow, you can adjust Quality, along with output dimensions, frame rate, and format.
Instead of searching for one perfect compression value, export a short test and inspect the details. If letters look blocky or their edges become fuzzy, increase quality or reconsider the output resolution.
6. Trim Footage That Doesn’t Help the Viewer
Not every second of a screen recording needs to appear in the final tutorial.
Long pauses, repeated actions, unsuccessful attempts, and unnecessary waiting time all add to the video’s duration without helping viewers understand the task.
Removing these sections reduces the amount of footage that needs to be encoded.
For example, trimming two minutes from a 12-minute tutorial reduces its duration by about 17%. If the average bitrate remains similar, the exported file may also be roughly 17% smaller.
In ActivePresenter, you can review recorded footage on the Timeline and remove unwanted sections before exporting.
Be selective, though. A tutorial that moves too quickly can be just as frustrating as one that takes too long. Keep enough time for viewers to locate controls, read dialogs, and follow the sequence of actions.
The aim is to make the recording more focused, not simply shorter.
7. Export a Short Sample Before Publishing
One of the most useful ways to avoid blurry text is to test the output before exporting the entire tutorial.
Choose a short section containing small labels, detailed interface elements, cursor movement, or scrolling. Export it with your planned settings, then watch it under conditions similar to those your audience will experience.
Ask yourself:
- Can I read menu labels and button text comfortably?
- Are thin lines, icons, and interface borders still clear?
- Does cursor movement look smooth enough to follow?
- Is the file size reasonable for the video’s length?
- Does the video play correctly on the intended platform?
If something looks wrong, change one setting at a time and export another sample.
For example, if text looks soft throughout the video, increasing compression quality may not help if the source was already downscaled too much. You may need to preserve more pixels or record a smaller area.
Testing a short sample is faster than repeatedly exporting a long tutorial, and it helps you find the right balance between clarity and file size.
Recommended Settings for Different Screen Recordings
There is no single combination of settings that works for every type of recording. Use the following recommendations as a starting point, then adjust them based on your content.
| Recording Type | Starting Resolution | Frame Rate | Main Priority |
| Slide-based tutorial | 720p–1080p | 15–30 FPS | Keep slide text readable |
| General software demonstration | 1080p | 30 FPS | Balance clarity and smoothness |
| Spreadsheet or coding tutorial | 1080p or higher | 30 FPS | Preserve small text and fine lines |
| Animation-heavy demonstration | 1080p | 30–60 FPS | Maintain smooth movement |
These are general recommendations rather than fixed ActivePresenter presets.
If your recording contains small text, improving the capture area and enlarging the relevant interface will often do more for readability than simply increasing export quality.
How to Reduce Screen Recording File Size with ActivePresenter 10
The techniques above are easier to apply when recording, editing, and exporting happen within the same application.
With ActivePresenter 10, you can capture a focused demonstration, trim unnecessary footage, and adjust the final video output without switching between separate tools.
Before you begin: ActivePresenter Free Edition is available without a time limit for trial and non-commercial use. Using features that require a paid license can add a watermark to the output. If you’re creating content for commercial purposes, check the applicable license before publishing.
Here’s how to put the file-size optimization techniques into practice.
Step 1: Record a Focused Screen Area
Open ActivePresenter 10 and select Record Screen as Video on the Start Page.
In the recording dialog, go to the Recording Area section. You’ll find two main capture modes:
- Full Screen: Captures the entire display.
- Custom: Lets you record a specific region by adjusting the blue recording boundary or entering its dimensions.
For a tutorial focused on one application, select Custom.
If you want to capture an application window, enable Lock To Application and select the target application. Then choose the appropriate fitting mode:
- Fit To Application: Adjusts the recording boundary to match the application’s window size.
- Fit To Boundary: Resizes the application window to fit the existing recording boundary.
If you’ve already arranged the application at a comfortable size, Fit To Application is usually the better choice. It adjusts the capture area around the window instead of changing the window to match a predefined region.
Next, click Settings > Recording Settings to review the available recording options. Choose a frame rate appropriate for your content; 30 FPS is a useful starting point for most software demonstrations.
Before clicking Rec, make sure important menus and dialogs will remain inside the recording boundary.
Start recording and complete the demonstration. When you’re finished, stop the recording using the Recording Toolbar or the appropriate keyboard shortcut.
ActivePresenter will open the captured footage in its editing workspace.
Step 2: Cut Unnecessary Footage
Once the recording is open, review it on the Timeline.
Play through the demonstration and look for sections that don’t contribute to the explanation. These might include a long pause while searching for a menu, an accidental click, or several seconds of waiting for an application to respond.
Select the unwanted time range and use the Timeline’s editing tools to remove it.
Repeat this process where necessary, then preview the remaining footage to make sure the steps still flow naturally.
Avoid cutting so tightly that viewers lose track of what’s happening. A brief pause after opening a dialog may be useful if the next action depends on information displayed there.
This step helps reduce video duration while preserving the visual quality of the remaining footage.
Step 3: Choose Suitable Video Export Settings
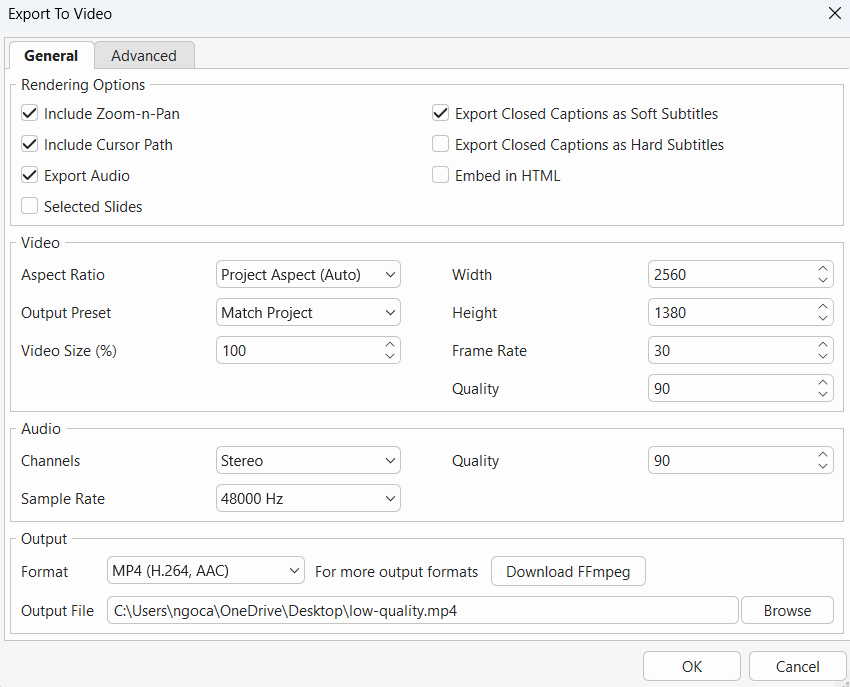
When the editing is complete, save your project and go to Export > Video.
The Export To Video dialog contains the settings you’ll use to balance file size and visual clarity.
Video Size (%), Width, and Height
These controls determine the output dimensions.
By default, Video Size (%) is set to 100%, meaning the exported video uses the project’s dimensions.
Reducing this value can produce a smaller output, but it also reduces the pixels available for displaying text.
If your tutorial contains small interface labels, start at 100%. Only test a lower value when the important details remain readable.
Frame Rate
For most software tutorials, start with 30 FPS.
If your recording is mostly static, a lower frame rate may be sufficient. For demonstrations involving fast movement, a higher value may provide smoother playback.
Quality
The standard Quality setting controls the balance between visual quality and file size for supported formats.
Higher values generally produce better-looking video but larger files. Lower values may reduce file size, although excessive compression can make text and fine lines less clear.
Unlike an average video bitrate control, this setting is not expressed in Mbps. The bitrate ranges discussed earlier should therefore not be treated as Quality values.
Format
Under the output options, choose a format suitable for your publishing platform.
MP4 (H.264, AAC) is a practical choice for general software tutorials because of its broad compatibility.
You can also compare supported formats if your destination platform allows them.
Output File
Choose where to save the exported video.
Before exporting the full tutorial, consider selecting a representative slide or section for a short test. ActivePresenter supports exporting selected slides, which is useful when you want to check the result without rendering the entire project.
Step 4: Check the Exported Video
Open the test video and watch it at the size your audience is likely to use.
Pay close attention to small menu labels, spreadsheet cells, thin interface lines, and any sections with scrolling or frequent cursor movement.
If the text is clear and the file size is reasonable, use the tested settings to export the full tutorial.
If the video is still too large, review the footage duration first. Then consider testing a smaller output size or a lower Quality value.
Change one setting at a time so you can see which adjustment affects the result.
A successful export is one that viewers can read comfortably—not simply the smallest file you can produce.
Common Screen Recording Problems and How to Fix Them
Even with suitable settings, the exported video may not look or behave as expected. The symptoms below can help you identify what needs attention.
Text Looks Blurry Even at High Export Quality
If the original recording contains tiny interface text or has been heavily downscaled, increasing export quality cannot restore the missing detail.
What to do: Check the source recording, enlarge important text, or capture a more focused area before recording again.
File Size Barely Changes After Lowering FPS
Reducing frame rate doesn’t always produce a large reduction in file size. Some encoding methods adjust compression according to the content and selected quality level.
What to do: Review the video duration, output dimensions, and encoding settings rather than relying on FPS alone.
Text Becomes Less Clear After Multiple Exports
Repeatedly compressing an already compressed video can introduce additional visual artifacts.
What to do: Keep the original recording or editable project and create new exports from that source instead of repeatedly recompressing the output file.
The Video Looks Clear Locally but Blurry After Uploading
Some publishing platforms resize or re-encode uploaded videos. Others display them in players too small for the original interface details.
What to do: Check the platform’s recommended format and dimensions, then preview the uploaded video. If the interface appears too small, consider enlarging the relevant elements in the source recording.
Frequently Asked Questions
Can I reduce screen recording file size without losing quality?
You can often reduce file size without noticeable quality loss by trimming unnecessary footage, recording a focused area, and choosing efficient encoding settings.
However, lossy compression can remove visual information. Always check the exported video, especially when it contains small text.
Is 720p or 1080p better for screen recording?
For detailed software tutorials, 1080p is generally a better starting point because it provides more pixels for interface text and fine lines.
720p may be sufficient for presentations and simple interfaces with larger text. The best choice depends on what viewers need to read.
Does lowering FPS make screen recording text blurry?
Not directly. Lowering FPS primarily affects how smooth movement appears, rather than the sharpness of individual frames.
Very low frame rates can still make scrolling and cursor movement harder to follow.
What is the best format for smaller screen recordings?
MP4 with H.264 is a reliable starting point for compatibility across devices and platforms.
More efficient codecs may produce smaller files at comparable perceived quality, but their playback support and actual results vary.
Should I lower resolution or quality first?
If the recording contains small text, preserve its resolution initially and test the export Quality setting.
If the output is still too large, try a modest reduction in dimensions and check readability again. Avoid changing several settings at once.
Conclusion
A smaller screen recording shouldn’t come at the cost of unreadable text. Often, the biggest improvements come from simple decisions: capturing only what matters, removing unnecessary footage, and testing export settings before producing the final video.
Ready to put these tips into practice? Try ActivePresenter Free Edition to record a focused screen area, trim unnecessary footage, and export a short sample. Check that your text stays sharp, then use the settings that work best for your full tutorial.
