
A screen recording can show every step correctly and still be difficult to follow. The pointer hesitates over a button, makes a small loop before a click, or moves back and forth while you explain a setting. These movements are easy to overlook during recording, but they can distract viewers from the task.
Smart Studio in ActivePresenter 10.6 lets you smooth cursor movement after recording, remove small accidental shakes, and adjust how the pointer appears. If the demonstration itself is correct, you can refine its cursor movement without recording the whole task again.
This tutorial walks you through preparing a compatible recording, adjusting cursor animation and path smoothing, and checking the finished result. It also covers optional settings for cursor appearance, idle behavior, and motion blur.
Before you begin: This guide uses ActivePresenter 10.6. Smart Studio is included in the Standard and Pro editions. You can try it in the Free edition, but output using this feature includes a watermark.
For an overview of the other recording enhancements, see Smart Studio in ActivePresenter 10.6.
Prepare Your Screen Recording
When choosing a free screen recorder for software tutorials, consider whether you will need to adjust cursor movement after recording. In ActivePresenter, Smart Studio uses cursor-path and action data saved with the recording. An imported MP4 with a visible pointer is not enough; the recording must contain the underlying data.
If you already have a compatible ActivePresenter recording, open that project and continue to Step 1. Otherwise, create a new recording:
- Open ActivePresenter and select Record Screen as Video.
- Choose the recording area.
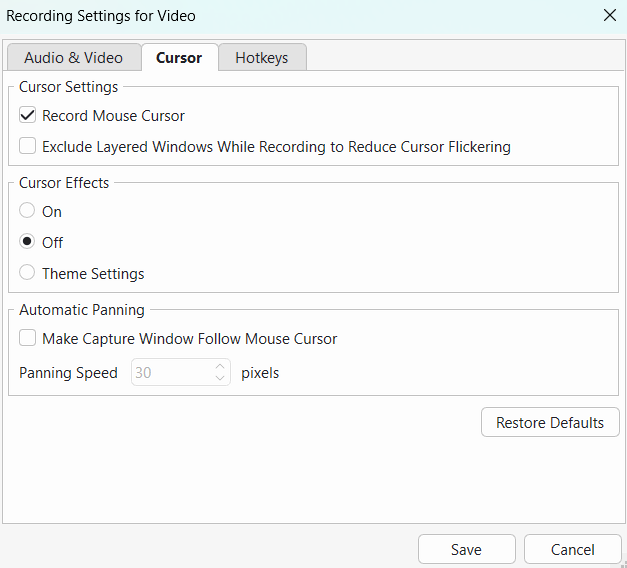
- Open Recording Settings > Cursor and enable Record Mouse Cursor.
- Record your workflow, then stop recording and save the project.
Move through the task in a clear sequence and pause briefly after important actions. For example, after selecting Save, leave the confirmation visible long enough for viewers to recognize the result.
Make sure Green Screen is turned off on the recording before opening Smart Studio.
You can use ActivePresenter’s free screen recorder to capture your workflow, then try the Smart Studio adjustments described below.
How to Smooth Cursor Movements with Smart Studio
Step 1: Open Smart Studio and Choose the Scope
Select exactly one screen-recording video on the Canvas or Timeline, then go to Properties > Media > Smart Studio.
Under Apply to, choose which clips you want to adjust:
| Scope | What it affects |
| Selected Clip | The selected clip only. |
| Current Slide | Eligible clips from the same recording source on the current slide. |
| Entire Recording | Eligible clips from the same recording source, including split clips on other slides. |
For your first attempt, choose Selected Clip so you can check the settings on a short section.
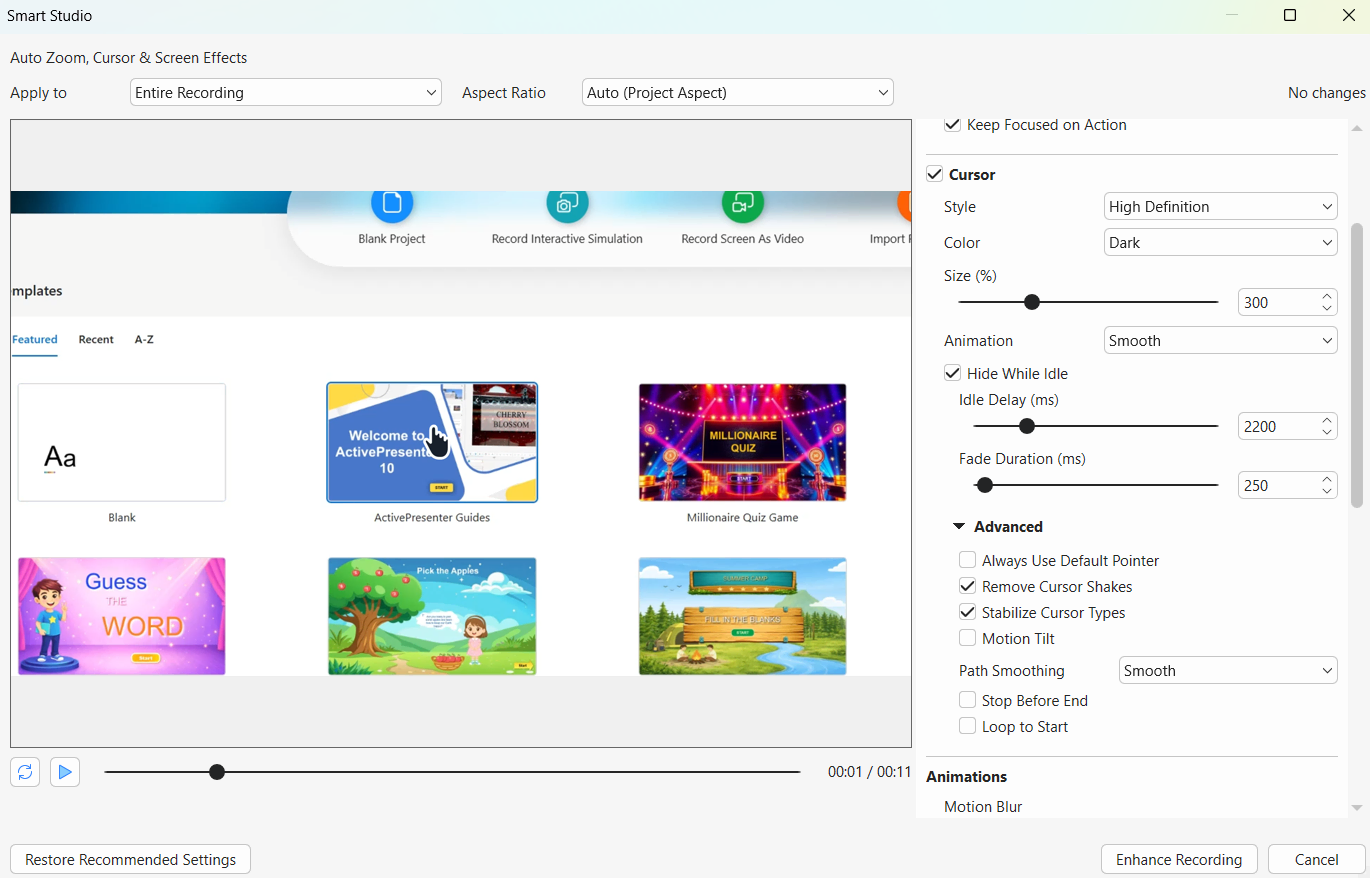
Click Open Smart Studio…. The editor displays a preview on the left and a Settings pane on the right. Locate the Cursor section, where you can adjust the pointer’s appearance, animation, and idle behavior. Open Advanced within this section to access Remove Cursor Shakes and Path Smoothing.
Play the preview once before changing any settings. Find a short section where the pointer shakes or changes direction unnecessarily, then replay that section as you adjust the settings.
Step 2: Set Cursor Animation to Smooth
In the Cursor section, make sure the cursor is enabled. Find Animation and select Smooth.
Animation controls how the cursor catches up to its recorded positions. You can choose among four options:
| Animation | Behavior |
| Rapid | Responds fastest to recorded positions. |
| Medium | Balances responsiveness and smoothing. |
| Smooth | Settles more gradually. |
| None | Keeps the recorded timing. |
Selecting None does not turn off Path Smoothing or Remove Cursor Shakes; those settings are controlled separately.
Play the preview and check how the pointer moves between controls and arrives at each click target. Click positions remain exact in all four modes.
Use Smooth as a starting point for a typical software tutorial. If the pointer feels too slow to settle during quick navigation, compare Medium or Rapid.
Step 3: Remove Cursor Shakes and Refine the Path
Open Cursor > Advanced and enable Remove Cursor Shakes. This removes short accidental reversals, such as the small back-and-forth movement that can happen while hovering over a button.
Next, adjust Path Smoothing:
- Off: Keeps the recorded path.
- Subtle: Removes small irregular movements.
- Smooth: Applies stronger cleanup.
Animation and Path Smoothing control different aspects of movement. Animation changes how the cursor follows recorded positions, while Path Smoothing changes the route it takes between them.
For routine navigation, start with:
| Setting | Starting configuration |
| Animation | Smooth |
| Remove Cursor Shakes | Enabled |
| Path Smoothing | Smooth |
Review the result before applying it throughout the recording. A tutorial about opening menus may benefit from stronger cleanup, while a design lesson demonstrating a precise drag may need Path Smoothing set to Subtle or the original path.
To adjust cursor highlights and mouse-click effects in a captured video, follow the cursor effects tutorial. These settings change how the pointer and clicks appear; the smoothing controls above refine its movement.
Step 4: Optional — Adjust Cursor Appearance and Idle Behavior
After smoothing the movement, check whether the pointer is easy to see without covering important interface details.
Under Style, choose:
- High Definition: Uses scalable ActivePresenter cursor artwork.
- Recorded: Retains the cursor shapes captured during recording.
- Touch: Replaces the pointer with a centered touch indicator.
For High Definition, select Dark or Light, then adjust Size (%). Start at 300% and preview the result. Keep the pointer large enough to follow without covering button labels or other interface details.
You can also enable Hide While Idle to fade the pointer during pauses. Use Idle Delay (ms) to control when fading begins and Fade Duration (ms) to adjust how long it takes.
For example, in a spreadsheet lesson, hiding the pointer can leave a formula unobstructed while you explain it. Keep the pointer visible when its location identifies the cell being discussed.
Under Cursor > Advanced, two additional options may help:
- Stabilize Cursor Types: Suppresses very brief changes in cursor shape.
- Stop Before End: Holds the final useful cursor position instead of following an unnecessary movement near the end of the clip.
Step 5: Optional — Fine-Tune Cursor Motion Blur
Cursor motion blur adds a soft trail behind the moving pointer. Try it after adjusting animation and path smoothing so you can judge whether it improves the result.
Open Animations > Advanced > Cursor Movement. Start with a low value and preview a section where the pointer moves quickly. Increase it gradually if needed, while checking that viewers can still follow the pointer between controls.
Use this advanced setting to adjust cursor blur independently. The main Motion Blur control changes cursor movement, screen zooming, and screen moving together.
If the cursor already looks clear and moves naturally, you can leave this setting as it is.
Step 6: Preview, Apply, and Check the Export
Replay a section containing a click, a pause, and any important drag operation. Check that the pointer reaches the intended control, stays visible when its position matters, and allows viewers to connect each action with the application’s response.
If your Apply to scope includes several clips, inspect each one before applying the settings.
Click Enhance Recording to apply Smart Studio for the first time. When revising an existing configuration, click Apply Changes. Until you click the button, your adjustments remain in the Smart Studio preview.
Back in the main editor, preview the adjusted recording. Then go to Export > Video and export a short sample using your intended output settings. Watch it at the size learners are likely to use, paying particular attention to cursor visibility and small interface details.
Tips for Natural-Looking Cursor Movement
If you need to build or reshape a cursor path manually, see how to work with Cursor Path objects.
Preserve Movements That Teach the Task
A small movement is not always a mistake. In a design lesson, viewers may need to see how you drag a handle, position an object, or make a precise selection. Compare those actions with Path Smoothing set to Subtle or Off before choosing stronger cleanup.
If one clip needs the recorded movement, select it on the Timeline, right-click, and choose Use Recorded Cursor Movement for This Clip. This turns off cursor animation, path smoothing, shake removal, motion tilt, and cursor-movement blur for that clip while preserving its cursor style and size.
Check the Cursor Against Your Narration
Watch moments where your explanation refers to a specific control. If you say “select this field” while the pointer has already faded, viewers may have to search for the field themselves.
Increase Cursor > Idle Delay (ms) to keep the pointer visible longer before it fades, or clear Hide While Idle when its position needs to remain visible throughout the explanation.
Change One Setting at a Time
If the movement still feels wrong, identify what is causing the problem before adjusting several controls.
- If the pointer takes too long to settle, compare Medium or Rapid under Animation.
- If the route between controls looks overprocessed, reduce Path Smoothing.
- If the moving pointer leaves too much of a trail, lower Animations > Advanced > Cursor Movement.
Replay the same short section after each change. This makes it easier to see which adjustment helps.
Troubleshooting Cursor Smoothing
| Problem | What to check |
| Smart Studio is unavailable. | Select exactly one eligible ActivePresenter screen recording. Check that it contains the required cursor-path and action data and that Green Screen is turned off. |
| Movement feels too gradual. | Compare Medium or Rapid animation and reduce Path Smoothing if needed. |
| The cursor disappears during an explanation. | Increase Idle Delay or disable Hide While Idle. |
| A precise movement looks overprocessed. | Reduce Path Smoothing. To restore the recorded movement for one clip, right-click it on the Timeline and select Use Recorded Cursor Movement for This Clip. |
| The moving pointer looks too blurred. | Reduce Animations > Advanced > Cursor Movement. |
Conclusion
Cursor smoothing works best when viewers can follow the demonstration without having to search for the pointer. Start with Smooth animation, Remove Cursor Shakes, and Path Smoothing, then reduce the adjustments wherever a precise movement needs to remain visible.
Download ActivePresenter and try Smart Studio on a short recording. Review it alongside your narration to check that each cursor movement supports the step you are explaining.
