Since its release in 2021, Windows 11 has introduced a cleaner interface, better performance, and a growing collection of built-in productivity tools. Recording your screen on Windows 11 with audio and a webcam is now easier than ever, thanks to several free screen recording tools that come with the operating system. However, many users don’t realize these tools exist, and those who do often find that they lack the flexibility needed for creating professional tutorials, presentations, or online courses.
That’s where ActivePresenter comes in. It is a free all-in-one screen recorder and video editor that lets you capture everything in a single recording session, then polish your video without switching to another application. Whether you’re creating software tutorials, educational videos, or product demos, ActivePresenter provides all the essential tools in one place.

This guide walks you through exactly how to do it using ActivePresenter, a professional screen recording and eLearning authoring tool built for Windows 11. Whether you’re making a software demo, an onboarding video, or a course lecture, you’ll have a reliable, repeatable workflow by the end of this article.
What Windows 11 Built-in Tools Can (and Can’t) Do
Let’s be honest about the native options before recommending a third-party solution.
Xbox Game Bar — Quick but Limited
Xbox Game Bar (Win + G) is fine for capturing gameplay or a quick screen grab with audio. But it does not support webcam overlay during recording. You get screen + audio, nothing more. It also lacks any meaningful editing capabilities after the fact.
Snipping Tool — Even More Limited
The updated Snipping Tool in Windows 11 can record your screen, but it records no audio by default in many configurations, and webcam support is nonexistent. It’s a screenshot tool that learned a new trick, not a production-ready screen recorder.
The bottom line: If your workflow requires screen + audio + webcam in a single recording, you need dedicated software. And among the options available in 2026, ActivePresenter offers the most complete package, especially if you also need to edit or publish the result.

ActivePresenter — The Best Screen Recorder for Windows 11 with Audio and Webcam
ActivePresenter, developed by Atomi Systems, is a cross-platform screen recording and eLearning authoring tool. It’s one of the few solutions that handles the full pipeline: record → edit → publish, without switching apps.
Key Features at a Glance
- ✅ Simultaneous screen + webcam recording
- ✅ System audio + microphone capture (independently configurable)
- ✅ Non-destructive video editing with a full timeline editor
- ✅ Zoom-and-pan, callouts, annotations, and cursor effects
- ✅ Noise reduction for cleaner audio
- ✅ eLearning authoring: quizzes, branching scenarios, SCORM/xAPI export
- ✅ Software simulation mode for interactive training modules
- ✅ HTML5 output for browser-based delivery
Free vs. Paid: What You Actually Get
| Feature | Free Version | Paid License |
| Screen + webcam recording | ✅ | ✅ |
| Audio recording | ✅ | ✅ |
| Basic video editing | ✅ | ✅ |
| Watermark | ❌ None | ❌ None |
| HTML5 export | ✅ | ✅ |
| SCORM / xAPI export | ❌ | ✅ |
| Software simulation | Limited | ✅ Full |
| eLearning authoring tools | Limited | ✅ Full |
The free version is genuinely useful, not a crippled trial. For screen recording with audio and webcam, it covers everything most users need.
How to Record Screen with Audio and Webcam in ActivePresenter (Step-by-Step)
Step 1 — Download and Set Up ActivePresenter
Head to atomisystems.com and download the latest version of ActivePresenter for Windows. Installation is straightforward — no bloatware, no forced account creation.
Step 2 — Open “Record Screen as Video”
There are a few ways to access this feature:
- From the Start Page: Click Record Screen as Video
- From within a project: Go to File → Record Screen as Video
- Via the Home tab: Click Record Screen → Record Screen as Video
- Via the Insert tab: Click New Slide → Record Screen as Video
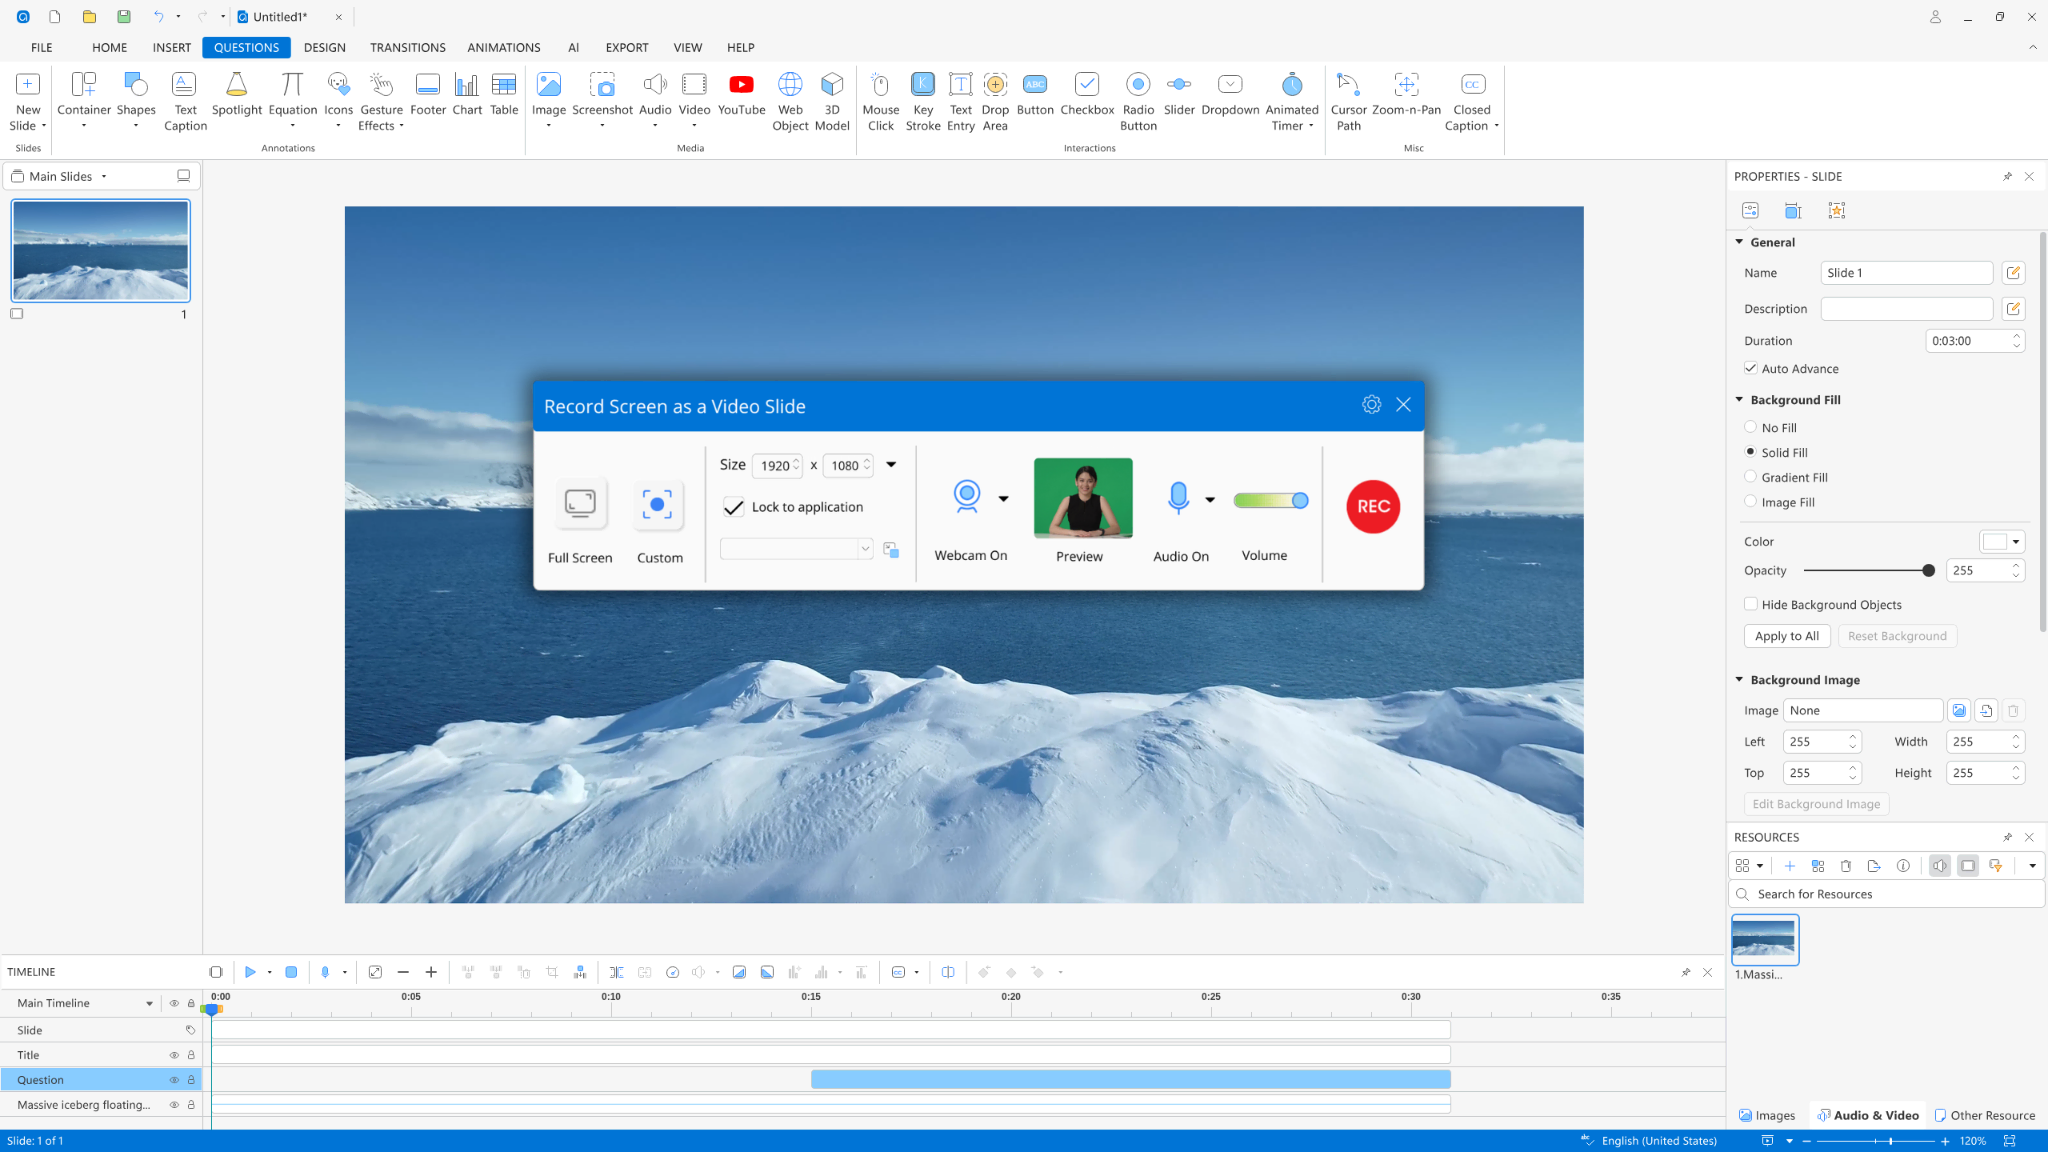
A blue selection rectangle will appear on your screen, along with the Record Screen as Video settings dialog.
⚠️ Important note: ActivePresenter 10 has two recording modes: Record Screen as Video and Record Interactive Simulation. Only Record Screen as Video supports webcam recording. The simulation mode is designed for interactive click-through exercises and does not capture webcam input.
Step 3 — Configure Your Recording Area
Drag the blue rectangle to define exactly which portion of your screen to capture. You can record a specific window, a custom region, or your full display. For most tutorial and demo videos, capturing a specific application window gives the cleanest result.
Step 4 — Set Up Your Webcam
In the recording dialog, locate the Webcam section. Here you can:
- Select your webcam device from the dropdown list
- Preview the webcam feed in real time before recording
- Adjust the frame rate: higher values produce smoother video but increase file size. For most screen recordings, 24–30 fps is the practical sweet spot
Once configured, the webcam feed will be captured simultaneously with your screen content.
Step 5 — Configure Audio (Microphone + System Audio)
ActivePresenter lets you record from multiple audio sources independently:
- System audio: captures sounds from applications, video playback, notification tones
- Microphone: captures your voice narration
You can enable both simultaneously. Before recording, click Calibrate Input… to test your microphone levels and avoid clipping or low-volume narration. This step takes 30 seconds and saves you a lot of frustration in post-production.
💡 Pro Tip: If you’re recording a software demo with voiceover, disable system audio unless the app sounds are meaningful to the viewer. Background notification pings and system sounds are the #1 source of audio pollution in tutorial videos.
Step 6 — Record, Stop, and Edit
When everything is configured, click REC to start. ActivePresenter captures all mouse movements, clicks, keystrokes, and cursor activity, alongside your webcam feed and audio.
To stop recording:
- Press Ctrl + End (Windows)
- Or open the Recording Toolbar and click Stop
Your recording opens automatically in the timeline editor. From here, you can trim clips, cut dead air, add zoom-and-pan effects, insert callout annotations, and apply noise reduction — all without re-encoding the source file.
How to Record Only the Webcam (Standalone Mode)
Sometimes you don’t need the screen at all — you just want a clean webcam recording to insert as a standalone video object in your project. ActivePresenter supports this too.
Navigate to Insert tab → Video → Webcam Recording.
The dialog that opens has two sections:
- Webcam: select your device, preview the feed, adjust frame rate
- Audio: choose system audio, microphone, or no audio
Click Record to start. Use the Pause and Stop buttons to control the session. The resulting video is added directly to your project as an editable object, you can reposition it, resize it, and apply effects just like any other asset.
This is particularly useful when you want to record a presenter introduction separately and then composite it into a screen recording during editing.
Evaluation Criteria — How to Choose a Screen Recorder for Windows 11
If you’re comparing tools beyond ActivePresenter, here’s the framework I use to evaluate screen recording software for professional use:
| Criterion | Why It Matters | ActivePresenter Score |
| Webcam overlay support | Core requirement for face-cam recordings | ✅ Full support |
| Multi-source audio | Mic + system audio simultaneously | ✅ Full support |
| Post-recording editing | Trim, cut, annotate without re-encoding | ✅ Full timeline editor |
| No watermark (free tier) | Professional output from the start | ✅ |
| Export flexibility | MP4, HTML5, SCORM, xAPI | ✅ All formats |
| Recording quality | Lossless source capture | ✅ |
| eLearning authoring | Quizzes, branching, interactivity | ✅ Built-in |
| Software simulation | Auto-generate interactive exercises | ✅ |
| Platform support | Windows + macOS | ✅ Both |
| Active development & support | Bug fixes, updates, community | ✅ Actively maintained |
Final Thoughts
Recording your screen on Windows 11 with audio and a webcam overlay doesn’t have to involve duct-taping three different tools together. With ActivePresenter, the entire workflow, setup, recording, editing, and publishing, lives in one place, and the free version is genuinely capable enough to get professional results without spending a cent.
The key things to remember:
- Use Record Screen as Video (not Simulation Mode) when you need webcam capture
- Calibrate your audio input before every session
- Take advantage of non-destructive editing to polish your recording without the risk of losing your source material
Whether you’re an IT trainer walking employees through a new system, a course creator building your first eLearning module, or a content creator who just wants clean tutorial videos — this workflow handles all of it.
🚀 Ready to Try It?
Download ActivePresenter for free, no watermark, no time limit, no credit card required. See for yourself why thousands of instructional designers, trainers, and content creators trust it for screen recording on Windows 11.