Cursor path enables you to simulate mouse movements and clicks, which is extremely useful for software training. Today’s tutorial will show you how to add cursor paths to your project.
Adding Cursor Paths
When you record screen, ActivePresenter records your mouse movements and converts them into cursor paths. You can change the cursor and add click effects after that. In addition, ActivePresenter allows you to manually insert your own cursor paths and style the path the way you want. In general, the idea is to insert a cursor path, then add points to the path and place them over buttons or other clickable objects. Optionally, you can add click points, where ActivePresenter produces the click sound in the rendered project.
Here’s how:
Step 1: Select the slide you want to insert a cursor path. Remember that only one cursor path can be added to each slide.
Step 2: Click the Annotations tab > Cursor Path.

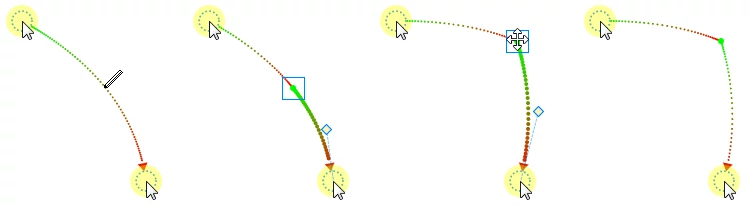
The cursor path will appear in the current slide. Each cursor path has a start point (1), an end point (2), and a dotted line (3) presenting the movement of the pointer between these two points.

- The red arrow shows the direction of the cursor movement.
- Half of the dotted line toward the start point is green in color, and its remaining half gradually turns red toward the end point.
- The spacing between dots indicates the speed of the cursor on screen. That is, the faster the cursor moves across the screen, the farther are the dots. On the contrary, closely spaced dots mean slower speeds.
- When you click the start point, a square appears to denote that the start point is currently selected. ActivePresenter shows a control point (4) associated with the end point. The line between the control point and the end point is tangent to the path at the end point. Move the control point to change the shape of the path.
Step 3: Add points to the path. Hover anywhere over the dotted line, the pointer changes to a pencil. Click to add a point and drag that point to the position you want.
Tip:
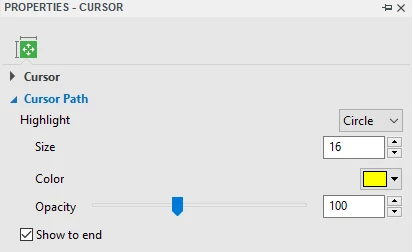
- Highlight the mouse cursor so that users will easily follow it. To do that, select one point on the path and click the Properties pane > Size & Properties > Cursor Path.
- Select Show to end to show the path until the end of the slide.
Changing the Path of Mouse Movements
When you insert a cursor path, the whole object is selected so that you can move it to another position in a slide. If you want to change the position of the start or end point of the path, first click anywhere on the Canvas to deselect the path. After that, click the start point or end point and drag it.
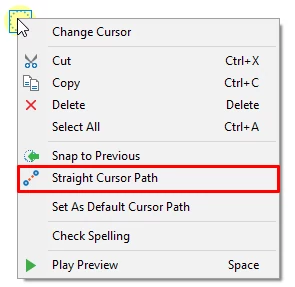
Any given path segment can be made a curve or a straight line. Just right-click the start point > Straight Cursor Path or Curved Cursor Path.
Tip: Another way to change the path is to move the control point. This point appears when you select the start point of the path.
Changing Cursor Styles
To add or change the cursor style, select a point and do the following:
Step 1: Click the Properties pane > Cursor > Cursor Image.
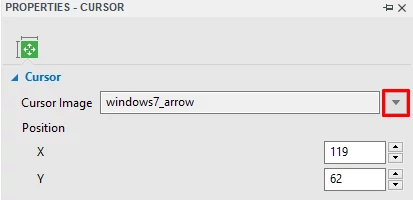
Step 2: Choose the cursor image you want from the gallery. You can even use your own cursor image by clicking From File….

Changing the Timing and Speed of Mouse Movements
Take a look at the cursor movement in time. The cursor path has three segments in total.
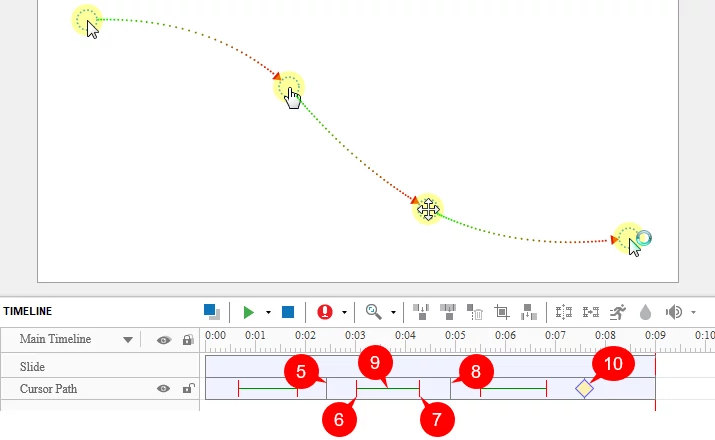
- Each gray vertical line (5, 8) denotes the end time of a segment and the start time of the subsequent segment.
- The instant when the cursor starts moving is marked with a red vertical line (6).
- During the 5→6 gap, the cursor is at rest. This is the start duration of the cursor.
- The instant when the cursor stops moving is marked with a second red vertical line (7).
- During the 7→8 gap, the cursor is at rest. This is the stop duration of the cursor.
- The green horizontal line (9) indicates the moving duration of the cursor.
- The yellow diamond (10) represents a click point. This is where ActivePresenter simulates a click by creating a click sound and click effect.
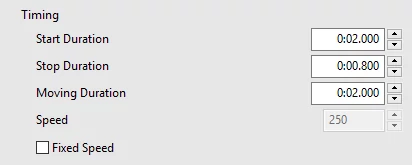
You can drag the lines above to change where the movements of the cursor begin and how long they last. Alternatively, click the Properties pane > Cursor > Timing to adjust the timing and speed of the mouse movement.
Adding Click Points and Click Effects
You can convert any point along the cursor path into a click point. Select a point and perform the following:
Step 1: Click the Properties pane > Cursor > Click Point.
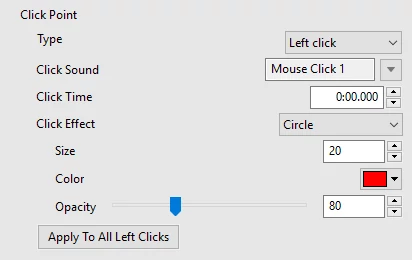
Step 2: Select a desired type of click point from the Type drop-down list. Then, further customize the click sound, time and effect if you wish.
Step 3: Click Apply To All to apply changes to all click points of the same type.
Continuation of Cursor Paths between Slides
Normally, when you drag the start or end point of a cursor path, ActivePresenter also moves the corresponding point in the previous/next slide to ensure a smooth mouse movement. That’s thanks to the Cursor Snapping tool in the View tab.
If you don’t want the cursor path to move continuously between slides, click the View tab and turn off Cursor Snapping.

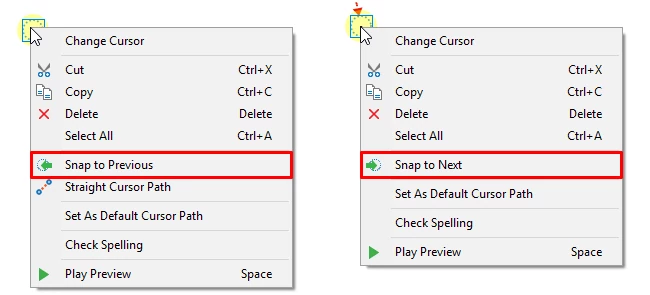
In rare cases, the cursor path can be out of sync, making an abrupt movement of the mouse cursor when transitioning between slides. To avoid this, stitch the ends of the cursor paths of adjoining slides together.
- Right-click the start point > Snap to Previous.
- Right-click the end point > Snap to Next.
Tips to Compose Cursor Paths
Here are a few tips for composing a realistic-looking cursor path:
- Avoid showing the mouse all the time. It is OK if the mouse vanishes from the scene for a while.
- Remove aimless wandering of the mouse to prevent distraction.
- Don’t use the mouse as a presentation pointer. Instead, use shapes, zoom-n-pan effects, spotlight effects, or other types of annotations.
- The resting periods are important in realistic depiction of the mouse movement. In fact, they contain the click points (you cannot click while the mouse is moving).
- When you are narrating something, keep the mouse at rest.
That’s all about cursor paths in ActivePresenter. Try it today and feel free to contact us if you need any support.