In captured videos, mouse cursor and effects allow viewers to easily follow your action. They are also useful in drawing viewers’ attention to specific parts of the screen. Sometimes, you may want to show/hide these effects of the mouse; other times you may need to change mouse cursor in terms of highlight and shape, etc. We’ll learn how to do that in this article.
In general, the procedure is to enable editing the mouse cursor and then change it in the recorded videos.
Enable Editing Mouse Cursor and Mouse Clicks in Captured Video
In order to change the mouse cursor in any captured video, you have to enable this feature before getting started to record.
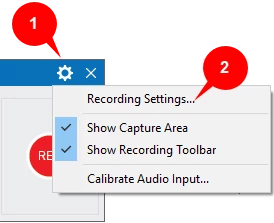
Step 1: In the Record Video Project dialog, click the Settings button (1) and then select Recording Settings… (2).
Step 2: Open the Cursor tab in the Recording Settings for Video dialog that pops up.
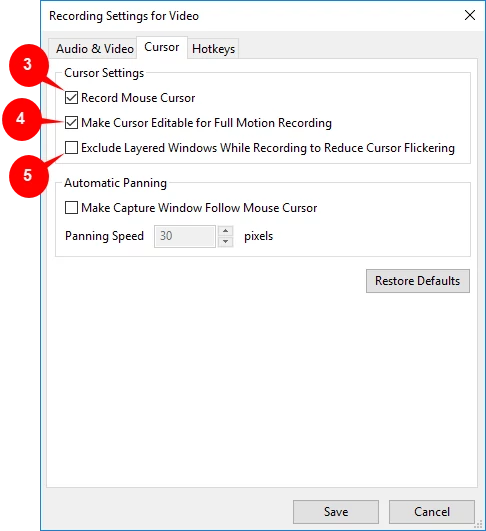
Step 3: Check the Record Mouse Cursor (3) and Make Cursor Editable for Full Motion Recording check box (4).
- Record Mouse Cursor: ActivePresenter will record the mouse movement on screen.
- Make Cursor Editable for Full Motion Recording: Allow editing the cursor highlight, mouse click sounds and effects in recorded videos.
Note: Remember to select both of these two options. If you only check the first one, you can only record the mouse cursor but cannot edit it later. On the other hand, if you only check the second one, your captured video will not have the mouse cursor. Hence, you cannot edit it.
- Exclude Layered Windows While Recording to Reduce Cursor Flickering (5): When recording videos, some layered windows may appear on screen. In that case, ActivePresenter will exclude those windows that you don’t want to record.
Change Mouse Cursor and Mouse Clicks in Captured Videos
After recording with the two options selected, your captured video will have the mouse cursor that is editable.
Step 1: Select the captured video.
Step 2: In the Media tab (6) of the Properties pane, access the Cursor Effects section.
Step 3: Check the Render Cursor button (7) to activate all the cursor properties.
Uncheck it will hide the mouse cursor in your recorded videos.
Step 4: Change mouse cursor effect properties.
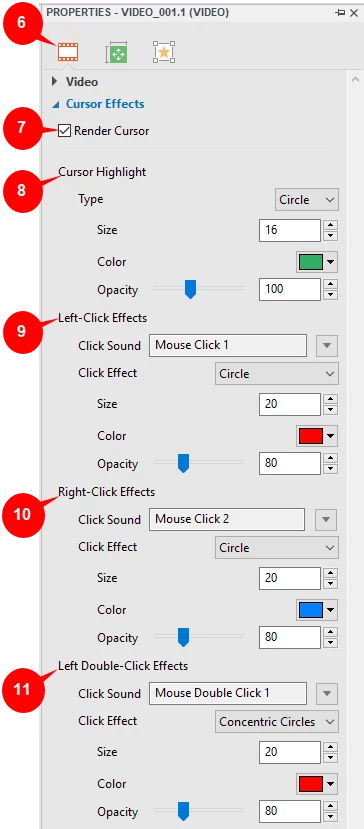
- Cursor Highlight (8): This is the highlight of the pointer.
- Type: Type of highlight effect (None, Circle, and Square).
- Size: Size of highlight effect. It is the radius of the circle in the Circle highlight or half of the width of the square in the Square highlight.
- Color: Color of highlight.
Click the Color Picker split button to change the cursor highlight. You should use some attention-grabbing colors such as red, yellow, and green for better effect.
-
- Opacity: Opacity of the highlight.
Drag the Opacity scale to change the opacity level. However, don’t make it too low because it can be hard to follow.
- Left-Click Effects (9)/Right-Click Effects (10)/Left Double-Click Effects (11): Select the sound and effect for the cursor when users left-click/right-click/double-click the mouse respectively.
- Click Sound: The sound which is played when users press the mouse button.
Click the Click Sound arrow button and select one sound track from the drop-down list. You can also import an audio file from your computer or from other projects.
-
- Click Effect: The animation effect (None, Circle, Concentric Circles, and Square) which is rendered when a mouse button is pressed.
The properties of the click effect (Size, Color, and Opacity) are the same as the properties of the cursor highlight.
That’s how to change mouse cursor and mouse clicks in recorded videos with ActivePresenter 7. Hope that it helps.