Working with ActivePresenter, chances are you want some batch operations to insert objects into multiple slides or delete multiple objects at once. ActivePresenter has got you covered.
Inserting Objects into Multiple Slides
ActivePresenter makes it easy to insert objects into multiple slides. Perform the following steps:
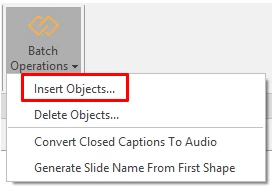
Step 1: Click the Slide tab > Batch Operations > Insert Objects.
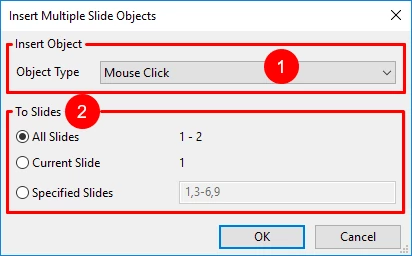
A dialog appears as follows:
Step 2: Select the object type (1) that you want.
Step 3: Specify the slides (2) into which you want to insert the object. If you choose Specified Slides, separate the ordering numbers of slides by commas. Otherwise, use hyphens to indicate ranges. For example, the range 3-6 indicates the 3rd, 4th, 5th, and 6th slides.
Step 4: Click OK to apply changes.
Once the batch processing finishes, the selected object will appear in all specified slides with the same properties. Then, you can edit each of these objects individually or style all of them in the same way. See Styling Multiple Objects for details.
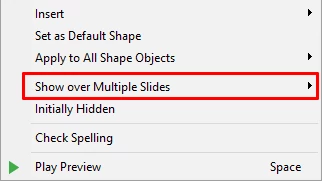
Note: You might want to make a single object appear in all the slides in the presentation. This is useful when the object is a corporate logo or background music. To do so, right-click the object > Show over Multiple Slides. Then, you can choose to place the object in the top layer or bottom layer of the stack order of slide objects. After that, in the Timeline pane, and click the All Slides button to view all the slides in the current project as well as the objects that span across multiple slides.
Deleting Multiple Objects at Once
If you don’t want an object anymore, just select it and press DELETE. The same steps are applied to remove more than one object in a single slide. But what if you want to delete multiple objects from multiple slides? The answer is using the batch operation.
Do the following:
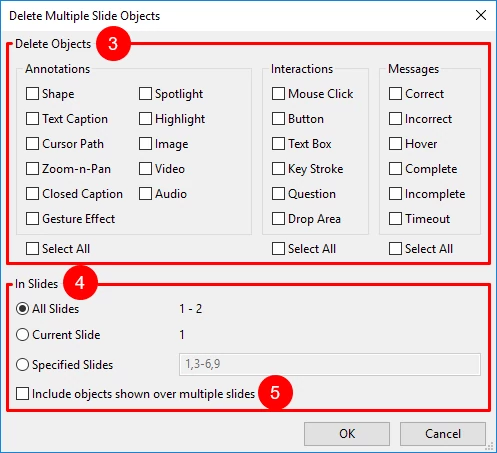
Step 1: Click the Slide tab > Batch Operations > Delete Objects. A dialog appears as follows:
Step 2: Select the object types (3) that you want to remove.
Step 3: Specify the slides (4) where you want the mass destruction to happen. If you choose Specified Slides, separate the ordering numbers of slides by commas. Otherwise, use hyphens to indicate ranges. For example, the range 3-6 indicates the 3rd, 4th, 5th, and 6th slides.
Step 4: Select Include objects shown over multiple slides (5) if you want to remove any objects shown over multiple slides.
Step 5: Click OK to apply changes. All the selected objects will be removed from the specified slides.
As you can see, it’s very easy to insert objects into multiple slides or delete multiple objects at once. Try ActivePresenter today and feel free to contact us if you need any support.


