In ActivePresenter, each slide may have numerous objects, such as shapes, text captions, images, and videos. You can arrange the objects in many ways to create precise and professional-looking slides. Today’s tutorial shows you how to order and align objects.
Ordering Objects
When being inserted into a slide, new objects are placed in front of others and may cover them partly or fully. This stack order of objects is called z-order. You can arrange objects in z-order such as moving them to the front or the back of the slide with ease.
To change the stack order, do the following:
Step 1: Select one or more objects.
Step 2: Click the Format tab > Order or the Home tab > Arrange > Order. Alternatively, on the Canvas or in the timeline, right-click objects (time bars) > Display Order.
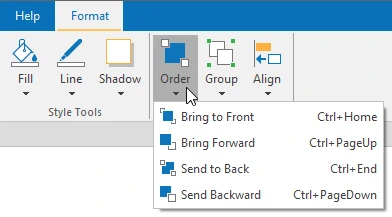
Step 3: Choose the desired display order options:
- Bring to Front (CTRL+HOME): Place the object at the very top of the stack.
- Bring Forward (CTRL+PAGE UP): Send the object higher by one level in the stack.
- Send to Back (CTRL+END): Place the object at the very bottom of the stack.
- Send Backward (CTRL+PAGE DOWN): Send the object lower by one level in the stack.
Note:
- These display order options let you set the z-order of objects even when they do not overlap each other. So, you can bring an object to the front or the back to easily identify and work on it.
- In the Selection pane, you can drag an object up or down to change its position in the stack order. Moving an object higher means that you bring it to the front of the stack.
Aligning Objects
ActivePresenter can automatically and perfectly align objects for you.
Aligning Objects Using Canvas Snapping
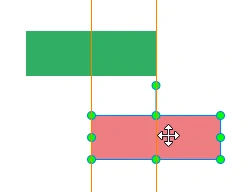
You can use canvas snapping to snap objects to the center/edge of the Canvas or of other objects. Snap lines appear as orange lines when you drag or reshape objects. They are vertical or horizontal lines through the edge/center of an object or the Canvas. Use snap lines to align an object relative to another object. Or, you can align an object relative to the center/edge of a slide.
Canvas snapping is turned on by default. To turn it off, click the View tab > Canvas Snapping. Temporarily disable canvas snapping by holding down CTRL when resizing or moving objects.
Aligning Objects with Anchor Objects
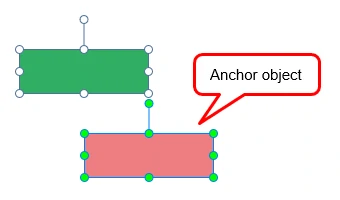
Sometimes, you have an object’s position set perfectly and you want to align other objects with that specific object. To do that, use the Alignment options and an anchor object. An anchor object (also a reference object) is the one with which all other objects align. It is the last object you select with green resizing handles rather than white handles like others. To define a different anchor object, click any of the currently selected objects without holding CTRL.
You have many options for aligning objects both vertically and horizontally. Do the following:
Step 1: Hold down CTRL while selecting all the objects that you want to align.
Step 2: Click the Home tab > Arrange or the Format tab > Align.
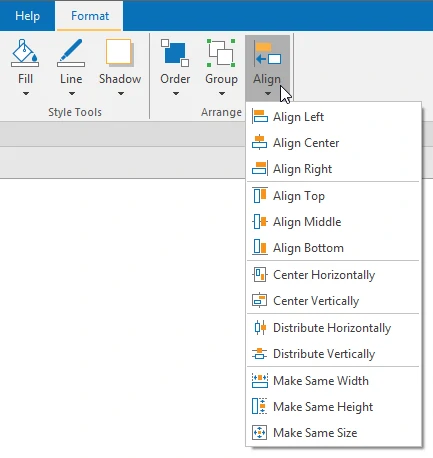
Step 3: Choose the desired alignment options:
- Align Left: Align the left side of all the objects with the left of the anchor object.
- Align Center: Align the center of all the objects with the vertical center of the anchor object.
- Align Right: Align the right side of all the objects with the right of the anchor object.
- Align Top: Align the top of all the objects with the top of the anchor object.
- Align Middle: Align the center of all the objects with the horizontal center of the anchor object.
- Align Bottom: Align the bottom of all the objects with the bottom of the anchor object.
Aligning Objects to the Canvas
You can align one or more objects to the center of the Canvas. Do the same steps to align objects as mentioned above, but choose either of the following:
- Center Horizontally: Move all the selected objects to the horizontal center of the Canvas.
- Center Vertically: Move all the selected objects to the vertical center of the Canvas.
Distributing Objects Evenly
If you arrange objects in a row or column, you may want them to be an equal distance from one another for a neater appearance. Do that by distributing the objects horizontally or vertically. Perform the same steps to align objects as mentioned above, but choose either of the following:
- Distribute Horizontally: Make the horizontal spacing equal between the selected objects.
- Distribute Vertically: Make the vertical spacing equal between the selected objects.
Note: These commands work only when you select more than two objects.
Resizing Objects to Anchor Objects
If you have multiple objects that you want to size equally, use the following alignment options:
- Make Same Width: Match the width of all the selected objects with that of the anchor object.
- Make Same Height: Match the height of all the selected objects with that of the anchor object.
- Make Same Size: Match the height and width of all the selected objects with those of the anchor object, respectively.
So that’s all about the ways to order and align objects in ActivePresenter. In case you want to group objects to better arrange them, see Grouping Objects. Feel free to contact us if you need any support.