When designing projects or courses, have you ever wished that you can keep some objects to reuse later on? Instead of opening your old projects and copy or even looking for them in every folder from your computer. Indeed, it’s such a waste of time! Now, with Object Templates in ActivePresenter 8, that’s not a problem. So, let’s find out how to create and use Object Templates in ActivePresenter 8 now.
What you can learn through this tutorial are:
Overview of Object Templates
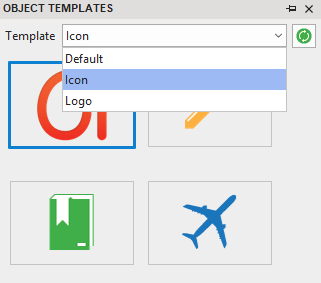
In ActivePresenter 8, object templates are placed in the Object Templates pane. To see this pane, open the View tab > Object Templates ![]() .
.
Basically, the Object Templates pane is where to hold object templates. Each object template comprises one or more object template items. In particular, these items can be annotations or interactive objects. By default, ActivePresenter gives you a “Default” object template. But, you can create your personal object templates for specific purposes. For example, create an “Icons” object template to put all icons you want to keep. This way, it’s easier to reuse those icons later.

The Object Templates pane is a practical feature to add, save, and reuse objects within a project or across other ones.
Now, keep reading to learn how to create, save, use, and share object templates in ActivePresenter 8.
Create Object Templates
Save Object Templates
First, to save a project as an object template, click ActivePresenter > Save or Save As…. Then, select ActivePresenter Object Template (*.apobject) from the Save as type list > click Save.

Normally, your file can be saved in the ActivePresenter Templates folder C:\Users\<user_name>\Documents\ActivePresenter Templates (for Windows) or /Users/<user_name>/Documents/ActivePresenter Templates (for macOS). After that, you can rename, remove, or share the template file with others in the normal way.
Note: In case you save the project in other folders on your computer, the object template will not appear in the Object Templates pane.
If you have any *.apobject file and want to import it into ActivePresenter as an object template, just copy the file and paste it into the ActivePresenter Templates folder. Then, click Reload ![]() to refresh the Templates folder. Now, the app shows this object template in the Object Templates pane. To see it, click the Template list.
to refresh the Templates folder. Now, the app shows this object template in the Object Templates pane. To see it, click the Template list.
Adding Object to Object Templates
After saving objects as an object template, you can add more objects to use this template across projects. To get it done, right-click an object or a group of objects > Add to Template. Then, that object/group appears as an object template item in the selected object template.

In fact, you can add any objects to object templates, except Zoom-n-Pan, Cursor Path, and Closed Caption.
Generally, an object template item has the same properties as the original object, even events, and actions. However, there are some exceptions. For example, assume that you have object “A” with the action “Show object B” when clicked. If you add these objects to the object template simultaneously, the event and action still remain. Otherwise, in case you just add object A to the object template, the action won’t exist anymore.
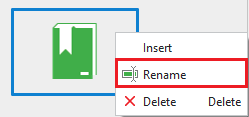
Rename Object Template Items
After adding objects to object templates, you are free to rename them. To do that, right-click an object template item > Rename.
Remove Object Template Items
In case, you want to remove an unwanted object template item, click it and press DELETE. Alternatively, right-click the object template item > Delete.
Note: If you select multiple objects, ActivePresenter then places them on the same object template item. They aren’t distributed to each new individual item. In this case, their position and alignment remain unchanged.
Use Object Template Items
Now, we will find out how to reuse object template items. Firstly, open the Object Templates pane and select your desired object template. Then, do any of the following:
- Double-click an object template item.
- Select an object template item. Then, drag and drop it to the Canvas.
- Right-click an object template item > Insert.
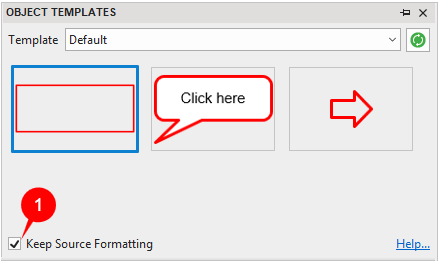
Note: There is the Keep Source Formatting check box (1) at the bottom of the Object Templates pane. It is selected by default. This means when you add any object template item to a slide, their font and colors still remain the same as the source formatting. In case you deselect this check box, the fonts, and colors of inserted object template items will modify according to the Theme Colors and Theme Fonts of the slide to which they are added.
Share Object Templates
As mentioned before, you can create as many object templates as you wish then share them with your co-workers or your friends. Just select the files (*.apobject) and send them to other users.
So, you’ve gone through how to create and use Object Templates in ActivePresenter 8. Hope that it helps. Let’s check out our YouTube channel, Twitter, and Facebook page for more useful information.
See Also: