When you have a long list of content to show in menus, consider using dropdowns. Now, this type of object is offered in the latest version of ActivePresenter. Let’s experience new things that the feature brings to us in ActivePresenter 9.
A dropdown is helpful in both appearance and interaction. It can conserve screen space, which makes the projects look well-arranged. You can interact with the dropdown conveniently. Initially, it shows a value or item. With a click, it will display all values. Then, you can choose one or more from the list to meet your needs. Depending on your purpose, it can be form-filling, navigation menus, attribute selections, and so on.
From version 9.0, ActivePresenter allows you to insert and work with dropdowns for more enhanced projects. This tutorial will show you how to:
- Insert Dropdowns
- Add Item List to Dropdown
- Set Score and Reporting
- Work with Dropdown States
- Add Events – Actions
- Style Dropdowns
Before going to the detailed tutorial, don’t hesitate to download, install, and experience the features with a few clicks.

Insert Dropdowns
There are two ways to insert a dropdown to your project.
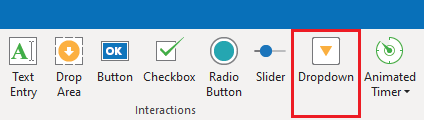
- In the Home tab > Interactions > Dropdown.
- Open the Insert tab > Dropdown.
As soon as you select the feature, the cursor turns into a crosshair. Click anywhere on the Canvas to insert it, or drag the mouse to draw one.
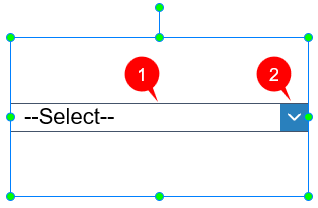
A default inserted dropdown is a single-select list box that has 2 parts: textbox (1) and drop-down arrow button (2). The container box has the text “–Select–” by default. It is also the hint item. You can add items to the list, make it work, and format it.
Add Item List to Dropdown
To add items to the list, in the Properties pane > Interactivity tab > Dropdown section.
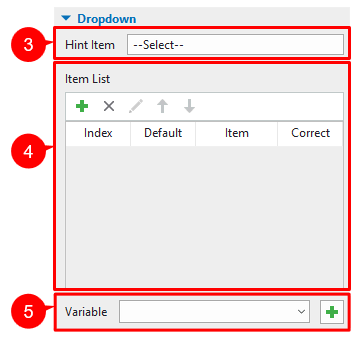
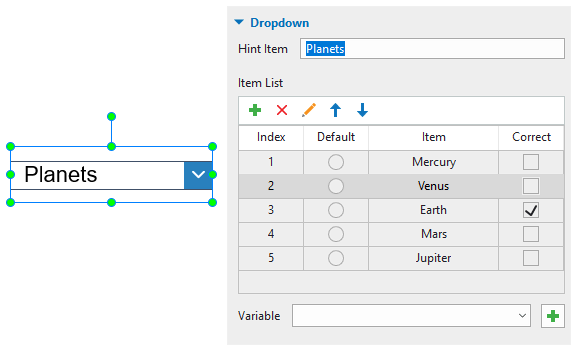
Here you can see Hint Item (3), Item List (4), and Variable (5). Let’s learn how to work with them.
Add Item List
To add new items to the list:
Step 1: Click ![]() to add a new item to the list.
to add a new item to the list.
Step 2: Type a text or value in the Item column.
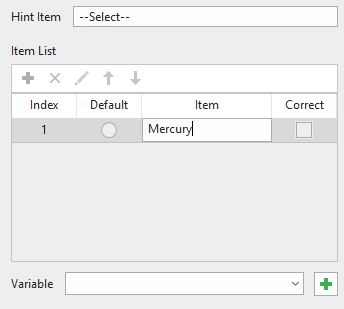
You can add as many items as you want. Then, feel free to edit, delete or rearrange them using commands above the item list.
Set Correct Values
To set any item as a correct value in the dropdown, in the item list created earlier, you simply tick the corresponding checkbox.
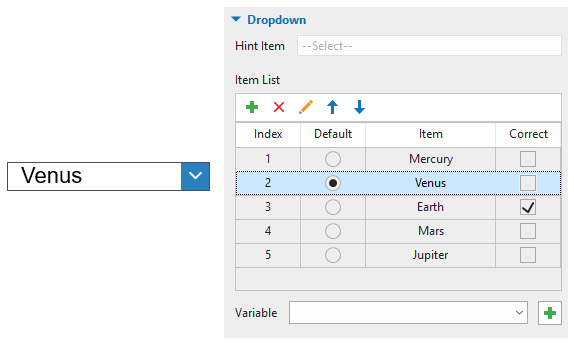
If you want to remove any correct value, simply untick its checkbox.
Change the Hint Item
Hint Item (3) is a suggested item that allows you to click on it to reveal a dropdown list. Its default text is “–Select–”. To change the Hint Item, select a checkbox in the Default column of the Item List.
Alternatively, uncheck the checkbox and type a new text in the Hint Item text box.
Add Variables to the Dropdown
Variable (5) can be used sometimes when one item refers to a specific object. To add a variable to the dropdown:
Step 1: Click ![]() next to the variable list.
next to the variable list.
Step 2: Type a name for the variable. For example, “Planets”.
Step 3: Click OK.
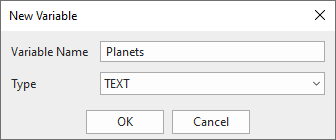
The type of the variable is TEXT.
To remove the variable that you have created, navigate to the Home tab > Variables > select the variable you want to remove > click ![]() .
.
Set Score and Reporting
After setting the correct values, you can easily set the score and report to evaluate learners. To do that, select the dropdown > Properties pane > Interactivity tab > Score & Reporting section.

This section provides you with many options:
- Mode (6) offers you 2 choices: Graded and Survey. While the first one measures learners’ performance, the latter collects their feedback or information.
- Report ID (7) is to track learners’ results.
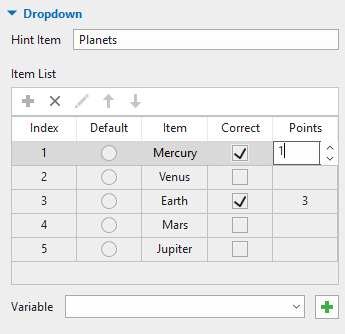
- Points (8) sets points for correct answers. If the point is Partial, the Points column appears in the Item List. Double-click the column to edit the point for each answer. Then, set the point by entering a new value or clicking the arrow drop up or down.
- Attempts (9) sets the maximum times that learners can interact with the question.
- Timeout (10) can limit the time a learner has to respond to a question.
- Submit (11) offers the way you want learners to submit the answers automatically (select Auto) or manually (select Manual).
Work with Dropdown States
The states of a dropdown show how it looks when it works. To view and work with the states, open the View tab > Object States.
In general, it has two states: Normal (Default) and Disabled.
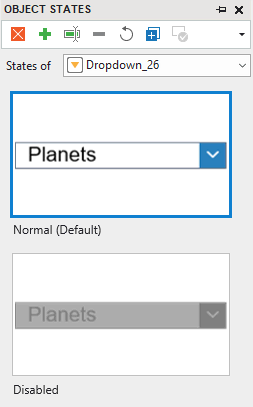
- Normal (Default): This is the neutral state of a dropdown. This is how it looks after being inserted into the slide.
- Disable: This is the state when the time is out, no more attempts, or cannot response to any user action.
Add Events – Actions
To make a dropdown work, you need to add events and actions to it. To do that, navigate to the Properties pane > Interactivity tab > Events – Actions section. A dropdown has six default events: On Change, On Correct, On Incorrect, On Timeout, On Rollover, and On Rollout. Add actions as many as you wish.
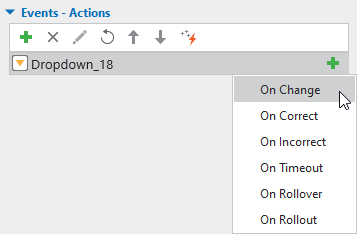
- On Change: Occur when selecting an item in the list.
- On Correct: Occur when selecting the correct values.
- On Incorrect: Occur when selecting the incorrect values.
- On Timeout: Occur when users don’t respond within the specified time.
- On Rollover: Occur when the mouse enters the boundary of the dropdown.
- On Rollout: Occur when the mouse exits the boundary of the dropdown.
Style Dropdowns
Like many other interaction objects, dropdowns can be styled with ease in the Format tab.

With the tools, you can:
- Choose a style for the dropdown in the Dropdown Styles gallery.
- Change the color of the textbox & arrow background, arrow, and border of the dropdown in Dropdown Tools.
- Choose a style in the Quick Style list or use tools in Style Tools to style the container box of the dropdown. Alternatively, navigate to its Properties pane > Style & Effects tab > Fill/Line/Shadow/Opacity section.
That’s how to work with dropdowns in ActivePresenter 9. More information can be found on our Tutorials page and our YouTube channel.
See more