Tables come in handy when you need to store and organize data in rows and columns. In this tutorial, you will learn how to work with tables in ActivePresenter 9.
This tutorial covers:
Before diving deeper into how to work with tables, click the button below to get ActivePresenter’s most recent version.

1. Insert, Select and Delete Tables
It’s easy to insert, select and delete tables in ActivePresenter 9. Keep reading for more information.
Insert Tables
To insert a table, perform the steps below:
- In the Insert tab > Table.
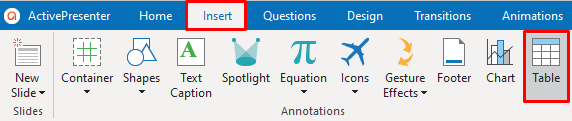
- In the Insert Table dialog, do either of the following:
- Select the number of rows and columns you want by clicking the up or down arrow in the combo boxes.
- Enter a number in a range of 1 – 50 in the Number of Columns and Number of Rows fields.

Then, click OK. The cursor now turns into a crosshair. You drag the mouse to draw a table or click anywhere on Canvas to insert a table.
Select Tables
To select a table, do one of the following:
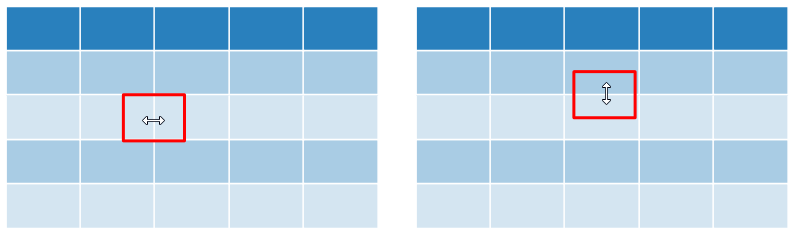
- Rest the mouse on the table boundary or the line inside a table until it turns into a bidirectional arrow (horizontal or vertical). Then, click to select the table.
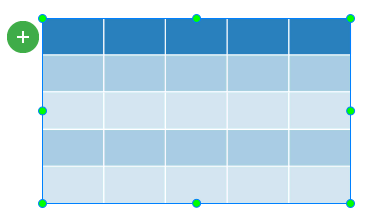
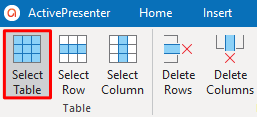
- Click any cell in a table to enable the Table group of the Table Tools tab. Then, click the Select Table button to select the entire table.
Delete Tables
To delete a table, do one of the following:
- Select a table, then press DELETE.
- Right-click a table, then select Delete.

2. Insert, Select, and Delete Rows/Columns
In this section, you mainly work with the commands in the Table Tools tab,

as well as the Table Tools button.
Insert Rows and Columns
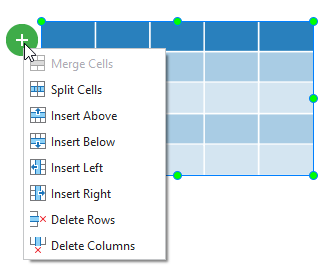
Click a cell in the row above or below where you want the new row to appear. Or click a cell in the column to the left or the right where you want the new column to appear. Then, click the Table Tools button, or in the Table Tools, Rows & Columns group, do either of the following:
- To insert a row above the selected cell, click Insert Above.
- To insert a row below the selected cell, click Insert Below.
- To insert a column to the left of the selected cell, click Insert Left.
- To insert a column to the right of the selected cell, click Insert Right.
Alternatively, to insert a row, right-click a cell in the row above or below where you want the new row to appear. Then, select Table > Insert Above/Insert Below. To insert a column, right-click a cell in the column to the left or right where you want the new column to appear. Then, select Table > Insert Left/Insert Right.

Note:
- To insert multiple rows at once, drag your mouse to select an equal number of rows to the amount you want to add, then click Insert Above or Insert Below. For example, if you want to add two more rows, select two in the table, and click Insert Above or Insert Below.
- To insert multiple columns at once, drag your mouse to select an equal number of columns to the amount you want to add, then click Insert Left/Insert Right, or right-click and select Table > Insert Left/Insert Right. For example, if you select two columns in the table, click Insert Left or Insert Right, and two more columns will be added.
Select Rows and Columns
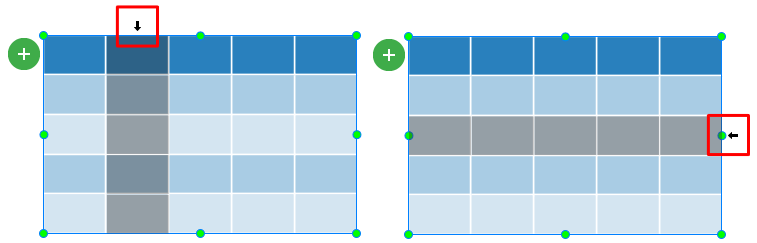
| To select a column, hover your mouse over the area near the table towards the top or bottom of the table column until it changes to a pointing arrow. Then, click to select a column. | To select a row, position your mouse over the area near the table to the left or right of the table row, and the mouse cursor will change to a pointing arrow. Then, click to select a row. |
Alternatively, click any cell in the table row you want to select. Access the Table Tools tab > Select Row. Or, click and drag the mouse to highlight the cells in the row you want to select.
Click any cell in the table column that you want to select. Access the Table Tools tab > Select Column. Or, click and drag the mouse to highlight the cells in the column you want to select.
Note: To select multiple rows/columns at once, select the first row/column, and while holding SHIFT, select the last row/column. Alternatively, click and drag the mouse to select the rows/columns you want.
Delete Rows and Columns
To delete a row or column on a table, do one of the following:
- Click a cell in the row or column you want to delete. Then, click the Table Tools button, or in the Table Tools tab > Rows & Columns group > Delete Row/Delete Column.
- Right-click a cell in the row or column you want to delete. Select Table > Delete Row/Delete Column.
- Select a row or column that you want to delete, then press DELETE or right-click to select Detele.
Note: To delete multiple rows/columns at once, select the rows/columns you want to delete and press DELETE or right-click to select Delete.
3. Split and Merge Cells
Split Cells
To divide a table cell into more cells, do either of the following:
- Click the cell that you want to split. Then, click the Table Tools button (the green plus button) > Split Cells.
- Click the cell that you want to split. Then, select Split Cells in the Table Tools tab.
- Click the cell you want to split. Then, hover the mouse over the border of the cell and right-click it > Table > Split Cells.
Then, the Split Cells dialog appears. Do one of the following:
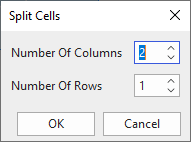
- To divide a cell vertically, enter the number of new cells into the Number Of Columns box.
- To divide a cell horizontally, enter the number of new cells into the Number Of Rows box.
- To divide a cell vertically and horizontally, enter the number of new columns you want into the Number Of Columns box. Then, enter the number of new rows you want into the Number Of Rows box.
Merge Cells
To combine two or more cells in the same row or column into a single cell, do as follows:
- Select the cells that you want to combine. Then, click the Merge Cells button in the Table Tools tab.
- Right-click the cells that you want to combine. Then select Table > Merge Cells.
4. Reposition and Resize Tables
When creating eLearning courses, you may want to move the table to a new position or change its width and height. This section will show you how.
Reposition Tables
Perform either of the following to reposition a table:
- Select a table then drag and drop it to a new position on a slide.
- Select a table and navigate to the Properties pane > Size & Properties > Transform > enter specific values in the Left and the Top spin boxes.

ActivePresenter 9 allows you to resize the entire table or a specific column, row, or cell.
Resize Tables
- Resize a table: Select a table then drag the resizing handles to resize it. Alternatively, navigate to the Properties pane > Size & Properties > Transform > enter specific values in the Width and Height spin boxes.

- Resize columns, rows, and cells: Rest the mouse on the line inside the table until it turns into a bidirectional arrow, then drag the table line until it is the size you want. Alternatively, select the column/row/cell and click the Properties pane > Table > Cell Size > enter specific values in the Width and Height spin box. To make multiple rows or columns the same size, select the columns or rows and click Distribute Rows or Distribute Columns.

5. Style Tables
A table style is a combination of different formatting options, including the color scheme used in your project. Once a table is inserted into a slide, the Table Tools tab appears, allowing you to change its style quickly.
Apply a New Table Style
To apply a new table style, perform the following steps:
- Select the table to which you want to apply a new style.
- Choose the desired table style in the Table Tools tab. Besides, to see more table styles, click the drop-down arrow on the right of the Table Styles gallery.

Edit Style Options
To change the table style, select the table. Then, navigate to the Properties pane > Table > Style Options. After that, check/uncheck the following options:
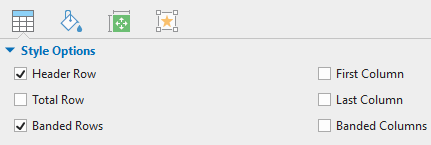
- Header Row: Format the top row of the table specially.
- Total Row: Display special formatting for the last table row.
- Banded Row: Display banded rows, in which even rows are formatted differently from odd rows.
- First Column: Display special formatting for the first column of the table.
- Last Column: Display special formatting for the last column of the table.
- Banded Column: Display banded columns, in which even columns are formatted differently from odd columns.
Add Text
To add text to the table cells, click a cell and enter your text. After entering the text, you click outside the table. To change the text font, size, and color, select the text, then use the buttons and commands in the Home tab or the toolbar that appears.
Add or Change the Table Border
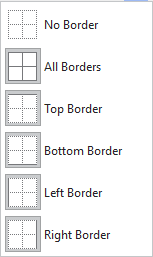
To add or change the table border, you select the cells/tables you want to add/change the border first. Then, navigate to the Properties pane > Table tab > Border. Select one of the following options in the Border group:
- Border: Choose one out of the 6 border options you want.
- Border Width: Click the up/down arrow or enter a number in the range of 0 – 20 to select the border width you want.
- Border Color: Select a color for your table border.
Remove a Table Style
To remove a table style, click the Table Tools tab. Then select the drop-down arrow on the right of the Table Styles gallery and choose Clear Table.
6. Add or Change Background and Shading in a Table
Add or Change Background Color in a Table
You can add or change the background color for the whole table. The background color appears underneath any fill color that is applied to the table cells.
To add or change the background color for the table, do the following:
Select a table, then navigate to the Properties pane > Table tab > Table Background section > select the fill option you want. In addition to the fill options for the shading, you can fill the background color of your table with three options, including Solid Fill, Gradient Fill, and Image Fill.
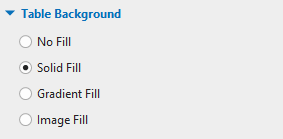
Or to choose no color, click No Fill.
Add or Change Shading in a Table
Adding shading to a table can help make specific rows, columns, cells, or the entire table stand out in your slide. To add shading to a table, perform the following steps:
- Click and drag the mouse to highlight the cells you want to add.
- Navigate to the Properties pane > Table tab > Shading > select the fill option you want.
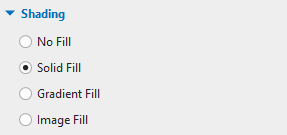
No Fill: Choose no color.
Solid Fill: Fill a selected cell or cells with a solid color.
Gradient Fill: Fill a selected cell or cells with several built-in gradients or create your custom gradient.
Image Fill: Select any picture from your computer or the current project to add it to the selected cell or cells.
That’s all about working with tables in ActivePresenter 9. Follow our Tutorial page and YouTube channel to learn more about ActivePresenter.
See Also: