ActivePresenter 9 allows you to preview the HTML5 output in a browser without exporting. Thanks to that, you can check if the content is perfect before delivering it to learners.
Table of content:

Preview the HTML5 Output
From version 9, you can preview not only the whole project but also the current slide only. This new feature comes in handy when working on a big project. Previewing the whole project takes more time to load in comparison with previewing one slide only.
Preview the Project
To preview the project, click the HTML5 Preview button in the Home, or Export tab.

By default, when you click the HTML5 Preview button, it will preview the content in the Tutorial mode. But, if you click this button after previewing in a specific mode, it will achieve this preview mode for future use.
Note: If you select the first slide and then click this button, it will preview the whole project. Otherwise, it previews the last selected slide.
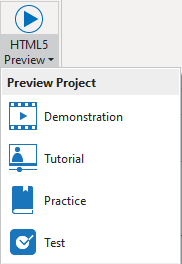
Besides, you can select a specific mode to preview the content. Click the dropdown arrow on the HTML5 Preview button, then select one option from the list.

ActivePresenter 9 will preview the content in a browser with HTML5 settings. All preview modes allow learners to interact with the Player including the Table of Content (TOC) and the toolbar with many navigation buttons.
Note:
- You can see which mode the content is previewed through the URL address.
- Apart from selecting the operation modes to preview/export projects, ActivePresenter 9 also lets you choose the modes in which the specified objects will be shown.
Preview the Current Slide
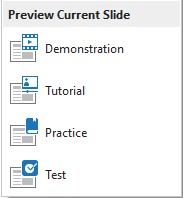
Apart from previewing the project as HTML5 output, ActivePresenter 9 allows you to preview only the currently selected slide. Click the dropdown arrow on the HTML5 Preview button. Options of previewing the current slide appear right below those of previewing the project.

Select Operation Mode to Preview the HTML5 Output
As you can see, there are 4 modes to preview the HTML5 output no matter the project or the current slide.
- Demonstration Mode: In this mode, the task will be shown as a demonstration for learners. So, learners can only view the content and can’t interact with it.
- Tutorial Mode: This mode allows learners to try the steps with hint messages and annotations provided to each step.
- Practice Mode: Learners can practice the task to see how well they understand it. There will be no hint message or annotation in this mode. Interactions (Mouse Click, Key Stroke, and Drop Area) will only appear if learners perform the steps incorrectly.
- Test Mode: Similar to the Practice mode, the Test mode also gives learners a chance to try the task themselves to see how well they understand it. There will be no hint message or annotation in this mode. Interactions (Mouse Click, Key Stroke, and Drop Area) will not appear whether learners perform the steps correctly or not.
Overall, compared to the rest, the Demonstration mode is most different. In this mode, learners can’t interact with the content except for pausing or resuming, while in the other modes, they can.
In ActivePresenter 9, the Show In Mode section is set reasonably in most cases. For instance, cursor path objects only appear in the Demonstration mode. If you want to change these modes, you can change the default Show in Mode options of each object in the Properties pane > Size & Properties tab.
That’s how to preview the HTML5 output before exporting it in ActivePresenter 9. Use this feature to know how the content will behave when learners interact with it on HTML5. If you have any questions, feel free to contact us. Besides, follow our Tutorials page and YouTube channel for more helpful articles and videos.
See more: