Say goodbye to passive, lengthy video lessons where learners easily zone out. Since ActivePresenter 10, you can now create interactive video quizzes and lessons effortlessly just by inserting the quiz at a specific timestamp.
If you are familiar with Coursera or Udemy, you are also not strange at how they embed quizzes directly within their video lessons. This deliberate and powerful technique is designed to keep learners actively engaged by making learners immediately recall and apply key information while they’re learning it.
Interactive video quizzes are the true game-changer, transforming passive viewing into dynamic interactive experiences. If you’re ready to create this kind of captivating content but don’t want to be involved in complex coding or technical setups, ActivePresenter is the solution you’ve been looking for. Since version 10 of this comprehensive eLearning authoring tool, you can directly insert interactive quizzes into your videos like a breeze.
But first, be sure to download ActivePresenter for free. Then, you can follow along with our upcoming step-by-step guide and start building your own engaging video quizzes today!

A quick brief of how to create interactive video quizzes in ActivePresenter:
- Allow Question Insertion at Timestamp
- Insert Video & Insert Question at Timestamp
- Customize Question
- Export
Allow Question Insertion at Timestamp
By default, a newly inserted question will be a new slide from the slide containing the video.
To be able to insert an interactive question in a video at a specific timestamp, you will need to enable the Allow Question Insertion at Timestamp option first.
- After launching the app and opening a blank project, head to the Question tab.
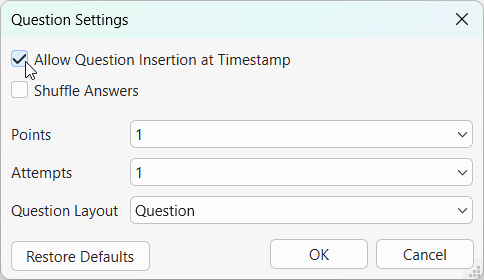
- Click on Question Settings. This section sets up how your questions work by default before inserting them into the Canvas. Check out the Question Settings tutorial for more details about how to work with it.
- Tick Allow Question Insertion at Timestamp. Click OK to apply.
By setting it so, you can now insert a new interactive question right within the video as a front layer.
Insert Video & Question at Timestamp
In the Insert tab, choose Video and insert a video From File or from Webcam Recording. Check out this tutorial to know more about these 2 options.
On the Timeline pane, drag the Playhead to the timestamp where you want the question to appear and place it there.
Go to the Question tab, choose 1 among 13 questions types.

Immediately, the question will appear as the top layer on the video.
This means that when the user views the video in the HTML5 player later, the video will pause and the question will appear at the timestamp he sets. Only after he finishes answering the question will the video continue to run or stop based on their settings in the next part.
Customize Question
Customize Question Visual
Right after inserting a question, the new question layer will appear on the video slide as below:
Question Title (1)
That’s a placeholder where you can enter the title of the question.
Answer Area (2)
The answer area is the main part of a question. The answer area of each question is unique due to the question’s nature. It may include a list of options (Multiple Choice), dropdowns (Select in Dropdowns), or blanks (Fill in Blanks). Here, learners are required to select an option or fill in blanks to answer the question.
In this section, you can customize the answer options such as add, delete them, or change the container layout. For most question types (except for True/False, Fill in Text Entry, Select in Dropdown, and Essay), you are free to add more answer options or delete them as desired. Select the answer area, then click the Plus button to add more answer options.
By contrast, if you want to delete unwanted answer options, select them and press DELETE on your keyboard. Besides, you can change the container layout in the Container Layout section of the Size & Properties tab (Properties pane).
Submit Button (3)
Each question slide comes along with a Submit button. This button allows learners to submit their answers. You are free to customize its properties.
Set Score and Reporting
In this section, you need to set up options like: Mode, Points, Attempts, Timeout, etc. Check out the detailed tutorial about how to set the score and reporting in ActivePresenter.
Add Events & Actions
To make any object interactive, you have to add events – actions to it. So does the question. It is the most important part when creating interactive quizzes. Normally, each question has events – actions added by default. But, you can customize it as you wish.
To customize events – actions of a question, select the answer area > navigate to the Properties pane > Interactivity tab > Events – Actions section > add more, delete or change them as you want.
To learn more, see Use Events – Actions to Add Interactivity to Courses.
Export Project
The final step to create interactive video quizzes is to export your project. If you export your project to video formats (MP4, MKV, AVI, WEBM, WMV), learners cannot interact with the questions because the interactivity is not supported in the video format due to its nature.
Instead, for learners to interact with the video and quizzes, you need to export the project to eLearning formats like HTML5 or SCORM/ xAPI. Open the Export tab and choose either of these eLearning formats.
While exporting to HTML5 allows you to upload the video project to a webpage, SCORM & xAPI are the standard formats for you to upload your project to a Learning Management System. Check out our tutorial here to better understand the differences and how to work with them.
Or, you can directly upload to our own LMS, uPresenter to view, interact with the video and share links to others immediately. Check out how to publish to uPresenter LMS here.
That’s all about how to create interactive video quizzes in ActivePresenter 10. Much quicker and more convenient, right? Now, it’s time you downloaded the app and tried creating a real cool project on your own!