
Creating a polished screen-recorded tutorial often takes more than simply capturing your screen. You may need to zoom in on important actions, smooth cursor movements, highlight keyboard shortcuts, adjust the recording layout, or add a webcam presenter.
Smart Studio in ActivePresenter 10.6 makes this post-recording process much easier.
This video editor analyzes the action data captured during screen recording and helps automatically enhance your video. It can generate camera movements around clicks and typing, improve cursor appearance and movement, display keyboard shortcuts, add customizable frames, arrange a companion webcam video, and even identify typing sections that can be sped up.
In this tutorial, you’ll learn how to work with Smart Studio in ActivePresenter, from opening the editor and configuring automatic zoom to customizing the cursor, keyboard shortcuts, frames, and presenter layouts.

What Is Smart Studio in ActivePresenter?
Smart Studio in ActivePresenter is designed to improve screen recordings after they have been captured.
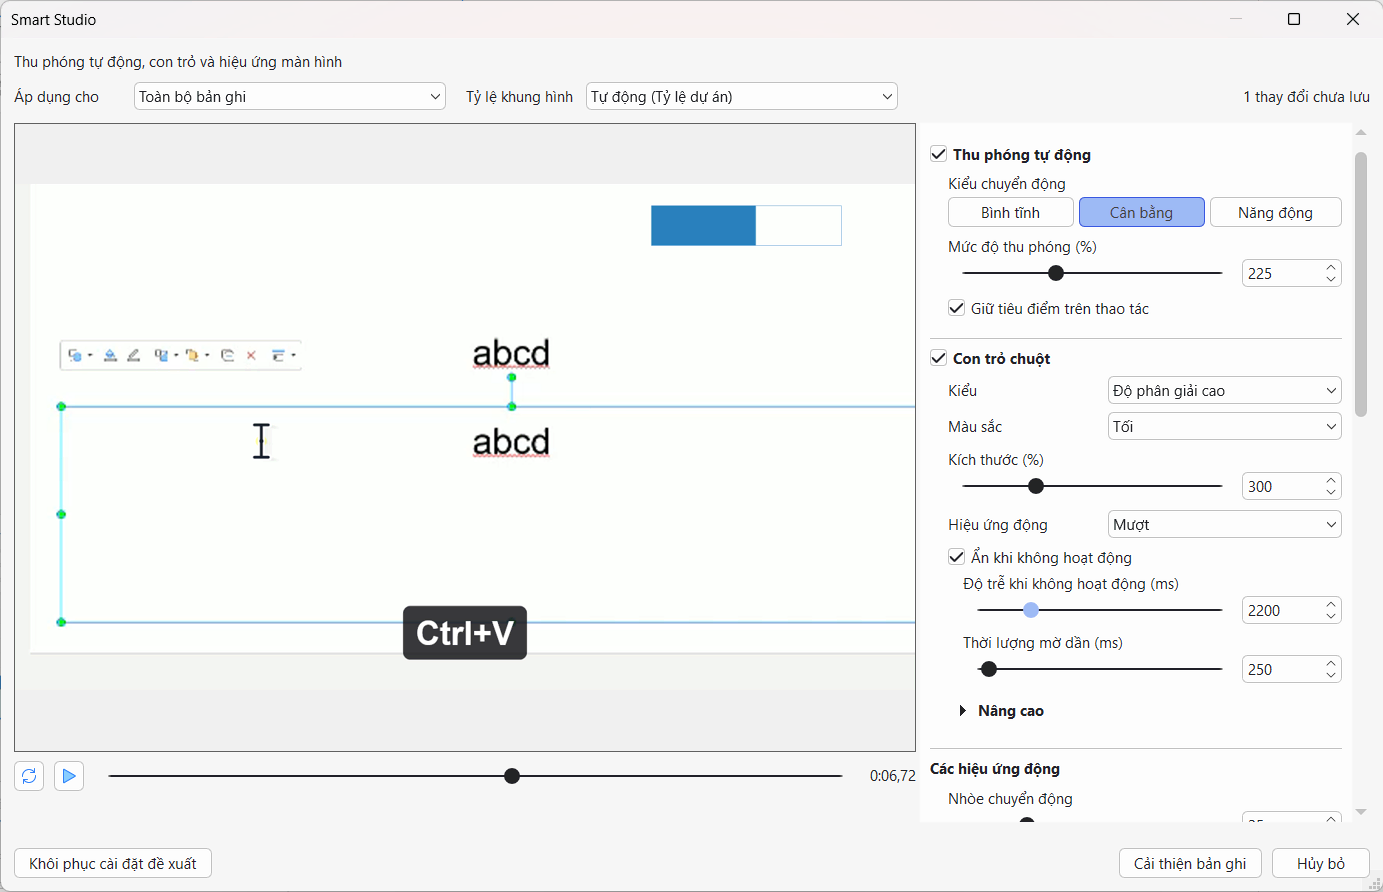
Instead of manually creating every zoom effect or adjusting cursor movement throughout a long software demonstration, Smart Studio uses the action data stored with your recording to help automate the process.
It can:
- Create camera shots that zoom toward clicks, typing, and scrolling.
- Smooth, resize, restyle, or hide the cursor when it is idle.
- Display captured keyboard shortcuts as overlays.
- Place the screen recording inside a customizable frame.
- Arrange a companion webcam video as a presenter.
- Suggest typing ranges that can be accelerated.
One important advantage is that Smart Studio follows a non-destructive workflow. Changes are first displayed in a candidate preview. Your project is not modified until you click Enhance Recording or Apply Changes.
This means you can experiment with different settings and preview the result before committing the changes.
Before You Start
Before opening Smart Studio, make sure your recording meets its requirements.
Smart Studio is available when:
- Exactly one video object is selected.
- The selected video is a recording created with ActivePresenter’s free video recorder rather than a regular imported video or webcam-only video.
- The recording contains cursor-path and action data.
To preserve the required data when making a new recording, enable Record Mouse Cursor in Recording Settings > Cursor before recording.
Smart Studio relies on recorded metadata to identify actions. It does not analyze the video image itself to infer clicks or keystrokes. Therefore, some older recordings or recordings created without the necessary action data can still be edited as regular videos, but Smart Studio may not be available for them.
How to Open Smart Studio in ActivePresenter
To access Smart Studio in ActivePresenter 10.6:
- Select the screen-recording video on the Canvas or Timeline.
- Open the Properties pane.
- Navigate to Media > Smart Studio.
- Choose the desired Apply to scope.
- Click Open Smart Studio….
Before opening the full editor, the Smart Studio section provides a compact summary of the current configuration, including Status, Zoom, Shortcuts, Frame, Presenter when available, Apply to, and generated effects.
Inside the Smart Studio editor, you’ll find a preview on the left and a scrollable Settings pane on the right. The available settings include Automatic Zoom, Cursor, Animations, Show Keyboard Shortcuts, Frame, and Presenter.
Step 1: Choose Where to Apply Smart Studio
Start by deciding which parts of your recording Smart Studio should affect.
The Apply to setting provides three scopes:
| Apply to | What It Affects | When to Use It |
| Entire Recording | Every eligible clip sharing the same physical recording source | Best when a recording has been split or distributed across multiple slides and you want consistent styling |
| Current Slide | Eligible clips from the same recording source on the current slide | Useful when one slide requires different treatment |
| Selected Clip | Only the currently selected screen-recording clip | Best for a clip-specific camera setup or visual style |
For most projects where one recording has been split into several clips, Entire Recording provides the most consistent result.
It is a good idea to select the scope before clicking Enhance Recording, as changing it later may require you to review the affected clips again.
Step 2: Choose an Aspect Ratio
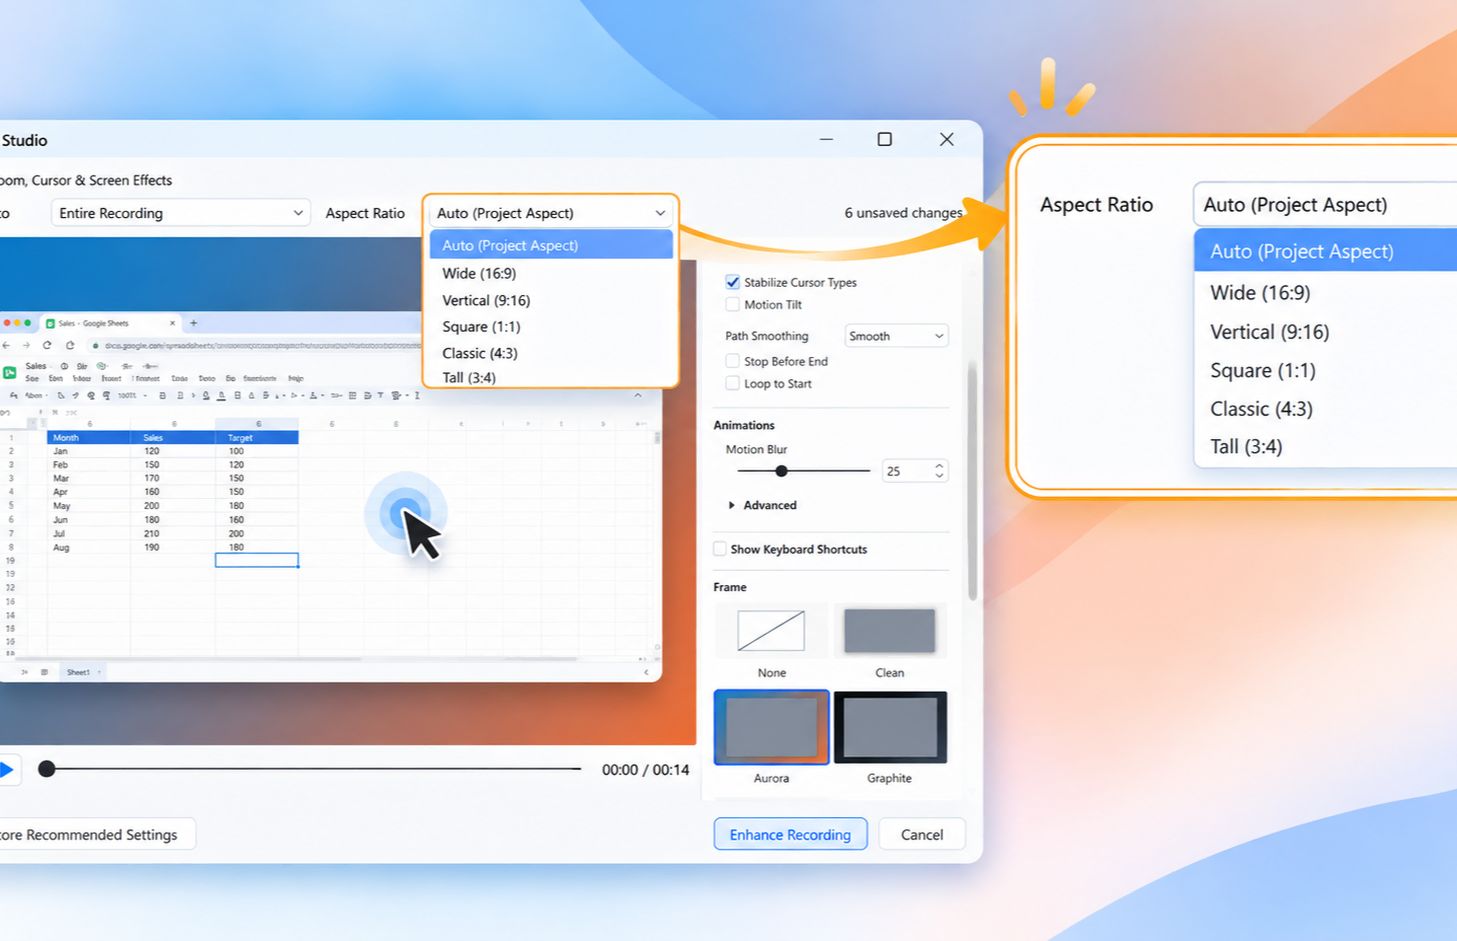
Next, choose the Aspect Ratio for your Smart Studio camera and output viewport.
Available options include:
- Auto (Project Aspect): Uses the current project ratio and offers the most flexibility.
- Wide (16:9): Suitable for widescreen presentations, desktop videos, and common video platforms.
- Vertical (9:16): Designed for phone-first and vertical video.
- Square (1:1): Useful for square social media content and embedded videos.
- Classic (4:3): Suitable for traditional presentation and training layouts.
- Tall (3:4): Designed for portrait-oriented training or social content.
If you are unsure about the final delivery format, Auto (Project Aspect) is a good starting point.
For content intended for one specific format, select the same aspect ratio in Smart Studio that you plan to use when exporting.
Keep in mind that Smart Studio reframes and crops the recorded screen through a camera viewport rather than stretching the source. With narrower formats such as 9:16, always check that important buttons, menus, and cursor actions remain visible.
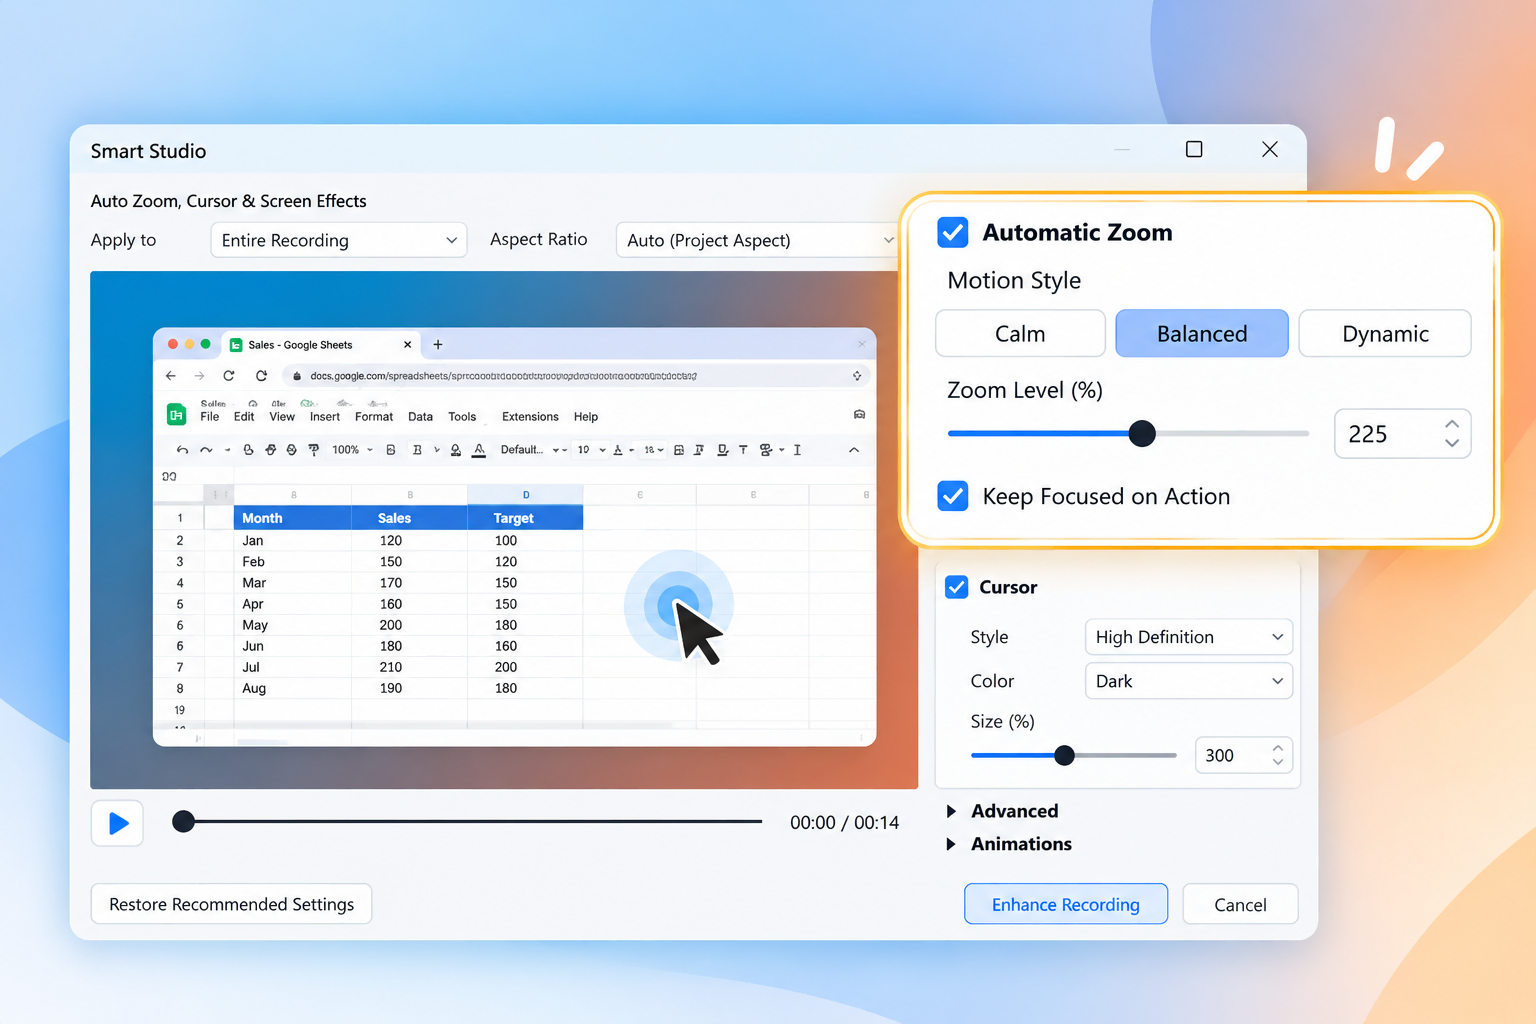
Step 3: Configure Automatic Zoom
One of the most useful features of Smart Studio in ActivePresenter is Automatic Zoom.
When enabled, Smart Studio uses recorded clicks, typing, and mouse-wheel actions to determine where camera shots should be placed.
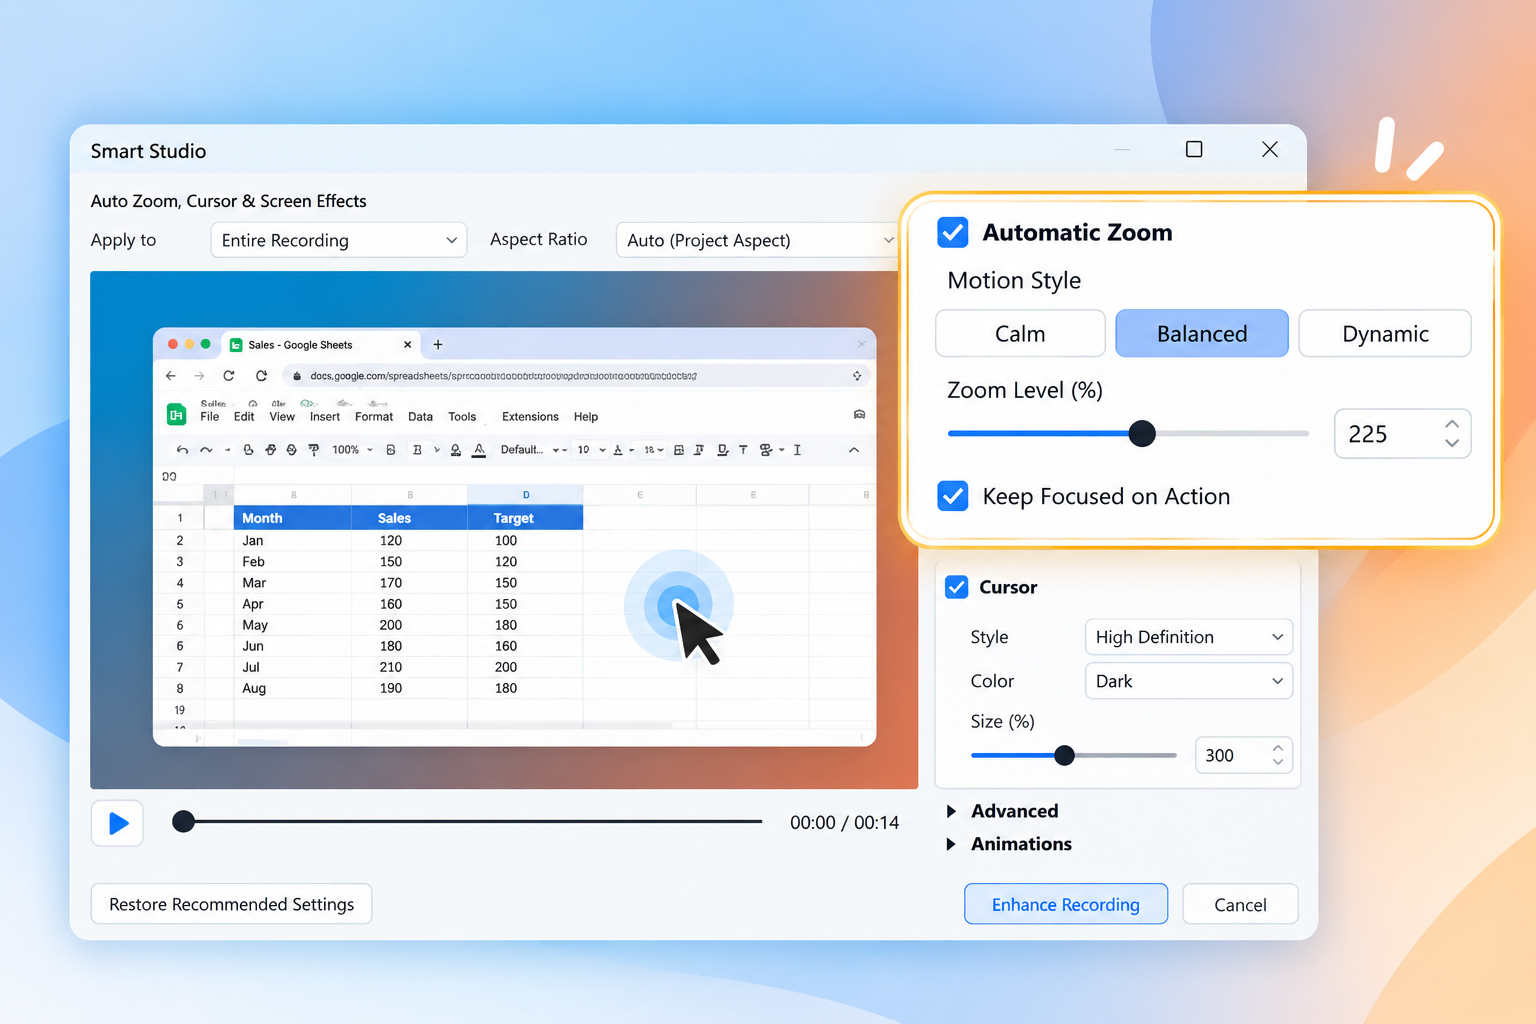
There are three main settings to configure.
Motion Style
Choose how the camera moves between actions:
- Calm: Uses gentler movement. Suitable for formal training and longer demonstrations.
- Balanced: Provides moderate movement and is recommended for most software tutorials.
- Dynamic: Creates faster, more energetic camera movement for short demonstrations.
For most projects, start with Balanced.
Zoom Level
The Zoom Level (%) controls how closely the camera focuses on an action. Values range from 125% to 400%.
A useful starting point is 225%. If the viewer loses too much surrounding context, reduce the zoom level.
Keep Focused on Action
When Keep Focused on Action is enabled, the camera continues following action locations instead of quickly returning to wider framing.
This can be particularly useful when zooming into detailed software interfaces or working with narrower aspect ratios.
Tip: Don’t increase the zoom level just to make the mouse pointer easier to see. Increase Cursor > Size (%) instead.
Step 4: Customize the Cursor
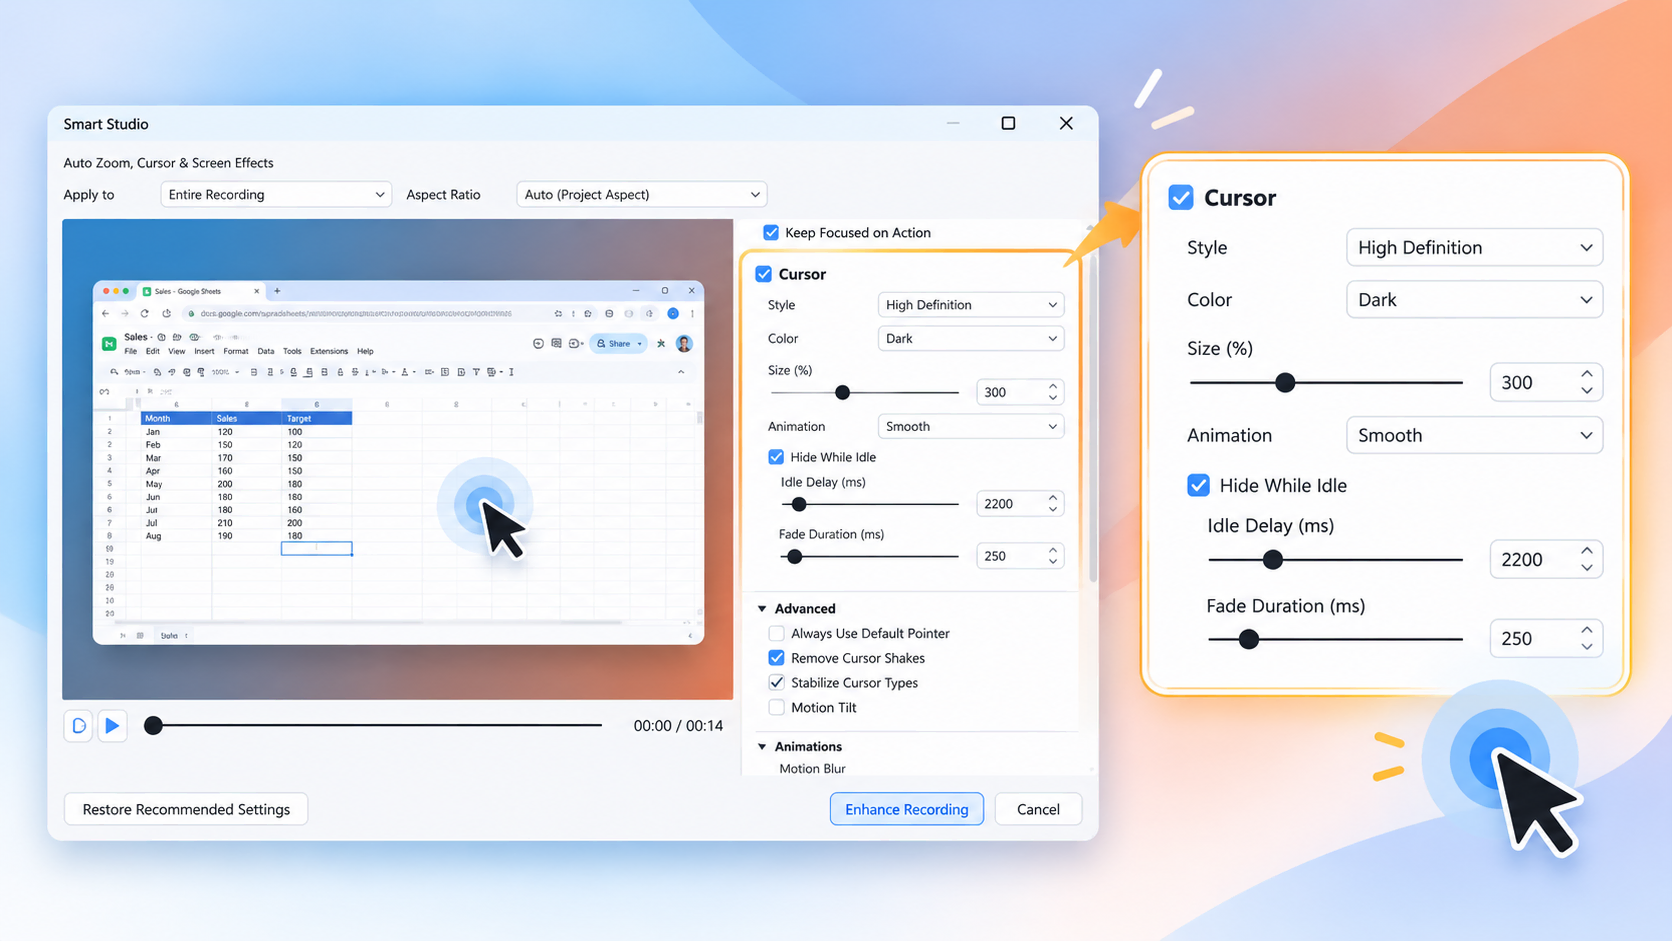
A cursor is one of the viewer’s primary visual guides in a software tutorial. Smart Studio provides several ways to make it easier to follow.
Choose a Cursor Style
You can choose from:
- High Definition: Uses scalable ActivePresenter cursor artwork.
- Recorded: Keeps the cursor shapes captured during recording.
- Touch: Replaces the pointer with a centered touch indicator.
The High Definition style is particularly useful when you want a clean cursor that remains sharp at larger sizes.
Adjust Cursor Size and Color
When using the High Definition style, you can select a Dark or Light cursor and scale it from 100% to 800%.
For many tutorials, a larger cursor makes actions easier to follow without requiring excessive screen zoom.
Smooth Cursor Movement
The Animation setting determines how the cursor follows its recorded positions:
- Rapid
- Medium
- Smooth
- None
Smooth provides a polished movement style suitable for most tutorial videos.
You can also enable Hide While Idle so the cursor fades away during pauses or narration.
Fine-Tune Cursor Movement
Open Cursor > Advanced for additional controls such as:
- Remove Cursor Shakes
- Stabilize Cursor Types
- Motion Tilt
- Path Smoothing
- Stop Before End
- Loop to Start
For a quick starting configuration, try High Definition, Dark, 300% size, Smooth animation, Remove Cursor Shakes, and Smooth Path Smoothing.
Step 5: Adjust Motion Blur
The Animations section controls motion blur for three types of movement:
- Cursor Movement
- Screen Zooming
- Screen Moving
The main Motion Blur control applies the same value to all three.
For greater control, expand Animations > Advanced and configure them separately.
A moderate amount of motion blur can make camera and cursor movement appear smoother. However, if your tutorial contains small text or detailed UI elements, keep the value relatively low and check the exported video at full size to ensure everything remains readable.
The recommended Smart Studio configuration starts with 25% Motion Blur.
Step 6: Show Keyboard Shortcuts
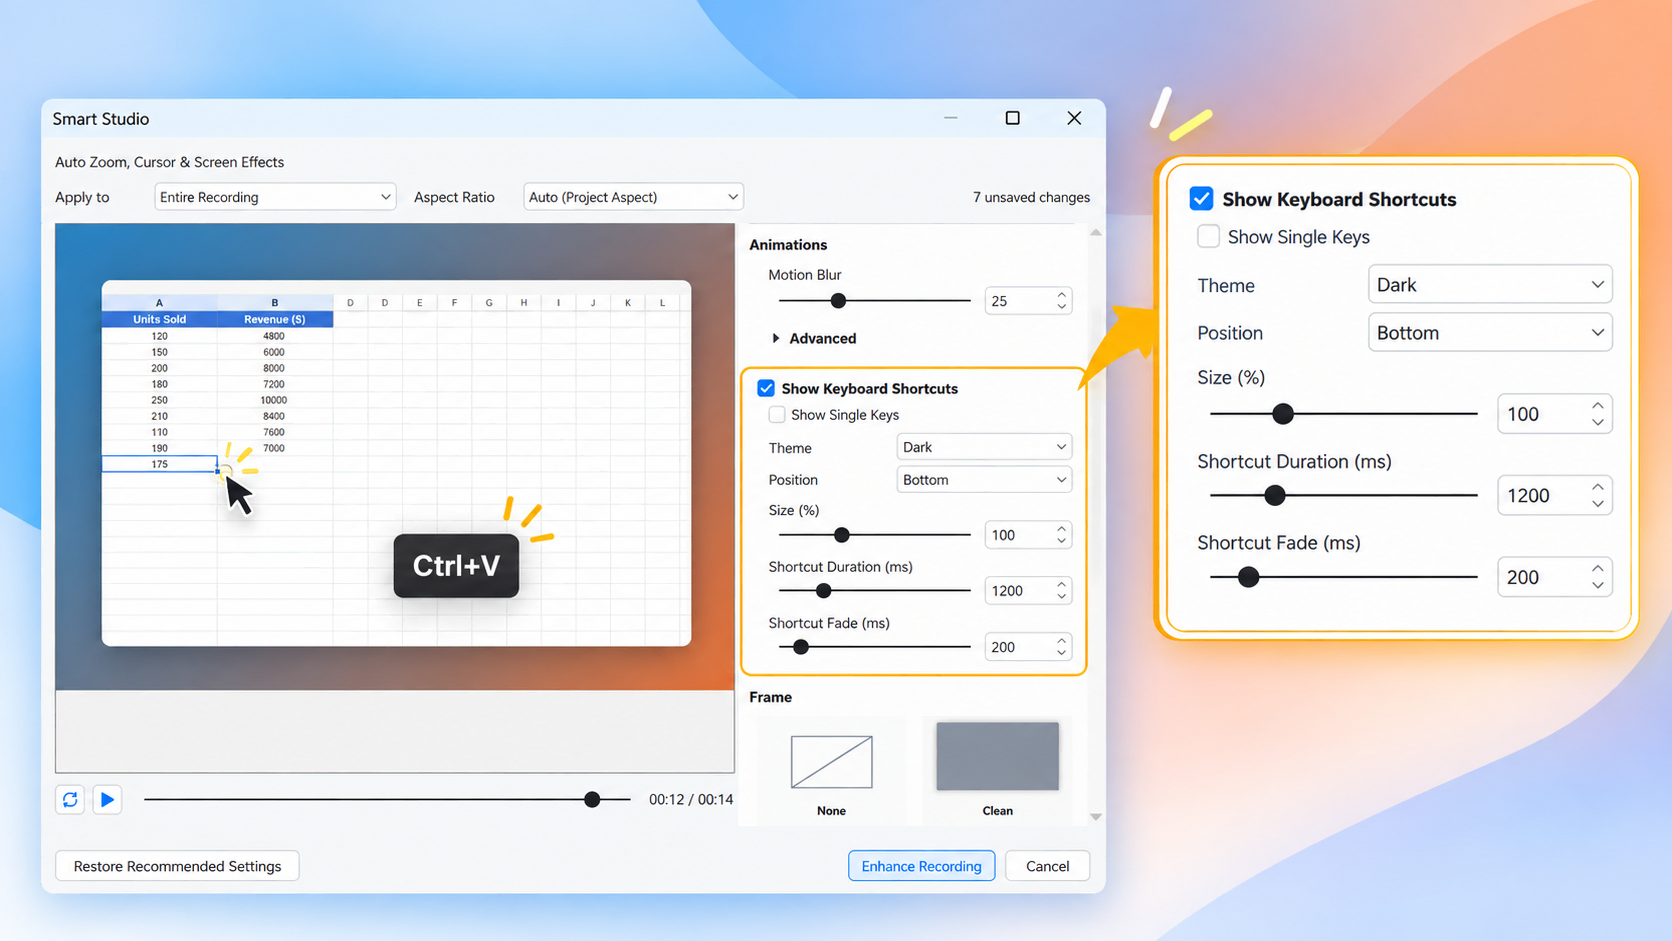
If your tutorial teaches keyboard-driven workflows, enable Show Keyboard Shortcuts.
Smart Studio can automatically generate an on-screen overlay whenever a captured shortcut occurs.
You can customize:
- Whether to show individual keys in addition to combinations.
- Dark or Light theme.
- Position: Bottom, Center, or Top.
- Size.
- Shortcut display duration.
- Fade duration.
A useful starting point is 1200 ms for the shortcut duration and 200 ms for the fade.
If your audience needs more time to read complex shortcuts, increase the duration.
Also check that shortcut overlays do not cover important interface elements, particularly when using vertical or square aspect ratios.
Step 7: Add a Frame to Your Screen Recording
Smart Studio can place your recording inside a designed background or frame.
Available presets include:
- None: Keeps the original full-canvas appearance.
- Clean: Provides a restrained light treatment.
- Aurora: Adds a more colorful background.
- Graphite: Uses a darker treatment.
- Custom: Gives you control over the background, padding, media fit, alignment, and video styling.
With Custom, you can use a solid color, gradient, or image as the background. You can also adjust frame padding and add rounded corners, shadows, or borders to the video.
For straightforward software tutorials, None keeps the focus entirely on the application. For promotional videos or more visually branded content, the frame presets and Custom mode provide additional design flexibility.
Step 8: Arrange a Webcam Presenter
If your screen recording has an associated companion webcam video, Smart Studio displays the Presenter section.
Available layouts include:
- Top Right
- Bottom Right
- Large Center
- Full Screen
- Full Screen Intro
- Large Intro
- Hidden
For a conventional software tutorial, Bottom Right is the recommended picture-in-picture layout.
You can also customize the presenter’s shape with Rectangle, Rounded, Square, or Circle options and use a border or shadow to separate the webcam from the screen content.
The Full Screen Intro and Large Intro options are particularly useful when you want to begin a tutorial with the presenter and then transition to the screen demonstration.
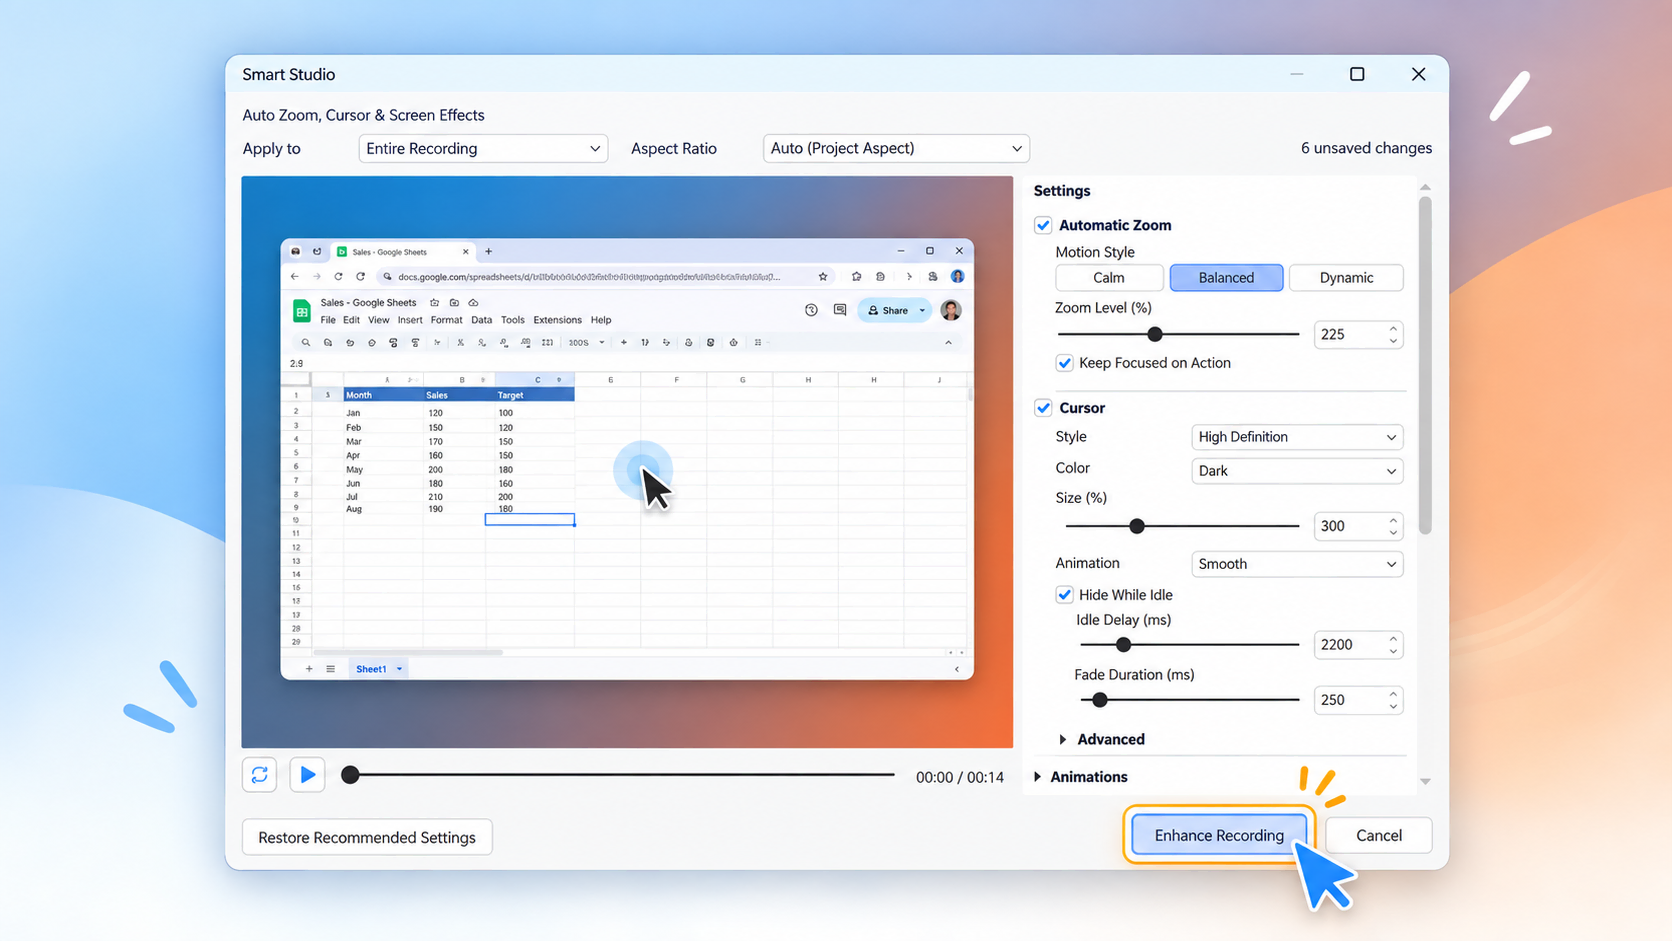
Step 9: Preview and Enhance the Recording
Smart Studio lets you review the result before applying it to the project.
Play or scrub through the candidate preview and pay attention to:
- Camera framing and zoom transitions.
- Cursor movement.
- Keyboard shortcut placement.
- Frame appearance.
- Presenter position.
- Visibility of important UI elements.
When you’re satisfied, click Enhance Recording.
If Smart Studio has already been applied to the recording and you’re modifying its settings, the button changes to Apply Changes.
Smart Studio applies the operation as one project command, so a single Undo can revert the complete change.
Step 10: Fine-Tune Generated Camera Shots
Automatic generation doesn’t mean you lose manual control.
After applying Smart Studio, generated camera shots appear on the Timeline. Select an individual camera shot or keyframe to adjust it.
You can modify:
- Zoom Level (%)
- Motion style
- Whether to animate to the next shot
- Focus area directly on the Canvas
- Target X and Y positions
You can also add, split, move, copy, paste, regenerate, or delete shots.
This workflow gives you a useful combination: let Smart Studio create the initial camera work automatically, then manually refine individual moments that need special attention.
Importantly, Smart Studio preserves manually edited generated work when applicable. This means later global changes do not necessarily overwrite camera shots you have already adjusted.
Step 11: Fine-Tune Keyboard Shortcut Overlays
Generated keyboard shortcuts can also be edited individually after applying Smart Studio.
Select an overlay on the Timeline to change its:
- Visibility
- Theme
- Position
- Size
- Duration
- Fade time
You can also disable or enable matching overlays for the same key combination in the current clip.
This is helpful when a shortcut appears repeatedly but you only want to emphasize it at certain points in your tutorial.
Step 12: Review Typing Acceleration Suggestions
Smart Studio can identify typing ranges that may be shortened.
When suggestions are available, you’ll see a Suggestions row and Review button in the Smart Studio summary.
To use them:
- Click Review.
- Inspect the detected typing ranges.
- Select the ranges you want to accelerate.
- Apply the accepted suggestions.
ActivePresenter shortens each accepted range to 50% of its original duration. Video and audio within that range are accelerated together, while later media effects are adjusted to stay synchronized.
Because audio is accelerated as well, always review narration or system audio afterward. If speeding up a range makes speech difficult to understand, leave that suggestion unapplied.
Recommended Smart Studio Settings for Beginners
If this is your first time using Smart Studio in ActivePresenter, the following settings provide a practical starting point:
| Setting | Recommended Starting Point |
| Apply to | Entire Recording |
| Aspect Ratio | Auto (Project Aspect) |
| Motion Style | Balanced |
| Zoom Level | 225% |
| Keep Focused on Action | On |
| Cursor | On |
| Cursor Style | High Definition |
| Cursor Color | Dark |
| Cursor Size | 300% |
| Cursor Animation | Smooth |
| Hide While Idle | On |
| Remove Cursor Shakes | On |
| Path Smoothing | Smooth |
| Motion Tilt | Off |
| Motion Blur | 25% |
| Keyboard Shortcuts | Off unless needed |
| Frame | None |
| Presenter | Bottom Right when applicable |
Treat these values as a starting point rather than fixed rules. The ideal configuration depends on the complexity of your interface, video dimensions, audience, and delivery format.
A Quick Smart Studio Workflow
Starting with the recommended settings can save time. After Smart Studio generates the initial result, review the camera shots and make targeted adjustments only where necessary.
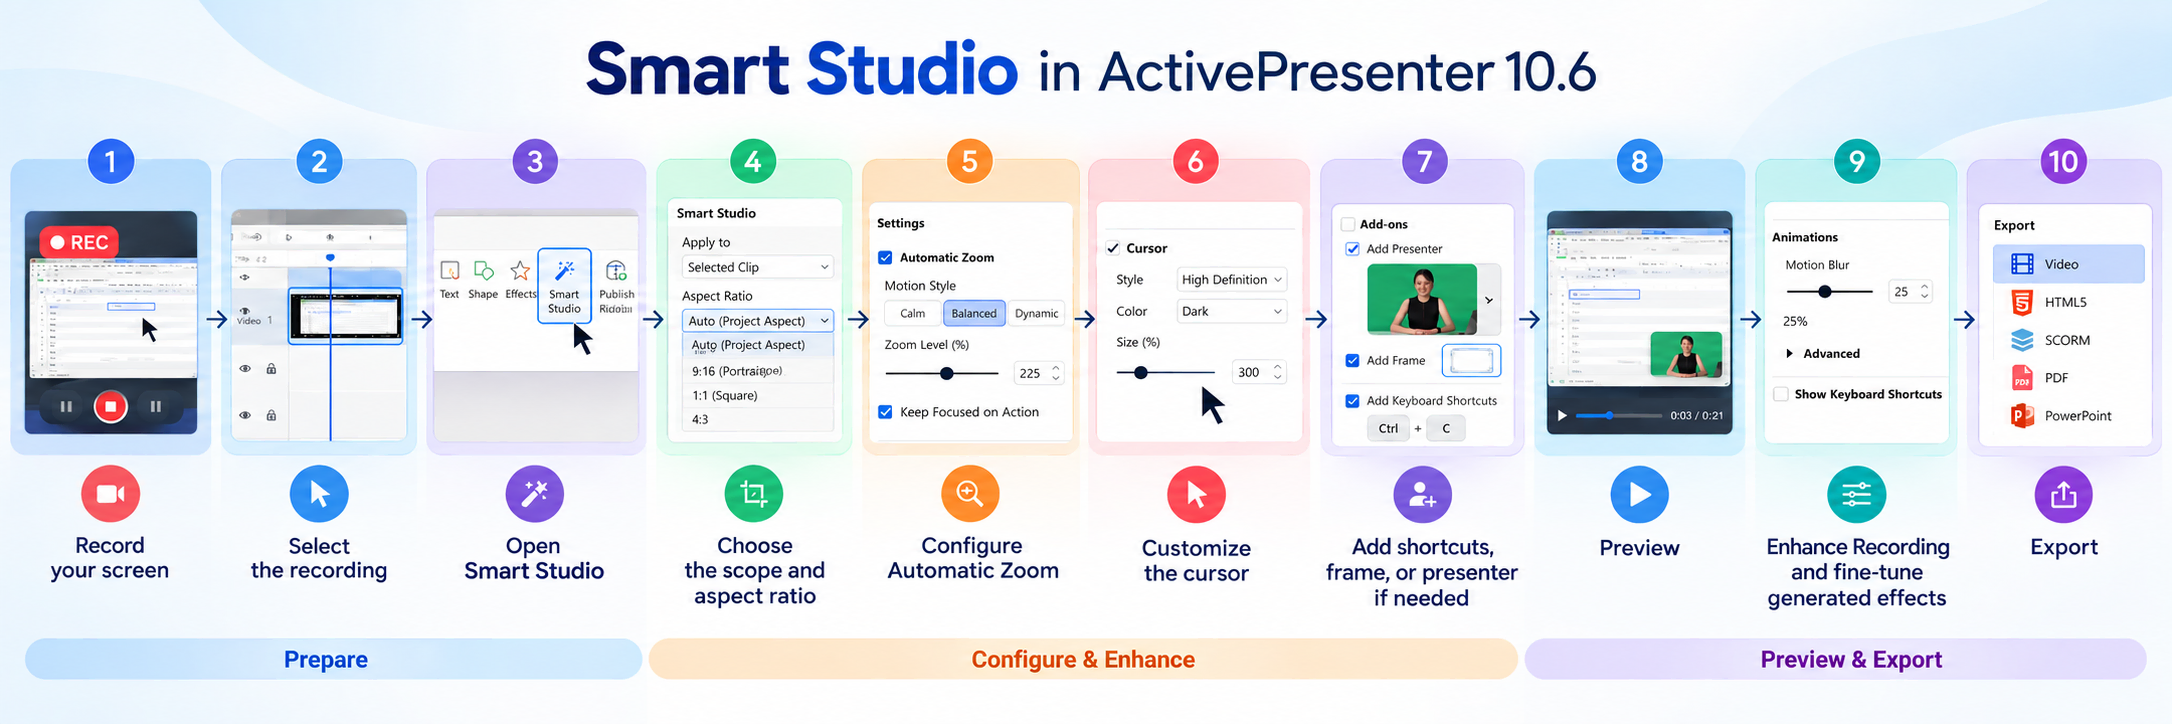
Make Screen Recordings More Engaging with Smart Studio
ActivePresenter 10.6 is a complete eLearning authoring tool built to simplify content creation. With its Smart Studio feature, you can quickly convert raw screen recordings into engaging, high-quality video tutorials.
Automatic camera shots can bring attention to important clicks and actions. Cursor smoothing makes demonstrations easier to follow. Keyboard shortcut overlays help viewers understand keyboard-driven workflows. Frames and presenter layouts give you more control over presentation, while manual editing tools let you refine the automatically generated result.
Rather than spending time creating every effect from scratch, you can use Smart Studio to generate a strong starting point and then focus your editing time on the moments that need additional attention.
Ready to try it?
Download ActivePresenter 10.6 and explore Smart Studio to create more polished screen-recorded tutorials.