Interactive flashcards are an effective method for learning faster and improving the chances of remembering new information.
With ActivePresenter eLearning authoring tool, you can easily create multiple interactive flashcards without coding skills needed. These digital flashcards go beyond static text and images, enabling you to incorporate multimedia elements, audio cues, and even interactive question formats directly within each card.
Imagine learners clicking to reveal definitions, listening to pronunciations, or answering quick questions related to the term on the card. This active engagement significantly boosts learning speed and reinforces memory retention in a way that traditional flashcards simply can’t match.
ActivePresenter’s Advanced Actions provide the flexibility to customize the behavior of your interactive flashcards, allowing you to create truly tailored and effective learning tools.
Whether you’re teaching vocabulary, concepts, or factual information, ActivePresenter empowers you to transform simple flashcards into captivating and memorable learning experiences.
Let’s figure it out in this blog.
Before that, make sure to download ActivePresenter for free & no sign in and follow our step-by-step guide to build your first Interactive Flashcards! (Available for Windows and macOS)

Basically, an interactive flashcard consists of two sides, front and back; and if you click on one side, the other side will show up.
Below are the steps to create a set of flashcards:
1. Create Two Sides of a Flashcard
First and foremost, you can make the first (front) side of the card by inserting different types of objects such as shapes, images, or text captions. All these objects are available on the Insert tab. Then, use the Object States feature, which you can access from the View tab to make the backside of the card.
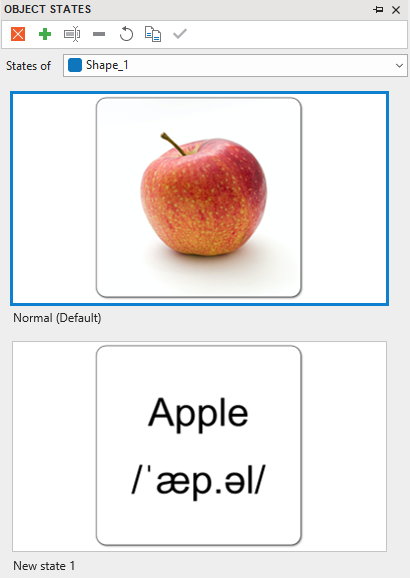
You may want to learn more Object States in this tutorial.
2. Add True/False Variable
We set up a True/False variable to keep track of things that execute one out of two values: right/wrong, clicked/not clicked, visited/not visited, and so on. In this example, there are only two cases for the card to happen, which are to turn over either the backside or the front side. So, you will need a True/False variable to control the two states of the flashcard.
To add a True/False variable, do the following:
- In the Home tab > Variables.
- Click the plus button to add a new variable.
- Select True/False type with the True value.
- Give the variable a name and then save it.
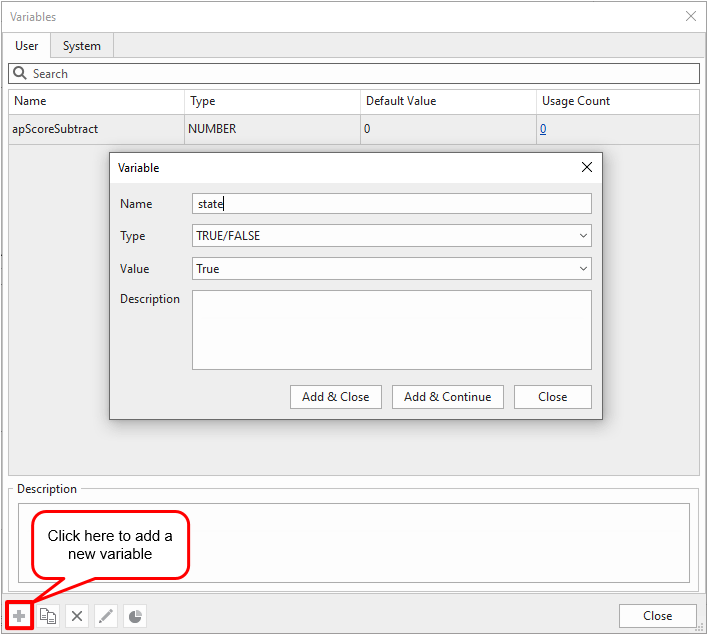
For more information, please visit How to use true/false variables
3. Create Advanced Action
Advanced Action is extremely useful when you would like to use the same events-actions for multiple objects like interactive flashcards. It will save you tons of time as one event can be reused many times with copy and paste commands.
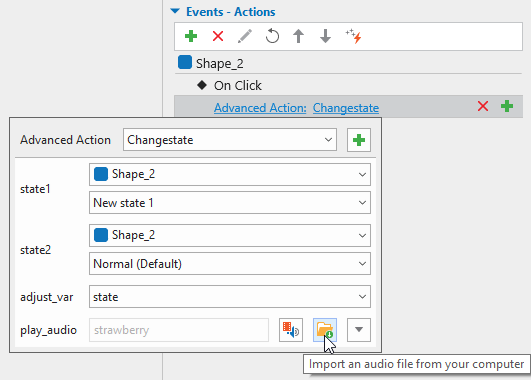
In general, an advanced action consists of 3 main components, which are name, parameters, and actions. Follow the steps below to add an advanced action:
- Click Advanced Actions in the Questions tab or in the Properties pane > Interactivity > Events-Actions to open the Advanced Actions dialog.
- Add parameters and select their corresponding types.
- Add actions and conditions using the parameters above. You will need the two Change Object State actions and an Adjust Variable action to switch between the two sides of the cards continuously. And a Play Audio action to play the audio when the front side is clicked.
- Give this advanced action a name and save it.
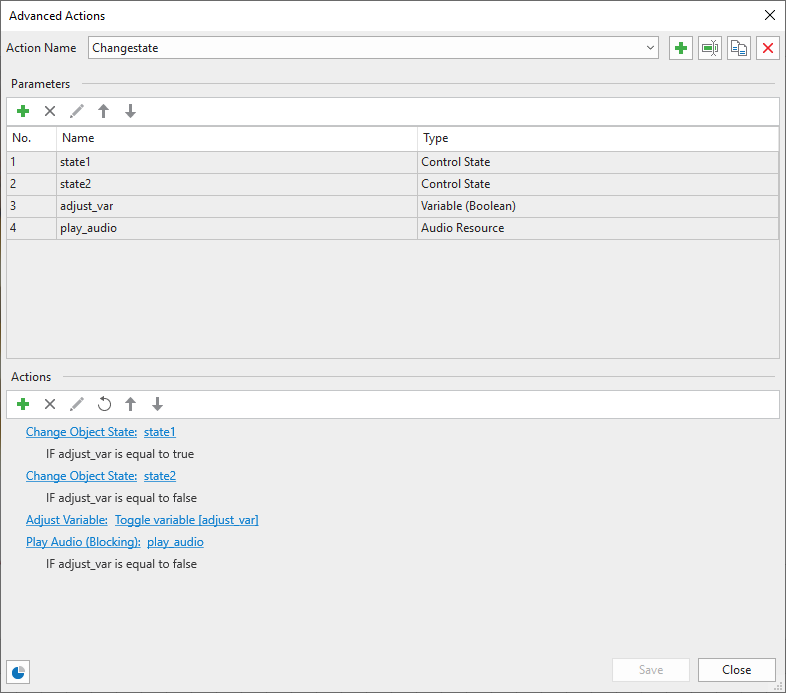
Please refer to this link to know more about how to use advanced actions.
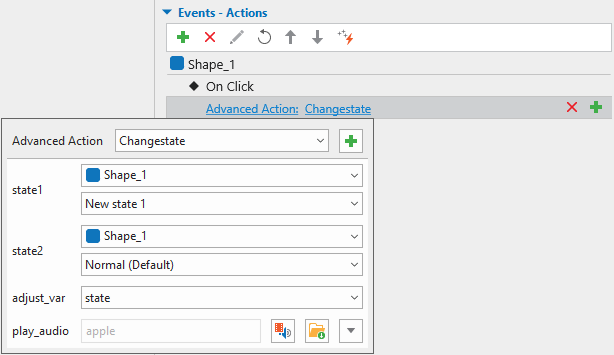
4. Apply the Advanced Action to Event
After successfully creating an advanced action, you will need to apply it to the cards. This step is the same way as when you add a default action to an event.
- Add the On Click event to the shape.
- Click Advanced Action to add the action you have created.
- Reference each parameter by a suitable object.
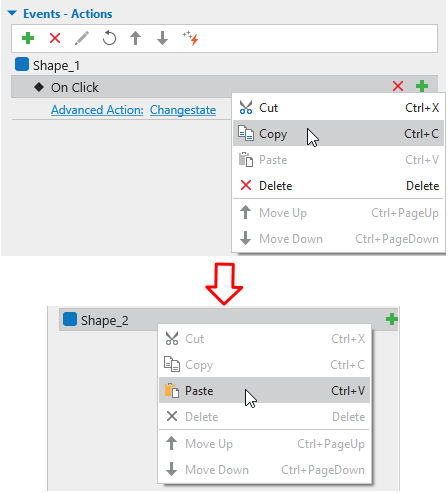
5. Copy and Paste the Event from One Flashcard to the Others
To quickly apply the same event to many different interactive flashcards, you just need to copy and paste the event as follows:
- Right-click on the event that you want to copy > select Copy.
- Place the cursor in the location that you wish to copy it to.
- Right-click and select Paste from the resulting drop-down menu.
Alternatively, you can also use the command keys CTRL + C and CTRL + V to copy and paste the event.
After that, any changes can be applied to the specific actions of the pasted event if needed, for example, replacing the audio with another.
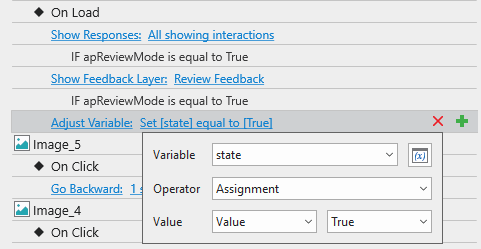
6. Add Actions to On Load Event
To make the set of interactive flashcards work perfectly, you need to add one more action to the On Load event of each slide. This way, the variable will be reset to the True value. You can use Slide Master to make changes to every slide quickly.
7. Add Navigation Buttons
The Next and Back buttons need to be seen all over the slides. For this to happen, we will add these two buttons to a layout in Slide Master. The button with added events-actions will move the card back and forward if you click it. Perform the following to insert these two buttons.
Step 1: Insert 2 shapes (images). (Insert tab> Shapes /Image.
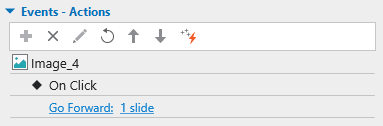
Step 2: Add events-actions for the Next and Back buttons:
- For the Next button: Add Go Forward action to the On Click event so that when learners click the button, it will move to the next card.
- For the Back button: Add Go Backward action to the On Click event so that when learners click the button, it will move to the previous card.
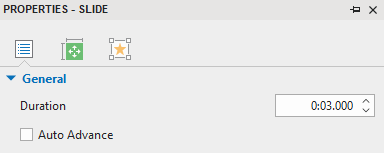
Note: So as not to have a slide automatically moved to another one, deselect the Auto Advance option in this layout. (Select a slide > Properties pane > General section >Deselect Auto Advance option).
That’s all about how to make multiple interactive flashcards by using Advanced Actions in ActivePresenter. If you want your flashcard to have a flip transition between two slides, let’s check out this flip card tutorial.