Creativity in web design today seems no longer limited. One of the examples demonstrating this statement is the creation of deep space for web designers. Therefore, designers can transform the look of flat-design websites into three-dimensional space by adding details to create 3D visual effects. Saola Animate provides a feature called 3D transformation to make a more realistic animation that can meet your lively imagination. Elements in Saola Animate are still 2D elements, but with 3D transformation properties, we can transform them in three dimensions. In today’s tutorial, we will explore this useful feature with examples created by it.
3D Transformation Properties
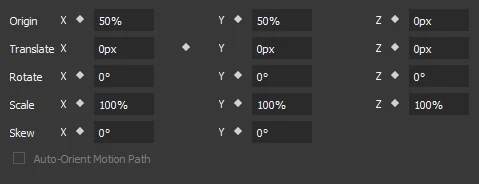
In Saola Animate, the 3D transformation properties help us to make the element live in a 3D space. There are 3 dimensions that we will work with: the horizontal x-axis, the vertical y-axis, and the depth z-axis. In order to work with their properties, you need to select an element first, then go to the Properties pane > Position & Size tab > Transform section.
The image below shows the properties of one selected element.
Origin X Y Z in 3D Transformation
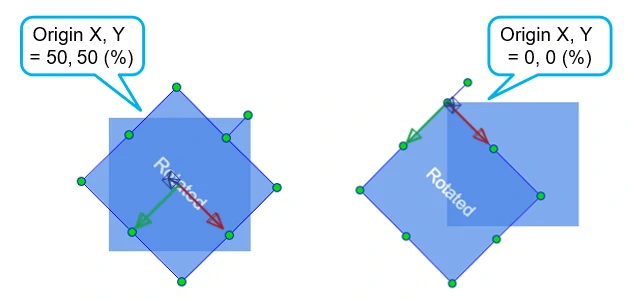
The transformation function in Saola Animate uses the transform origin as the point around which a transformation is applied. And Origin X, Y and Z are the values that are used to specify the transform origin property. Modifying these 3 values will change the transform origin point and affect how the element will rotate or scale. By default, the transform origin position is located in the center of the element.
For both Origin X and Y, we can set their position using percentages. The percentages of them are relative to width and height of the element. For instance, Origin X, Y with the values of 50% set the origin point in the center. Meanwhile, Origin X, Y with the values of 0% set the origin point to start at the top left. When we rotate the element around z-axis by 45 degrees with these two cases, we will get different results:
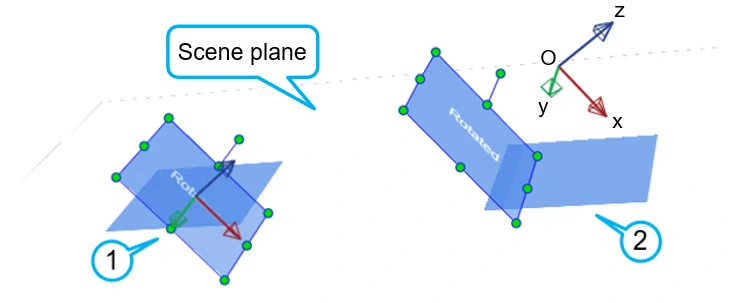
About the Origin Z, changing its value will reposition element’s origin point out of its plane. The picture below illustrates how the element rotates in two different cases of 2 various coordinates of origin point. In this example, the element rotates by 55 degrees around the y-axis. And the view is changed by using the Rotate View tool, so that we can see the difference more clearly.
The picture (1) represents how the element rotates with the default transform origin. In addition, the origin point is located in the element plane because a value of Z is equal to 0.
In the picture (2), the value of Z is set to 100px. And in this case, the origin point stays in front of the element. The element still rotates around the y-axis but with the radius of 100px.
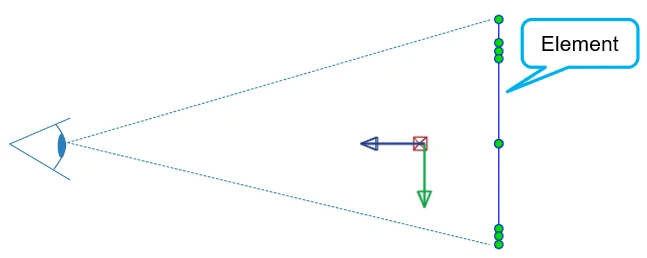
To be more precise, your viewing position is in front of the scene plane by default. When a value of Z is positive (>0px), the origin point will move to the front of the element and come closer to us. Meanwhile, the negative value of Z (<0px) means that the origin point will move behind the element plane. For example, this image illustrates the position of the origin point when Origin Z = 100px with default viewing position:
Translate Z in 3D Space
Regarding Translate X, Y, Z, changing their values can translate the element to a different position relative to the origin. Please learn more about Translate X and Translate Y in tutorial about using motion path in animations.
When it comes to Translate Z, changing its value will reposition the element along the z-axis. A positive value translates the element towards the viewer, while a negative value moves it farther away. And this property makes the moved element plane parallel with its original plane.
Rotate X Y for the Illusion of Depth
In terms of rotating, changing the values of Rotate X, Y, Z will rotate the element around the corresponding axis. And positive angles make the element rotate clockwise. In the opposite way, the negative angles make the element rotate counterclockwise. Note that rotation is applied to the element in ZYX order. In other words, the element will rotate around the z-axis first, then the y-axis, and finally the x-axis.
Rotating the element around the x, y-axis makes the element have a depth in the original coordinate. This means points in the element may have different z values, though it is still flat in the new coordinate.
To be more precise, let’s try an example.
Firstly, select the element you want to rotate.
Next, in the Properties pane > Position & Size tab > Transform section.
Then, to rotate around the x-axis, change the Rotate X value. For example, Rotate X is set to 180 degrees in this video:
And in order to rotate around the y-axis, change the Rotate Y value. The video below describes how the element rotates 180 degrees around the y-axis:
In addition, Rotate Z will make the element rotate around the z-axis. However, if the element is 2D, rotating around z-axis will happen in the element plane.
Scale Z in 3D Transformation
We will need Scale X, Y, Z when we want to scale the element along the corresponding axis. Please note that a negative Scale X or Scale Y will mirror the element horizontally or vertically, respectively. And scaling along the depth z-axis doesn’t help converting a square into a cube, the element is still flat. There is a fact that the transformation by changing Scale Z is more obvious when it applies to the 3D space. For instance, we have a cube that is made by a group of elements. When we change Scale Z of the group, the cube will be transformed like this:
In terms of a single element, we need to be noticed about its Origin Z before changing Scale Z. Because this transformation can’t be represented on the plane when the Origin Z of element is equal to 0 by default. In order to see clearly the transformation of scaling Z on a plane, change the Origin Z other than 0. For example, let’s try to change the element’s Origin Z to 100px. So, when we transform that element’s Scale Z from 100% to 400%, it will move like the video below:
As you can see, the element will move behind the element’s plane in this case. And with the default viewing position, this means that the element will move farther away from us. By contrast, when the Origin is negative (<0px), changing the Scale Z will reposition the element to the front of its plane. In other words, the element will move closer to us with the default viewing position.
Perspective Property
One more property that helps the 3D transformation become realistic is the perspective property. This property defines the viewing point at which the viewer see the 3D space. In Saola Animate, perspective property can be adjusted by Perspective section in scene Properties pane.
X, Y values are position of the viewing point in the scene plane, relative to the scene width, height respectively. Z value is the distance from the viewer to the scene.
That’s all about how the 3D transformation function works in Saola Animate. Let’s try this feature to bring your animation to a three dimensions. Thus, it may help enhance your web design and improve your user experience remarkably.


