Animation keyframes play an important role in creating HTML5 animation in Saola Animate. In the previous tutorial, you’ve learned 3 ways to add animation keyframes. This tutorial will show you how to adjust, move, copy, and remove animation keyframes.
In this tutorial, you will learn how to:
Adjust Keyframe Values
There are many ways for you to adjust keyframe values. Do one of the following:
- In the Properties pane: Adjust the property value using spin boxes, sliders, text fields, etc.

- In the Timeline pane: Double-click the value to make it editable and adjust it. To finish editing, press ENTER or click any elsewhere outside.

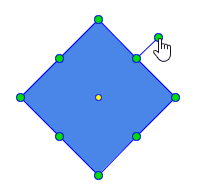
- On the Canvas: For some visual properties such as position, size, and rotate, you can change the value visually on the Canvas. For example, drag the rotation handle to adjust the rotate value.

Note:
If you place the Playhead at an existing keyframe and change the property value, the change will affect that keyframe only. Meanwhile, if you place the Playhead at any other timestamp and change the property value, the change will affect all keyframes of the same property animation.
Consider the following animation [Left, duration: 2.5s, value: 200px – 400px].
- Place the Playhead at the Starting/Ending keyframe: Place the Playhead at the ending keyframe and change the left value from 400px to 500px. The element now moves 300px to the right instead of 200px as before. The ending point changes, leading to the change in the space the element moves.

- Place the Playhead at any other timestamp: Change the left value to 500px. The element still moves 200px to the right as before, but it now moves from a different position to another different position. Space remains the same while the starting and ending points are shifted to the new positions.

Move Keyframes
To move single or multiple keyframes, do the following steps:
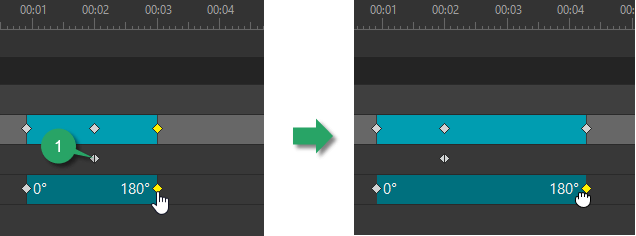
Step 1: Select one or more keyframes (holding down CTRL while selecting multiple keyframes). Then, the selected keyframes turn from white to yellow.
Step 2: Drag the selected keyframes to the desired position. By doing so, you also change the segment duration. Remember that a longer segment defines a slower animation.

Note: If you drag a keyframe to another, the animation segment has the same starting and ending keyframes. Its duration becomes zero and the animation is displayed as a special keyframe (1) on the timeline.
Copy Keyframes
Copying keyframes can speed up the animation-making process. You can copy keyframes to the same or other elements as long as the target elements share the same properties as the source ones. For example, you can copy color keyframes between elements filled with Solid, not between an element filled with Solid color and another element filled with Gradient. Do the following:
Step 1: Select keyframes.
Step 2: Press CTRL+C, right-click selected keyframes > Copy or click Copy in the dockable toolbar to copy the keyframes. If you want to cut the keyframes, press CTRL+X or click Cut in the dockable toolbar.
Note: You can copy keyframes to the same or other elements. If you want the latter, select those elements.
Step 4: Move the Playhead to the desired position.
Step 5: Press CTRL+V, right-click new position > Paste or click Paste in the dockable toolbar to paste the keyframes onto the Timeline.
Remove Keyframes
To remove keyframes, click to select them so that they become highlighted. Then, press DELETE or click Delete in the dockable toolbar. If you delete adjacent keyframes, the animation segments between those keyframes will also be removed.

That’s how to adjust, move, copy, and remove keyframes in Saola Animate. Feel free to contact us if you need any help.
See Also: